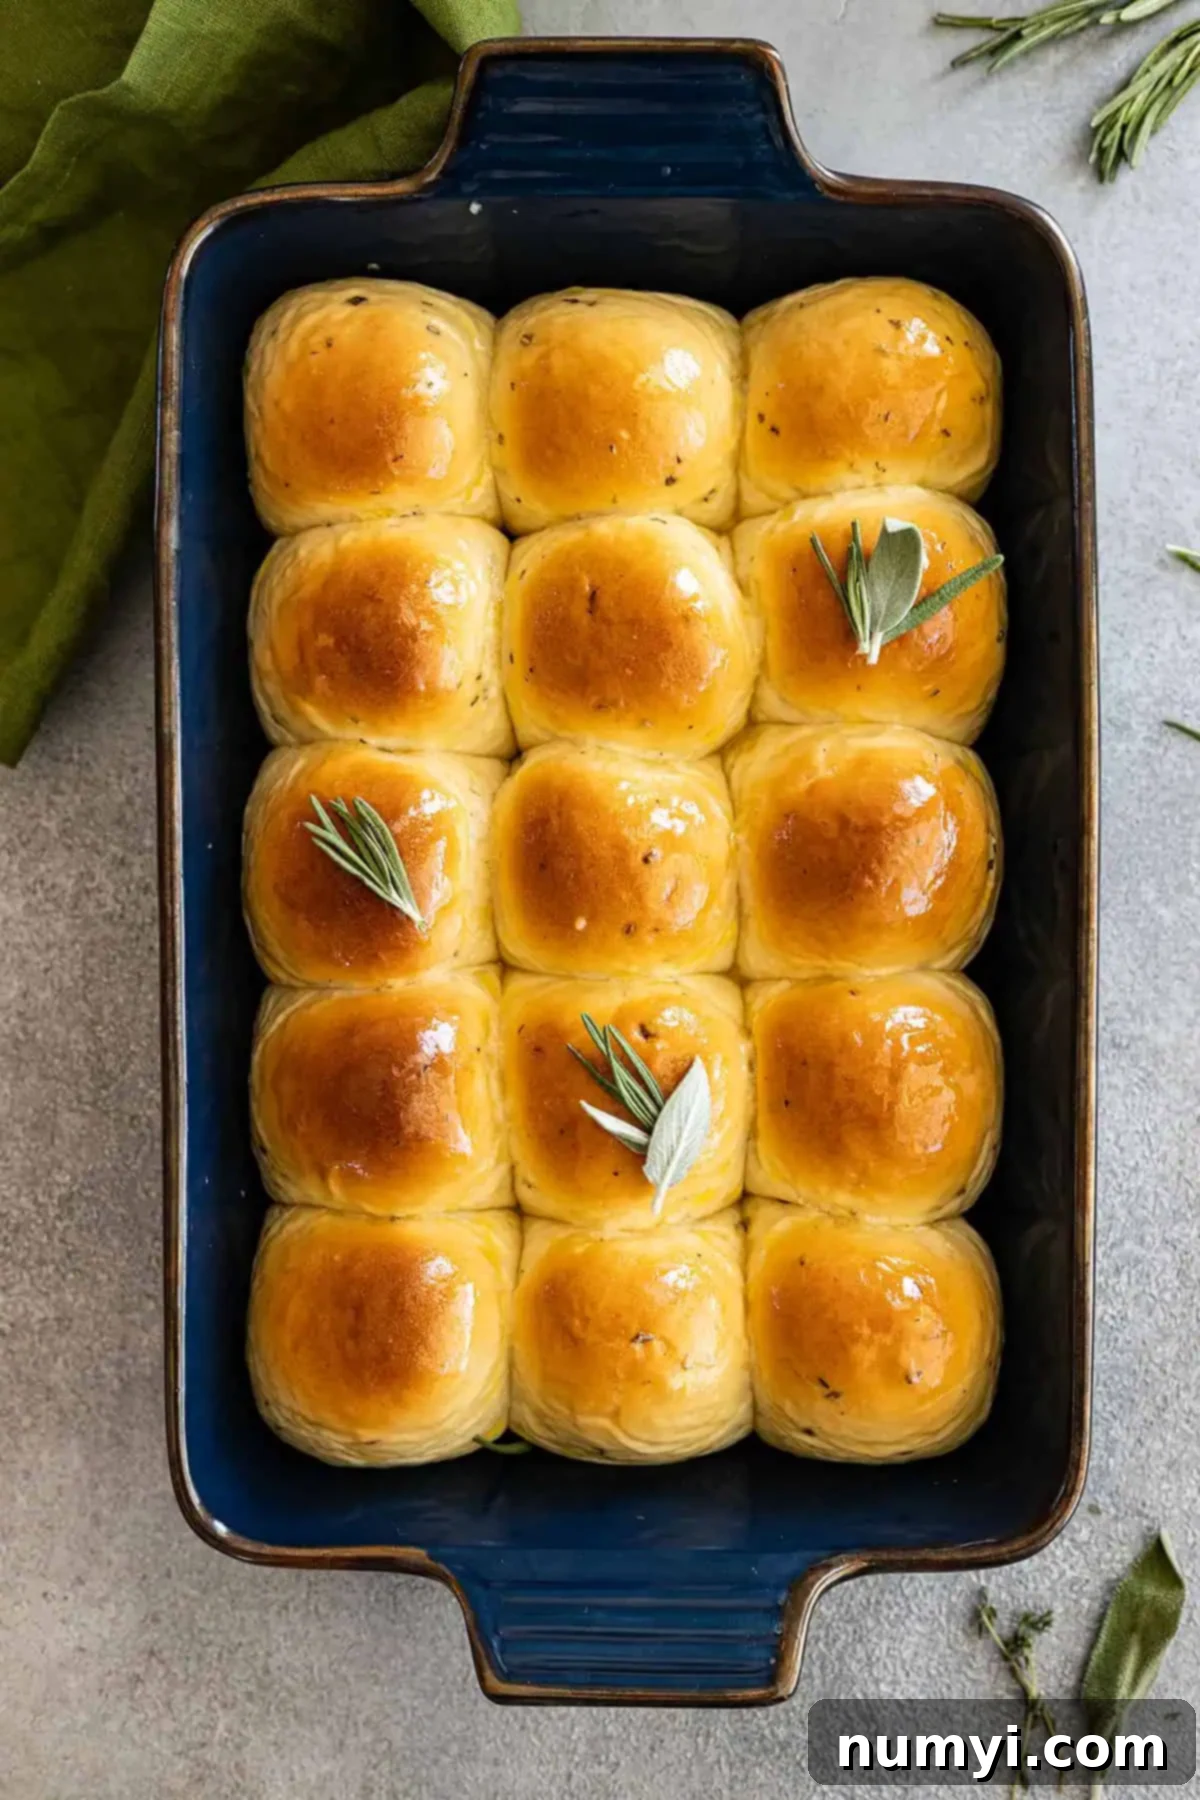
Fluffy & Flavorful Herb Dinner Rolls: Your Ultimate Guide to Perfect Homemade Bread
These Herb Dinner Rolls are truly exceptional! Infused with a vibrant medley of fresh herbs for an incredible burst of flavor, these buttery soft and delightfully fluffy rolls are the perfect addition to any meal, transforming ordinary dinners into something extraordinary.
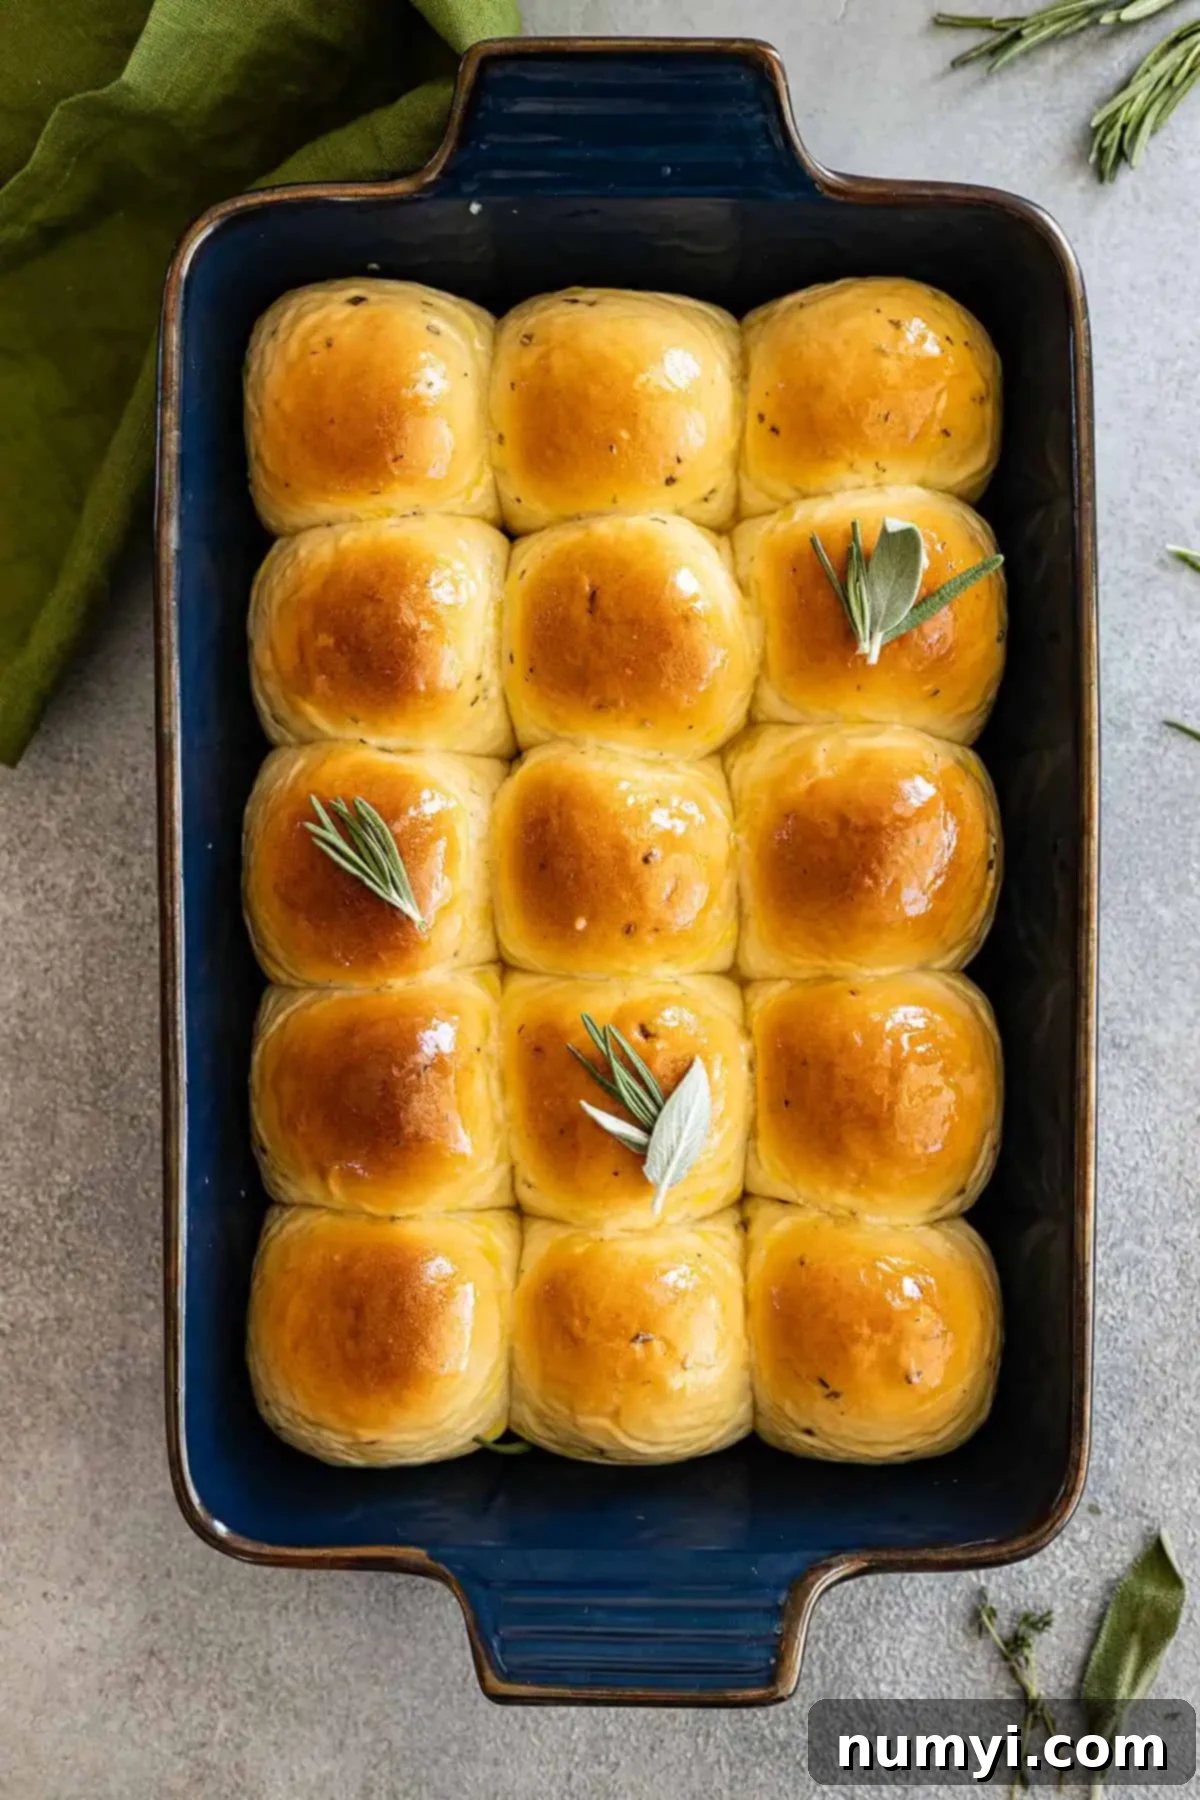
There’s something incredibly comforting and satisfying about homemade bread, especially when it’s infused with aromatic herbs. While I initially crafted these irresistible herb dinner rolls to add a special touch to holiday feasts – think Thanksgiving or Christmas – I quickly realized they are far too delicious to be reserved for just a few days a year! Their savory flavor and tender texture make them a welcome guest at any table, any time.
This recipe builds upon a cherished family tradition: my grandma’s tried-and-true dinner roll recipe. Her original recipe consistently produced the softest, most perfect rolls, and by simply adding a generous mix of fresh herbs, I’ve elevated it into a savory sensation. Each bite offers a delightful warmth, reminiscent of autumn and cozy meals, making these rolls truly feel like “fall in bread form.” They’re a simple yet profound way to bring a gourmet touch to your everyday dining experience.
Why These Herb Dinner Rolls Will Become Your New Favorite
These aren’t just any dinner rolls; they’re designed to be the highlight of your bread basket. Here’s what makes them utterly indispensable:
- Rich and Aromatic Flavor Profile: Each roll is generously infused with a medley of fresh herbs, offering a depth of flavor that is both robust and inviting. The fragrant herbs beautifully complement the rich, buttery dough, creating an aroma that will fill your kitchen and tantalize your taste buds.
- Unbelievably Soft and Pillowy Texture: Prepare for rolls that melt in your mouth! Our recipe ensures a supremely soft interior with a slight, satisfying chew, making them perfect for soaking up gravies or enjoying on their own.
- Excellent for Make-Ahead Preparation: Hosting a dinner party or a holiday meal can be hectic. These rolls are designed with convenience in mind, allowing you to prepare much of the work in advance, so you can enjoy the big day without stress.
- Freezer-Friendly for Future Enjoyment: Don’t just make one batch – double it! These rolls freeze beautifully, meaning you can always have a stash of homemade goodness ready to go, perfect for unexpected guests or a quick weeknight treat.
- Versatile Pairing for Any Occasion: While they shine alongside a roasted turkey, these herb rolls are incredibly versatile. They pair wonderfully with hearty stews, comforting soups, grilled meats, pasta dishes, or simply with a smear of butter for an everyday indulgence.
The Heart of the Recipe: Key Ingredients Explained
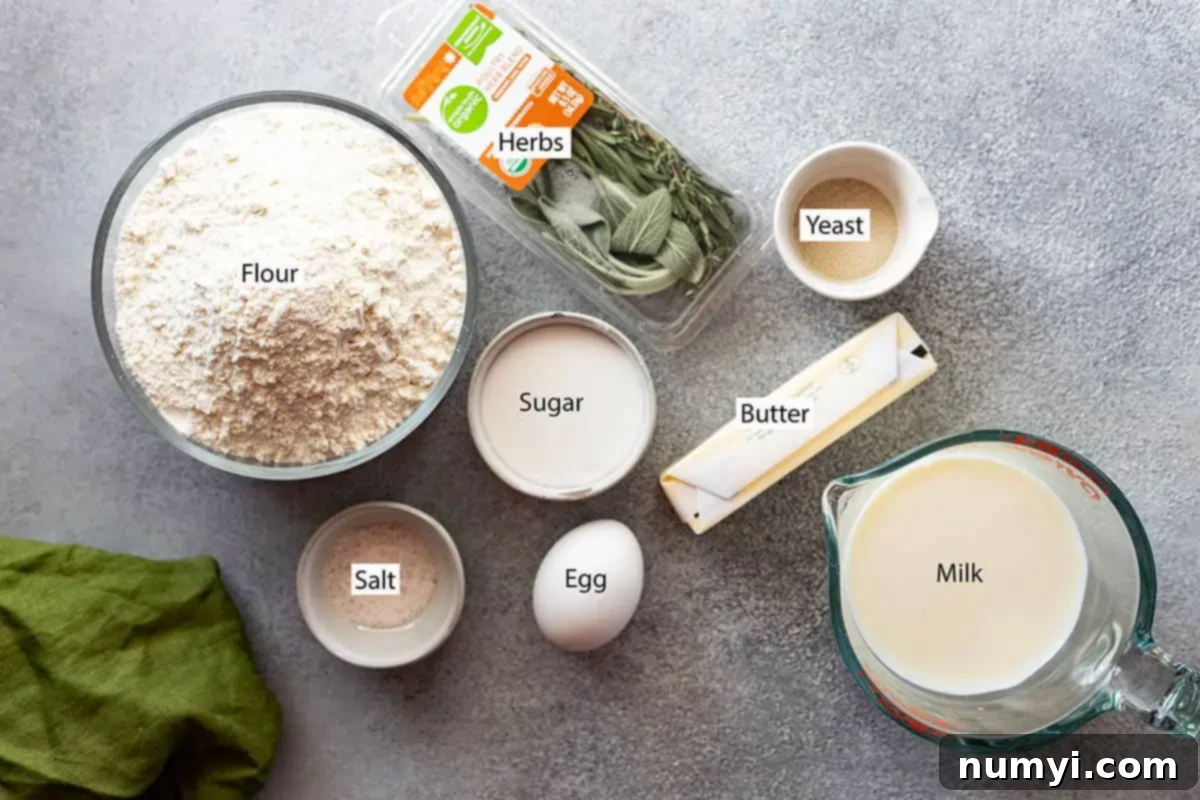
Understanding the role of each ingredient is key to baking perfect herb dinner rolls every time. This section provides a deeper dive into the essential components. For precise measurements and detailed step-by-step instructions, please refer to the comprehensive recipe card located at the bottom of this post.
FLOUR: I consistently recommend using bread flour for all yeast bread recipes, and these herb dinner rolls are no exception. Bread flour boasts a higher protein content than standard all-purpose flour. This higher protein level translates to more robust gluten development, which is crucial for creating the ideal dough structure. The result? Rolls that are wonderfully chewy, yet incredibly soft and airy. While you *can* substitute all-purpose flour without altering other measurements, be aware that the final texture might be slightly less elastic and chewy.
HERBS: The fresh herbs are the star of this recipe, providing its distinctive aromatic flavor. My go-to is the pre-packaged poultry herb blend, commonly found in the produce section of most grocery stores. This convenient blend typically includes fresh sage, rosemary, and thyme – a trifecta of flavors that perfectly complements savory dishes. I usually use the entire package for a robust herb flavor. Feel free to experiment with other fresh herbs like chives, parsley, or even a hint of marjoram if you prefer. For those times when fresh herbs aren’t available, see our FAQ section for dried herb substitutions.
MILK: For the richest flavor and most tender crumb, I strongly prefer using whole milk. The fat content in whole milk adds a beautiful richness to the dough and contributes to a softer texture. If you need to make these rolls dairy-free, your favorite dairy-free milk alternative (such as almond milk or soy milk) can be used as a direct substitute. However, I advise against using low-fat or skim milk, as the reduced fat content will impact the texture and richness of the final product.
BUTTER: Like milk, butter plays a vital role in adding unparalleled richness and tenderness to the dough. It contributes to the golden crust and the melt-in-your-mouth texture that makes these rolls so addictive. For a dairy-free option, you can successfully replace butter with an equal amount of olive oil or avocado oil. These oils will still provide necessary fat for a tender crumb, though the flavor profile will subtly change.
YEAST & SUGAR: Active dry yeast is the leavening agent that makes these rolls rise, giving them their fluffy texture. Sugar not only adds a touch of sweetness to balance the savory herbs but, more importantly, it acts as food for the yeast, helping it activate and thrive. Ensure your yeast is fresh and active for the best results.
SALT: A crucial ingredient in all bread baking, salt not only enhances the overall flavor but also helps to regulate yeast activity and strengthen the gluten structure, contributing to the dough’s elasticity.
How To Make Herb Dinner Rolls: A Detailed Guide
Creating these delightful herb dinner rolls is a rewarding experience. Follow these detailed steps to achieve perfect results every time.
STEP 1: Activate Your Yeast – The Foundation of Great Bread
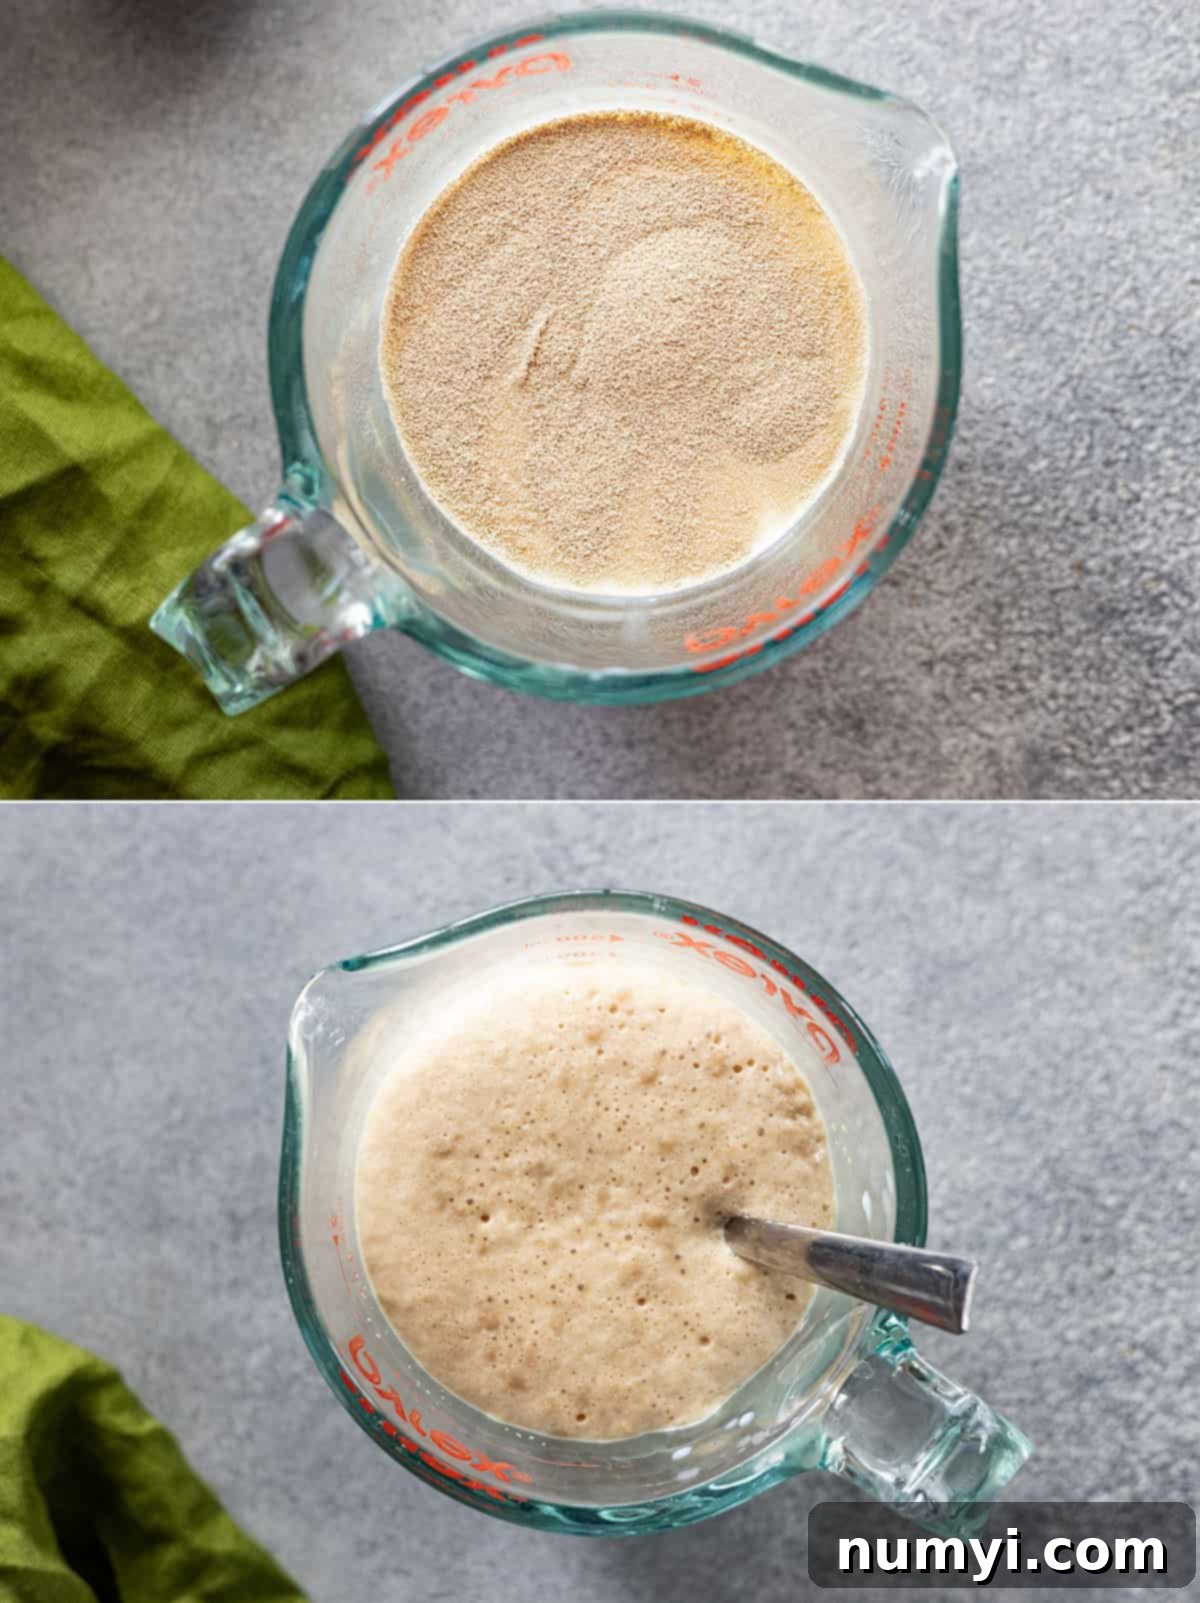
In a large mixing bowl, or the bowl of your stand mixer, combine the warm milk, granulated sugar, and active dry yeast. The milk should be around 105-115°F (40-46°C) – warm to the touch but not hot enough to kill the yeast. Gently stir the mixture and then let it sit undisturbed for about 5-10 minutes. This process is called “blooming” the yeast. You’ll know your yeast is active and healthy if it becomes foamy or frothy on the surface. This foam indicates that the yeast is alive and ready to work its magic. If you don’t see any foam after 10 minutes, your yeast is likely inactive (too old, or the liquid was too hot/cold), and you’ll need to start again with new yeast to ensure your rolls rise properly.
STEP 2: Mix, Knead, and First Rise – Developing Flavor and Texture
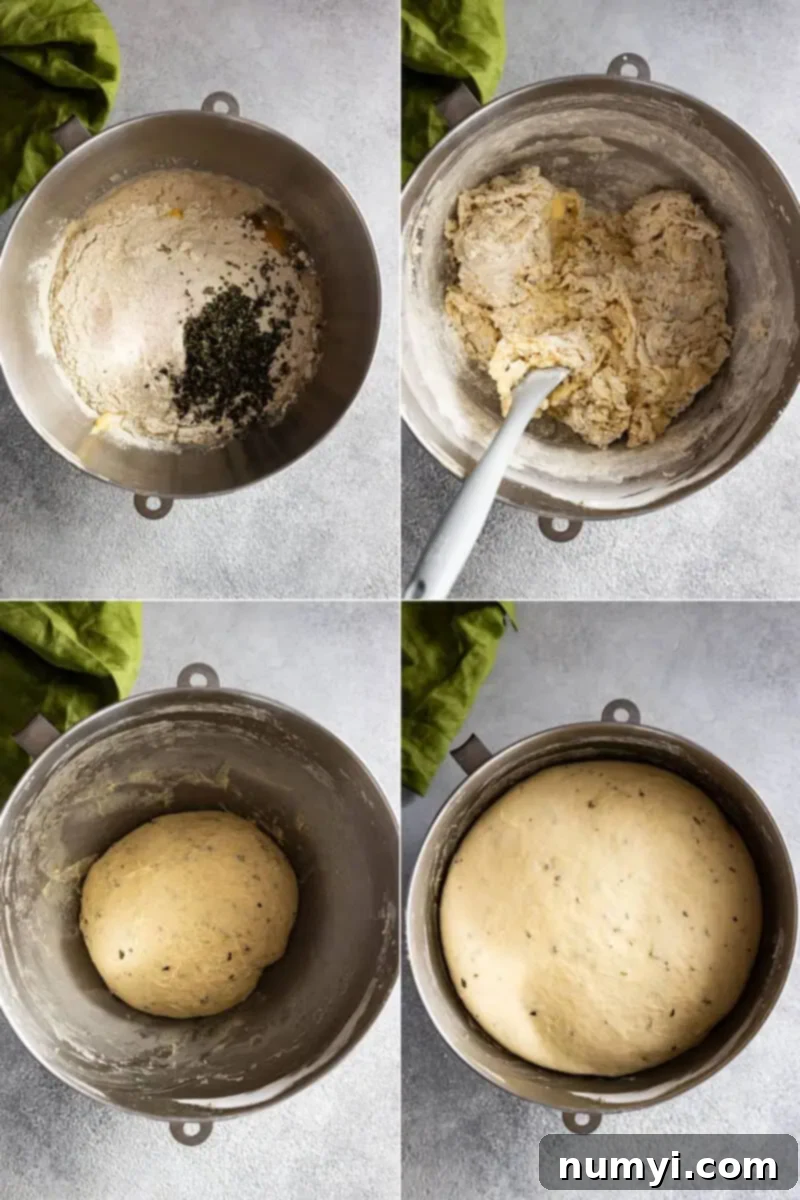
Once your yeast is active, add the remaining ingredients to the bowl: the egg, melted butter, bread flour, minced fresh herbs (sage, rosemary, thyme), and salt. Give everything a quick stir with a spoon or spatula to roughly combine the flour with the wet ingredients. This initial stir helps prevent flour from flying everywhere when you start kneading. Attach the dough hook to your stand mixer and knead the dough on low speed. Continue kneading for about 8-10 minutes, or until the dough becomes smooth, elastic, and pulls away cleanly from the sides of the bowl. If kneading by hand, this process might take 12-15 minutes. Once kneaded, lightly grease the bowl, place the dough back in, turn it over once to coat, then cover the bowl tightly with plastic wrap. Place it in a warm, draft-free spot to rise until it has visibly doubled in size. This usually takes 1 to 2 hours, depending on the warmth of your kitchen.
STEP 3: Shape the Rolls and Second Rise – Achieving Lightness
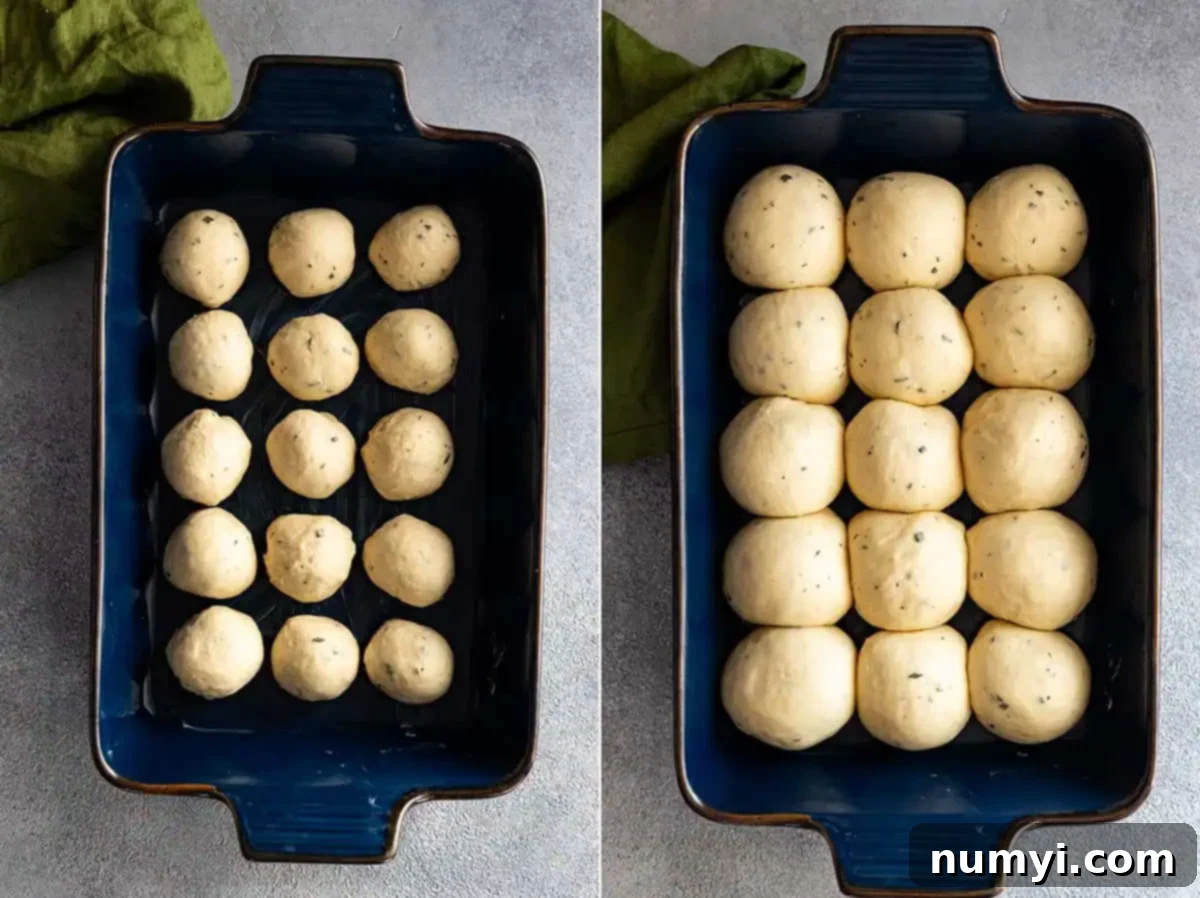
After the first rise, gently punch down the dough to release the air. This step helps create a finer, more even crumb. Turn the dough out onto a lightly floured surface. Divide the dough into 12 equal-sized pieces. You can eyeball this for rustic rolls, or for perfectly uniform rolls, use a kitchen scale to weigh each piece. Shape each piece into a smooth, tight ball. This can be done by cupping the dough in your hand and rolling it against the counter in a circular motion. Arrange the shaped dough balls in a lightly greased 9×13-inch baking dish. Ensure they are spaced evenly, but close enough so they can rise and gently touch, creating soft sides. Cover the baking dish again with plastic wrap and let the rolls rise in a warm place for their second rise until they have doubled in size once more. This secondary proofing is crucial for creating that light, airy texture and typically takes about 30-60 minutes.
STEP 4: Bake and Finish – Golden Perfection
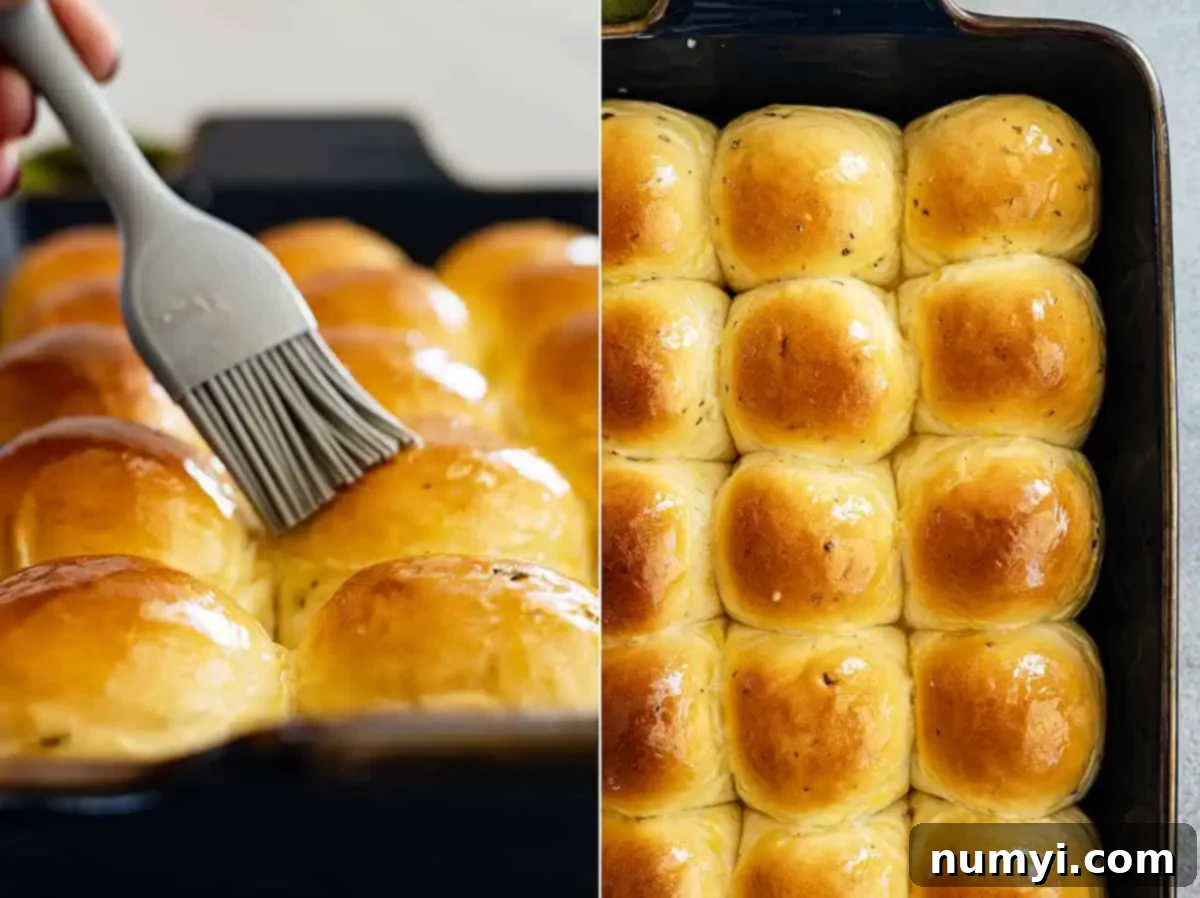
While your rolls are undergoing their second rise, preheat your oven to 350°F (175°C). Once the rolls have doubled, place the baking dish into the preheated oven and bake for 20-25 minutes. Look for a beautiful golden-brown color on top, indicating they are fully cooked. Immediately upon removing the hot rolls from the oven, brush their tops generously with a little extra melted butter. This simple step not only adds a lovely sheen but also contributes to an ultra-soft crust. Allow the rolls to cool in the pan for 5-10 minutes before serving. The aroma alone will be enough to draw everyone to the table!
Frequently Asked Questions (FAQs)
Absolutely! While fresh herbs offer the most vibrant flavor, dried herbs are a perfectly acceptable substitute. As a general rule, use one-third the amount of dried herbs compared to fresh. For this recipe, you can replace the fresh sage, rosemary, and thyme blend with 2 teaspoons of dried rosemary, 2 teaspoons of dried sage, and ½ teaspoon of dried thyme. Crush dried herbs lightly in your palm before adding them to help release their oils and aroma.
Once your herb dinner rolls have completely cooled, store them in an airtight container or a plastic freezer bag at room temperature for up to 3 days. To maintain their softness, try to remove as much air as possible from the container or bag. They will naturally become a little drier each day, but a quick warm-up in the microwave or oven can help revive their tenderness.
While many modern bread recipes, especially those using instant yeast, might skip the blooming step, I strongly advocate for it when using active dry yeast, especially for home bakers. Blooming yeast is a simple test that confirms your yeast is alive and active before you commit all your other ingredients. It takes only 5-10 minutes and can save you the disappointment and expense of a batch of dough that refuses to rise. Think of it as a crucial quality control step for successful bread baking!
If your dough isn’t rising, the most common culprits are inactive yeast (which blooming helps to prevent!) or an environment that’s too cold. Ensure your water temperature for yeast activation is correct (105-115°F). For rising, find a warm spot – a sunny window, a turned-off oven with the light on, or near a warm appliance are all good options. Drafts can also hinder rising, so keep the dough covered and away from open windows.
Yes, absolutely! While a stand mixer with a dough hook makes the process quicker and less strenuous, you can certainly knead this dough by hand. It will require a bit more effort and time, typically 12-15 minutes of vigorous kneading, until the dough is smooth, elastic, and passes the “windowpane test” (where a small piece of dough can be stretched thin enough to see light through it without tearing).
Pro Tips for Perfect Herb Dinner Rolls
Achieving bakery-quality rolls at home is easier than you think with these expert tips:
- Don’t Rush the Rise: Dough rising is a delicate process that requires patience. A slow, steady rise often results in a more flavorful and tender roll. Don’t try to speed it up too much with excessive heat, as this can affect the yeast and the final texture.
- Measure with Precision: Especially for bread baking, accuracy in measurements is crucial. Using a kitchen scale for flour (grams) is highly recommended for consistent results, as scooping flour can vary wildly in weight.
- Ensure a Warm Environment: Yeast loves warmth! Find a consistently warm, draft-free spot for your dough to rise. This could be near a heating vent, in a slightly warmed (but turned off) oven with the light on, or simply in a warm corner of your kitchen.
- Avoid Over-Flouring: When kneading or shaping, resist the urge to add too much extra flour to your work surface. Excess flour can make your rolls tough and dry. Use just enough to prevent sticking.
- Brush with Butter Immediately: Don’t skip brushing the hot rolls with melted butter right out of the oven. This seals in moisture, creates a tender crust, and adds an extra layer of delicious buttery flavor.
Make-Ahead and Freezer-Friendly Dinner Rolls!
One of the best features of this recipe is its adaptability to your schedule. You can prepare these delicious rolls in advance, making meal planning and entertaining a breeze. Here are three convenient options:
OPTION #1: Bake and Freeze Finished Rolls
Once your rolls are fully baked and have cooled completely, wrap them tightly in plastic wrap, then encase them in heavy-duty aluminum foil. This double layer of protection prevents freezer burn. You can freeze them for up to 2 months. To reheat, thaw the frozen rolls overnight in the refrigerator or for a few hours at room temperature. Cover them well with foil to prevent them from drying out, then reheat in a 325°F (160°C) oven for 5-10 minutes, or until they are warmed through to your liking and feel soft again.
OPTION #2: Freeze Shaped, Unbaked Rolls
Prepare the dough through its first rise (until doubled in size). Then, punch it down, divide, and shape the rolls as directed. Place the shaped rolls onto a baking tray lined with parchment paper, making sure they don’t touch. Cover the tray loosely with plastic wrap and freeze for at least 1 hour, or until the rolls are solid. Once frozen solid, transfer them from the baking tray into a freezer-safe bag, removing as much air as possible, and freeze for up to 2 months. To bake, remove the frozen rolls from the bag and place them in a lightly greased 9×13-inch baking dish. Cover with plastic wrap or foil and let them thaw and rise until doubled in size. This can take anywhere from 5-6 hours, depending on the ambient temperature of your kitchen. Once risen, bake as per the original instructions.
OPTION #3: Refrigerate Shaped, Unbaked Rolls for Short-Term Storage
Prepare the dough and let it complete its first rise. Punch it down, shape the rolls, and arrange them in a lightly greased 9×13-inch baking pan. Cover the pan tightly with plastic wrap and refrigerate for up to 24 hours. When you’re ready to bake, remove the rolls from the refrigerator about 2 hours before you plan to bake them. This allows them to come to room temperature and complete their final rise, ensuring they are light and fluffy before they go into the oven.
DID YOU KNOW….
Rating and sharing recipes is one of the best ways you can support your favorite food bloggers? If you make this recipe, I would love if you clicked the stars when commenting below to leave a rating and/or sharing a photo on Instagram, Facebook, or Pinterest!
⭐⭐⭐⭐⭐
(Rated 5 stars by 1 user)
Herb Dinner Rolls
These Herb Dinner Rolls are exceptional! Infused with fresh herbs for a burst of flavor, these buttery soft and fluffy rolls are ideal for any meal!
12 rolls
Malinda Linnebur
20 mins
25 mins
3 hrs
3 hrs 45 mins
Print Recipe
Ingredients
- 1¼ cup (295ml) warm milk (about 110℉)
- ¼ cup (55g) granulated sugar
- 1¼ teaspoons active dry yeast
- 1 large egg
- 3 tablespoons butter, melted
- 3½ cups (460g) bread flour
- 1 tablespoon minced fresh sage
- 1 tablespoon minced fresh rosemary
- 2 teaspoons minced fresh thyme
- 1 teaspoon salt
Instructions
- Whisk the warm milk, sugar, and yeast in the bowl of a stand mixer. Set aside to “bloom” or activate the yeast. If the yeast is not foamy after 5 minutes, your yeast is no good, and you will need to get new yeast.
- After the yeast has become foamy, add the remaining ingredients and give it a little stir to start to combine the flour with the wet ingredients. Place on the stand mixer fitted with the dough hook and knead on low until dough comes together and is nice and smooth. It should pull away from the sides of the bowl. This can take around 10 minutes.
- Cover the bowl with plastic wrap and allow to rise until doubled in a warm place. This can take 1-2 hours depending on how warm your house is. Punch the dough down and divide it into 12 equal-sized pieces of dough. You can eyeball this or weigh them out. Shape each piece into a smooth ball and place into a lightly greased 9×13 baking pan. Cover with plastic wrap and allow to rise until doubled in a warm place.
- Preheat oven to 350℉ (175°C) and bake rolls for 20-25 minutes or until rolls are golden brown. Brush tops of rolls with butter for ultra-soft rolls. Allow rolls to cool for 5-10 minutes before serving.
Notes
- This recipe can also be made into 15 smaller rolls if desired.
- Be sure to read the post above on how to store and freeze your rolls, as well as information on various make-ahead options.
- NUTRITION: Since different brands of ingredients have varying nutritional information, the data provided is an estimate. This website is not intended as nutritional advice, or a diet or health plan. Readers are ultimately responsible for all decisions pertaining to their health.
Nutrition
Carbohydrates: 57 g |
Protein: 10 g |
Fat: 5 g |
Saturated Fat: 2 g |
Polyunsaturated Fat: 1 g |
Monounsaturated Fat: 1 g |
Trans Fat: 0.1 g |
Cholesterol: 25 mg |
Sodium: 213 mg |
Potassium: 119 mg |
Fiber: 2 g |
Sugar: 6 g |
Vitamin A: 157 IU |
Vitamin C: 1 mg |
Calcium: 49 mg |
Iron: 1 mg
Did you make this?
Let me know by sharing a picture and tagging @countryside_cravings on Instagram
