Ultra Creamy One-Pot Evaporated Milk Mac and Cheese: Your New Go-To Stovetop Recipe
Are you tired of lackluster boxed mac and cheese but short on time for a complicated homemade version? Look no further! This Mac and Cheese with Evaporated Milk is a game-changer. It’s arguably one of the easiest stovetop mac and cheese recipes you’ll ever encounter, designed for maximum flavor and minimal effort. Prepared entirely in one pot, it delivers an unbelievably creamy, exceptionally cheesy, and delightfully smooth result every single time. It’s so straightforward and utterly delicious, it will quickly become your family’s favorite and make you permanently ditch those blue boxes!

The Secret to Old-Fashioned Mac and Cheese: Evaporated Milk
Let’s be honest, who hasn’t reached for that familiar blue box of mac and cheese more times than they’d care to admit? For many, it’s a go-to solution on busy weeknights or when dinner plans fall through. While quick and convenient, the taste often leaves something to be desired, especially for those of us who appreciate genuine, wholesome flavor. I certainly found myself in this predicament, craving a superior alternative that my kids and husband would adore as much as the boxed stuff, if not more, and that I would feel truly good about serving. That determination led to the creation of this incredible evaporated milk mac and cheese recipe, and trust me, it’s a revelation!
The magic ingredient here is evaporated milk. Unlike recipes that rely solely on water or even fresh milk, evaporated milk brings an unparalleled richness and creaminess to the sauce. Its concentrated nature means a higher proportion of milk solids, which translates to a smoother, more stable, and intensely cheesy sauce that truly coats every piece of pasta. This recipe transforms ordinary macaroni into a luxurious, ultra-creamy stovetop mac and cheese that boasts all the comforting appeal of the boxed variety, without any of the questionable processed ingredients. It’s a meal that feels genuinely homemade, satisfying, and incredibly easy to prepare. Say goodbye to that powdered cheese and hello to a new family favorite!
If you’re on the hunt for other easy weeknight dinner ideas featuring pasta, be sure to explore my recipes for Homemade Baked Mac and Cheese, a delightful Pasta all’Amatriciana, and the comforting Chicken Florentine Pasta Casserole! Each offers a delicious and straightforward path to a satisfying meal.
Why This Evaporated Milk Mac and Cheese Will Be Your New Favorite
There are countless reasons why this particular mac and cheese recipe stands out and is destined to become a staple in your kitchen:
- A True One-Pot Wonder: Forget the hassle of multiple pots and excessive cleanup! This recipe cooks all in a single pot – pasta and sauce alike. This streamlined process means less time scrubbing dishes and more time enjoying your delicious meal. It’s the ultimate convenience for busy weeknights, making homemade mac and cheese an achievable reality even on your most hectic days.
- Made with Accessible Ingredients: You won’t need to hunt for obscure or expensive cheeses or specialty items. All the ingredients for this creamy stovetop mac and cheese are readily available at any grocery store. We focus on simple, everyday staples that combine to create extraordinary flavor, making it a budget-friendly and stress-free option for any home cook.
- Astonishingly Quick and Delicious: This creamy stovetop mac and cheese can be on your table in a mere 15 minutes! Yes, you read that right – quicker than most delivery services, and undeniably more flavorful. The swift preparation doesn’t compromise on taste; in fact, the rich, smooth, and deeply satisfying flavor far surpasses any store-bought or boxed version. It’s gourmet taste with weeknight speed.
- Say Goodbye to Powdered Cheese Forever: Once you experience the authentic, rich, and velvety texture of this homemade cheese sauce, you’ll wonder how you ever settled for anything less. The smooth, melt-in-your-mouth goodness is a far cry from the gritty, artificial taste of powdered cheese packets. This recipe empowers you to create superior comfort food from scratch, guaranteeing a more wholesome and infinitely more delicious experience.

Key Ingredients for the Ultimate Creamy Stovetop Mac and Cheese
Crafting the perfect mac and cheese begins with understanding the role of each ingredient. Here’s a closer look at what makes this recipe exceptional:
- PASTA: For the best results, opt for short, sturdy pasta shapes that can hold up to a rich, creamy sauce and capture all that cheesy goodness. Classic elbow macaroni is a timeless choice, but small shells, ditalini, or even rotini work beautifully. The key is to ensure the pasta is cooked al dente, meaning it still has a slight bite, as it will continue to soften slightly in the warm cheese sauce.
- EVAPORATED MILK: This is the star ingredient and the secret to our incredible creaminess. Evaporated milk is cow’s milk from which about 60% of the water has been removed through evaporation. This concentration gives it a richer, slightly sweeter flavor and a higher fat content, which is crucial for a smooth, stable, and luxurious cheese sauce. Importantly, it’s far less prone to curdling under heat compared to fresh milk or heavy cream when boiling the pasta directly in the liquid. We strongly recommend sticking with evaporated milk for this recipe to achieve the intended results; other dairy products may not provide the same smooth, rich consistency or stand up to the cooking process as well.
- FLOUR AND BUTTER (For the Roux): These two ingredients form the foundation of our luscious sauce. A roux (a mixture of cooked butter and flour) acts as a thickening agent, ensuring the cheese sauce is velvety and clings perfectly to the pasta. Don’t be intimidated – making a roux is incredibly simple, especially in this one-pot method, as it doesn’t require a separate pan. It’s cooked for just a minute to remove any raw flour taste, laying the groundwork for a deeply flavorful sauce.
- SEASONINGS: The right blend of spices elevates the flavor profile beyond just cheese. We use a combination of onion powder and garlic powder to add savory depth and warmth, creating a more complex and inviting taste. A touch of cayenne pepper is included for a very subtle kick – just enough to add interest without making the mac and cheese overtly spicy. Even my kids, who are sensitive to heat, enjoy it! Feel free to adjust the amount of cayenne to your family’s preference, or omit it entirely if you prefer a milder flavor.
- CHEESE (The Triple Threat): To achieve the perfect balance of flavor, melt, and stretch, we incorporate three types of cheese into this homemade stovetop mac and cheese.
- Cheddar: The backbone of any classic mac and cheese. I typically use mild or medium cheddar for its balanced flavor and excellent melt. While sharp cheddar can be used, sometimes it can result in a slightly gritty texture, so I lean towards the milder varieties for maximum smoothness.
- Mozzarella: This cheese is a must for its incredible melting properties. It contributes that desirable stretchy, gooey texture and a wonderfully smooth consistency to the sauce.
- Parmesan: A small amount of grated Parmesan adds a layer of salty, nutty, and umami depth, enhancing the overall cheesiness without overpowering it. You can certainly leave out the Parmesan if you prefer, but I find it adds an extra dimension of flavor.
Highly Recommended Tip: For the absolute creamiest and smoothest cheese sauce, I cannot stress this enough – always shred your own cheese from a block. Pre-shredded cheeses often contain anti-caking agents (like cellulose or potato starch) that prevent them from clumping in the bag but can also hinder their ability to melt seamlessly, potentially leading to a grainy or clumpy sauce. Freshly shredded cheese melts beautifully, making it perfect for this ultra-creamy stovetop mac and cheese.

Step-by-Step Instructions to Make Homemade Stovetop Mac and Cheese
Creating this delicious one-pot mac and cheese is surprisingly simple. Follow these steps for a perfectly creamy and cheesy result:
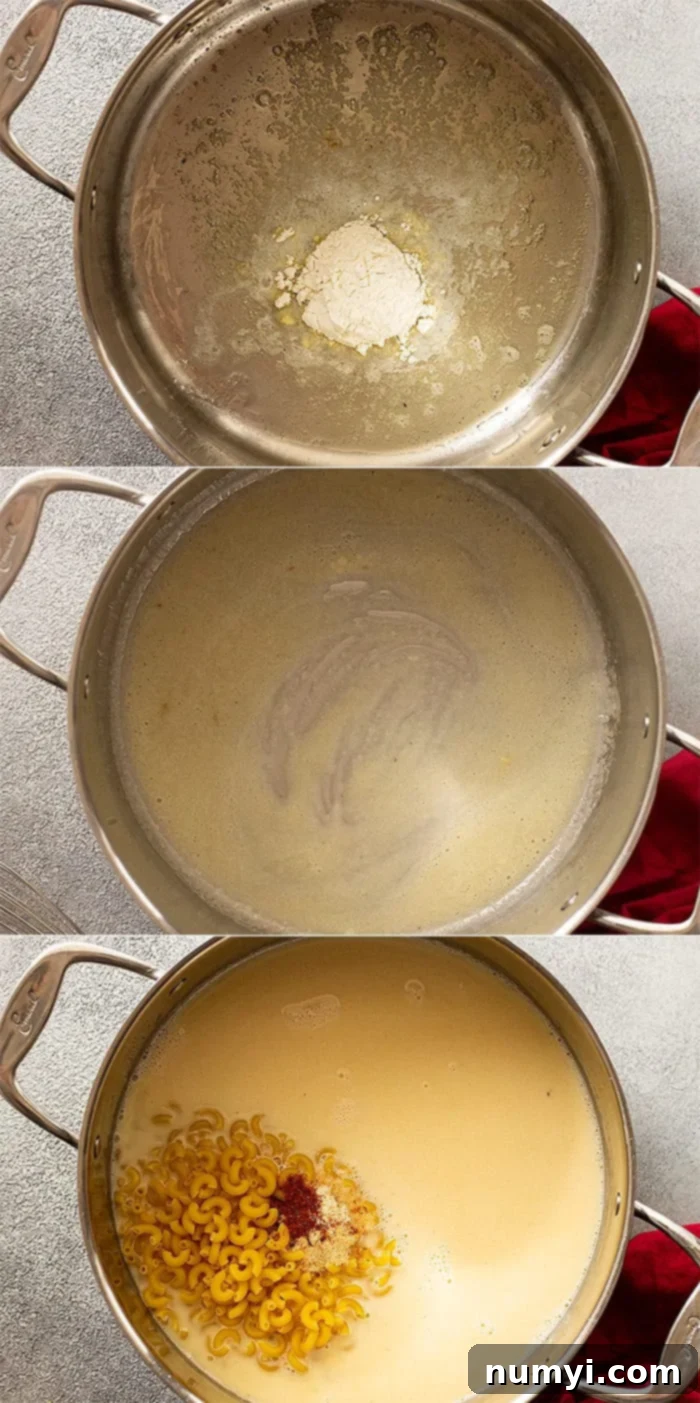
1. PREPARE THE ROUX: Begin by melting the butter in a large, heavy-bottomed saucepan or Dutch oven over medium-low heat. Once the butter is fully melted and shimmering, sprinkle in the all-purpose flour. Whisk continuously for about 1 minute. This cooking time helps to cook out the raw flour taste, ensuring a smooth and flavorful sauce. The mixture should form a thick paste. Next, gradually whisk in the water, followed by the evaporated milk. Whisk until the mixture is smooth and lump-free.
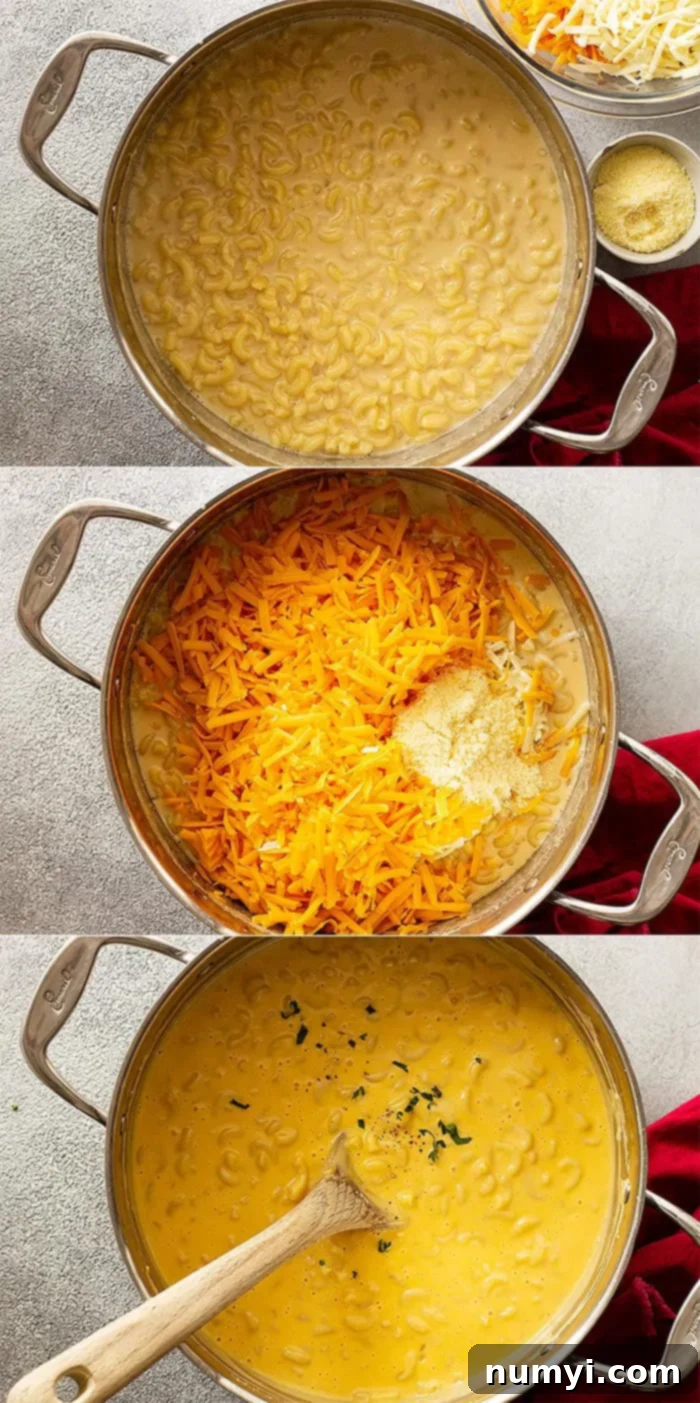
2. ADD PASTA & SIMMER: Stir in your chosen short pasta (like elbows or small shells), along with the onion powder, garlic powder, and cayenne pepper. At this stage, you can also season with a pinch of salt and black pepper to taste. Bring the mixture to a gentle boil over medium-low heat, then reduce the heat to maintain a steady simmer. Cook the pasta, stirring occasionally to prevent it from sticking to the bottom of the pot, until it is al dente – usually around 9-10 minutes. While the pasta is cooking, it’s the perfect time to shred your cheeses if you haven’t already.
3. MELT THE CHEESE: Once the pasta is perfectly al dente, immediately remove the pot from the heat. This is a crucial step to prevent the cheese from becoming oily or grainy. Stir in your shredded cheddar, mozzarella, and Parmesan cheeses. Keep stirring until all the cheese has completely melted into the sauce, creating a luxurious, smooth, and homogeneous consistency. The sauce will continue to thicken as it cools slightly. Serve your old-fashioned mac and cheese with evaporated milk hot and enjoy its irresistible creaminess!

Pro Tips for the Best Evaporated Milk Mac and Cheese
To ensure your one-pot evaporated milk mac and cheese is always a resounding success, keep these expert tips in mind:
- Freshly Shredded Cheese is Key: As mentioned, this is a non-negotiable for the creamiest sauce. Pre-shredded cheeses contain anti-caking agents that can make your sauce gritty. Take the extra few minutes to shred your own for an unparalleled smooth texture.
- Don’t Overcook the Pasta: Cook the pasta only until al dente. It will continue to absorb liquid and soften slightly in the hot cheese sauce even after it’s removed from the heat. Overcooked pasta can become mushy.
- Remove from Heat Before Adding Cheese: This prevents the cheese from separating and becoming oily or grainy. The residual heat in the pot is more than enough to perfectly melt the cheese into a luscious sauce.
- Adjust Seasonings to Your Taste: The provided seasoning amounts are a great starting point. Feel free to add more garlic powder, onion powder, or a pinch of dry mustard (a classic secret ingredient for depth in mac and cheese) to customize the flavor.
- For an Extra Kick: If you love a bit more heat, a dash of your favorite hot sauce stirred in at the end can add a wonderful layer of flavor without overwhelming the dish.
Delicious Variations & Add-Ins for Your Mac and Cheese
While this evaporated milk mac and cheese is perfect as is, it also serves as a fantastic base for customization. Here are some ideas to make it your own:
- Add Protein: Transform it into a heartier meal by stirring in cooked and shredded chicken (rotisserie chicken works wonderfully!), crispy bacon bits, diced ham, sliced hot dogs (a nostalgic childhood favorite!), or seasoned ground beef.
- Incorporate Vegetables: Boost the nutrition and texture by adding cooked broccoli florets, frozen peas (stirred in during the last minute of cooking), sautéed spinach, or roasted bell peppers.
- Experiment with Cheese Blends: While our triple cheese blend is fantastic, feel free to try other melting cheeses. Gouda, Gruyere, Fontina, Colby Jack, or a spicy Pepper Jack can all add unique flavors and textures.
- Spice It Up: If you desire more heat, increase the amount of cayenne pepper, or add a pinch of red pepper flakes or finely diced jalapeños for a noticeable kick.
- Make it Baked: For a crispy topping, transfer the finished stovetop mac and cheese to a baking dish, sprinkle with extra cheese or breadcrumbs, and bake at 375°F (190°C) for 15-20 minutes, or until golden and bubbly.
Frequently Asked Questions (FAQ)
Once your delicious mac and cheese with evaporated milk has fully cooled to room temperature, transfer any leftovers to an airtight container. It can be safely stored in the refrigerator for up to 1 week. To reheat, gently warm it on the stovetop over low heat or in the microwave. The sauce may thicken considerably in the fridge, so we highly recommend stirring in a little extra milk (regular or evaporated) during reheating to restore its wonderfully smooth and creamy consistency.
Yes, absolutely! Freezing leftover evaporated milk mac and cheese is a great way to enjoy it later. Ensure the mac and cheese is completely cooled before transferring it to a freezer-safe Ziploc bag or an airtight container. It can be frozen for up to 2 months. When you’re ready to enjoy it, let it thaw completely in the refrigerator overnight. Then, reheat it gently on the stovetop or in the microwave. As with refrigerated leftovers, you may find it necessary to add a splash more milk (evaporated milk works best here) to bring back its signature smooth creaminess and prevent it from drying out.
Mac and cheese is an incredibly versatile side dish that pairs well with a vast array of main courses and other sides! For a classic comfort meal, serve it alongside any BBQ dish like pulled pork or ribs, a hearty Meatloaf, crispy fried chicken, or savory Sloppy Joes. To balance the richness, a fresh green salad or some simply prepared vegetables are always a good idea. Consider Roasted Broccoli with Lemon and Parmesan, steamed green beans, or a vibrant coleslaw. The options are truly endless for creating a complete and satisfying meal!
Turning this creamy mac and cheese into a full-fledged main course is incredibly easy and delicious, offering plenty of customization options! You can effortlessly boost its protein and substance by stirring in cooked and sliced hot dogs (a nostalgic and budget-friendly favorite!), crispy cooked and crumbled bacon, or tender pieces of leftover Rotisserie Chicken. For added nutrition and color, cooked vegetables such as steamed broccoli florets, sweet peas, or sautéed mushrooms are excellent choices. You can also brown some ground beef or turkey with taco seasoning for a “taco mac” twist, or add some spicy sausage for extra flavor. The possibilities for creating a satisfying one-dish meal are abundant!
Absolutely! Adapting this recipe to be gluten-free is incredibly simple. All you need to do is make two straightforward substitutions: replace the all-purpose flour in the roux with an equal amount (cup-for-cup) of your favorite gluten-free all-purpose flour blend. Additionally, use your preferred brand of gluten-free pasta in place of regular pasta. With these easy changes, you can enjoy all the creamy, cheesy goodness of this evaporated milk mac and cheese without compromising on taste or texture!

More Delicious Macaroni and Pasta Recipes to Try:
If you’re a fan of comforting pasta dishes and looking for more quick and easy meal ideas, be sure to check out these other fantastic recipes:
- Homemade Hamburger Helper – A healthier, more flavorful take on a classic weeknight meal.
- Spaghetti Aglio e Olio – Simple yet sophisticated, this garlic and oil pasta is a timeless favorite.
- Cheese Ravioli in Creamy Mushroom Sauce – Indulgent and satisfying, perfect for a cozy dinner.
- Taco Pasta – A fun fusion dish that brings together two family favorites.
- Cheeseburger Pasta Skillet – All the flavors of a cheeseburger in a comforting pasta dish, made in one skillet!
Thank you so much for reading and exploring this recipe! I truly hope you give this ultra-creamy, one-pot evaporated milk mac and cheese a try. It’s designed to be a simple yet incredibly satisfying meal that your entire family will absolutely adore. I’d love to hear what you think about this old-fashioned mac and cheese made with evaporated milk – leave a comment below and let me know how it turned out!
HUNGRY FOR MORE? Don’t miss out on my latest recipes and kitchen tips! Subscribe to my newsletter and follow along on Pinterest, Facebook, and Instagram for all my latest updates, delicious inspiration, and behind-the-scenes glimpses!
Mac and Cheese with Evaporated Milk

Ingredients
- 3 tablespoons unsalted butter
- 2 tablespoons all-purpose flour
- 4½ cups (1.06L) water
- 1 (12 floz) (354ml) can evaporated milk
- 1 pound (454g) uncooked elbow macaroni or small shells
- ½ teaspoon onion powder
- ½ teaspoon garlic powder
- ⅛-¼ teaspoon cayenne pepper (adjust to taste)
- 3 cups (340g) freshly shredded cheddar cheese (mild or medium for best melt)
- 1 cup (115g) freshly shredded mozzarella cheese
- ¼ cup (30g) grated Parmesan cheese (optional, for extra depth)
Instructions
-
In a large pot or Dutch oven, melt the butter over medium-low heat. Once melted, stir in the flour and cook, whisking constantly, for 1 minute to create a roux. Gradually whisk in the water and then the evaporated milk until the mixture is smooth. Stir in the uncooked pasta, garlic powder, onion powder, and cayenne pepper. Bring the mixture to a gentle boil over medium to medium-low heat, then reduce heat to a simmer. Cook for about 9 minutes, or until the pasta is al dente, stirring occasionally to prevent sticking. While the pasta cooks, shred your cheeses if you haven’t already.
-
Once the pasta is al dente, remove the pot from the heat immediately. Stir in the shredded cheddar, mozzarella, and Parmesan cheeses until they are completely melted and the sauce is smooth and creamy. The sauce will continue to thicken as it cools. Serve your homemade evaporated milk mac and cheese hot and fresh for the best experience!
Notes
- STORAGE: Allow mac and cheese to cool completely. Store leftovers in an airtight container in the refrigerator for up to 1 week. To reheat, gently warm on the stovetop or in the microwave, stirring in a splash of extra milk (evaporated milk works best) to restore its smooth creaminess.
- FREEZER FRIENDLY: For longer storage, place completely cooled leftovers in a freezer-safe Ziploc bag or an airtight container. Freeze for up to 2 months. Thaw completely in the refrigerator before reheating. You may need to add more milk during reheating to regain its desired creamy texture.
- GLUTEN-FREE OPTION: Easily make this recipe gluten-free by replacing the all-purpose flour with a cup-for-cup gluten-free flour blend and using your preferred brand of gluten-free pasta.
