Homemade Raspberry Cream Cheese Danish: Your Guide to a Flaky, Bakery-Style Delight
Prepare to be enchanted by the delicate layers, rich fillings, and vibrant flavors of this homemade Raspberry Cream Cheese Danish. Imagine a pastry so flaky it practically melts in your mouth, revealing a creamy, tangy cream cheese blend perfectly complemented by a sweet, slightly tart raspberry jam. This recipe is incredibly easy to follow, making it accessible for bakers of all skill levels, and promises a result so delicious you’ll never consider buying one from the bakery again. It’s truly the perfect sweet indulgence for any occasion, whether you’re looking for a luxurious breakfast, an elegant brunch centerpiece, or a delightful dessert.

There’s something uniquely satisfying about serving a homemade treat that looks and tastes like it came from a high-end patisserie. Your family and friends will undoubtedly be impressed with your culinary prowess when you present these beautiful raspberry cream cheese danishes. Forget the trip to the local bakery; this recipe empowers you to create an equally, if not more, delicious and impressive pastry right in your own kitchen. It’s not just a breakfast item; its sophisticated flavor profile makes it a fantastic dessert option, a delightful afternoon snack, or a special treat for holiday gatherings.
The beauty of this recipe lies in its simplicity, primarily thanks to the clever use of store-bought puff pastry. This shortcut eliminates hours of labor typically associated with traditional danish dough, allowing you to focus on the exquisite fillings and the art of assembly. The combination of sweet raspberries and creamy cheese creates a harmonious balance that is both comforting and sophisticated. This versatile pastry is suitable for a relaxed weekend breakfast, an elegant brunch, or as a sweet ending to any meal.
Looking for another comforting classic? Don’t miss our indulgent Bread Pudding recipe!
The Art of Crafting Your Perfect Cream Cheese Danish Braid
Creating these stunning danish braids is a rewarding process, and the results are truly worth every step. The key to a truly exceptional danish lies in the quality of the ingredients and a few simple techniques. Let’s delve into how to prepare these delightful pastries, focusing on achieving that perfect flaky texture and rich, flavorful filling.
Mastering the Cream Cheese Filling

For me, the heart of any great danish is its cream cheese filling. This creamy, slightly tangy mixture does more than just add richness; it beautifully cuts through the sweetness of the fruit, introducing a subtle savory note that elevates the entire pastry. The inclusion of ricotta cheese adds an extra layer of moisture and a wonderfully delicate texture, making the filling incredibly smooth and luscious.
To begin, you’ll need to preheat your oven to a precise 400 degrees Fahrenheit (200 degrees Celsius). This ensures your puff pastry gets that initial burst of heat needed to rise and create those signature flaky layers. While the oven heats, prepare your filling.
In a medium-sized bowl, combine the softened cream cheese, ricotta cheese, granulated sugar, and vanilla extract. It’s crucial that your cream cheese is at room temperature to prevent lumps and achieve a perfectly smooth, uniform mixture. Beat these ingredients together using an electric mixer or a sturdy whisk until they are thoroughly combined and silky. This smooth consistency is vital for an even spread and a delightful bite.
Preparing the Puff Pastry Foundation
One of the greatest advantages of this recipe is the use of high-quality, store-bought puff pastry sheets. This ingenious shortcut saves you a tremendous amount of time and effort compared to making puff pastry from scratch, without compromising on the flaky, buttery texture that is characteristic of a true danish. Ensure your puff pastry is properly thawed according to package directions, typically in the refrigerator overnight, but kept cold enough to be easily handled without becoming sticky or tearing.
Once thawed, lay out a sheet of parchment paper on a clean, flat work surface. Lightly flour the parchment paper – this tiny step prevents sticking and allows you to work with the pastry more easily. Carefully unfold one sheet of thawed puff pastry onto the prepared parchment. Using a rolling pin, gently roll out the puff pastry lengthwise by about 2 inches (5 cm). This slight extension helps to create more surface area for the filling and the elegant braid.
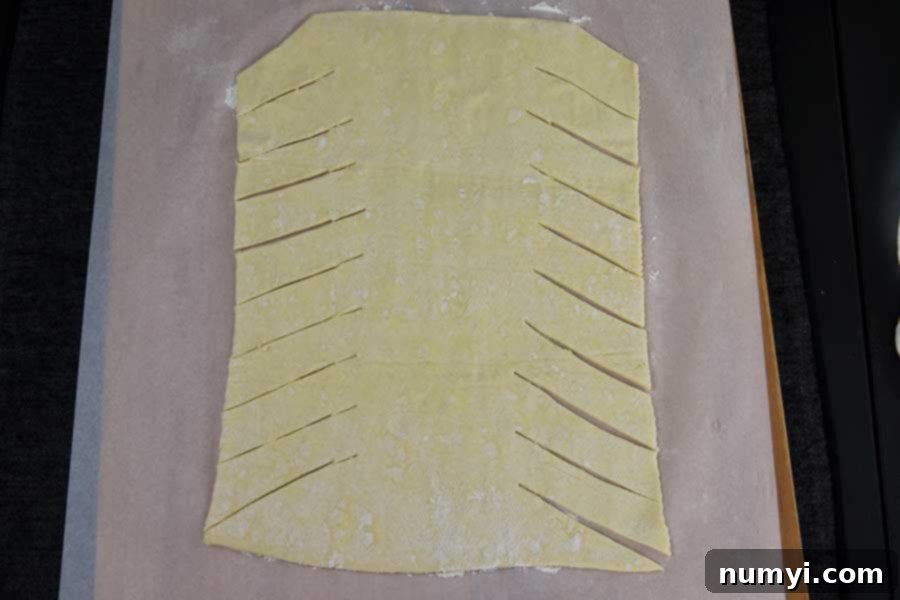
Now comes the shaping. Using a sharp knife or a pizza cutter, slice off the top corners of the puff pastry sheet to create a slight angle, as demonstrated in the accompanying photo. Then, starting from just below where you trimmed the corners, begin cutting strips diagonally down the sides of the pastry sheet, stopping about 1 inch (2.5 cm) from the center. You should aim for approximately 9 to 10 strips on each side, each measuring about 1 inch (2.5 cm) wide. The center section, where you haven’t cut, will serve as the bed for your delicious fillings.

Filling and Braiding for Perfection
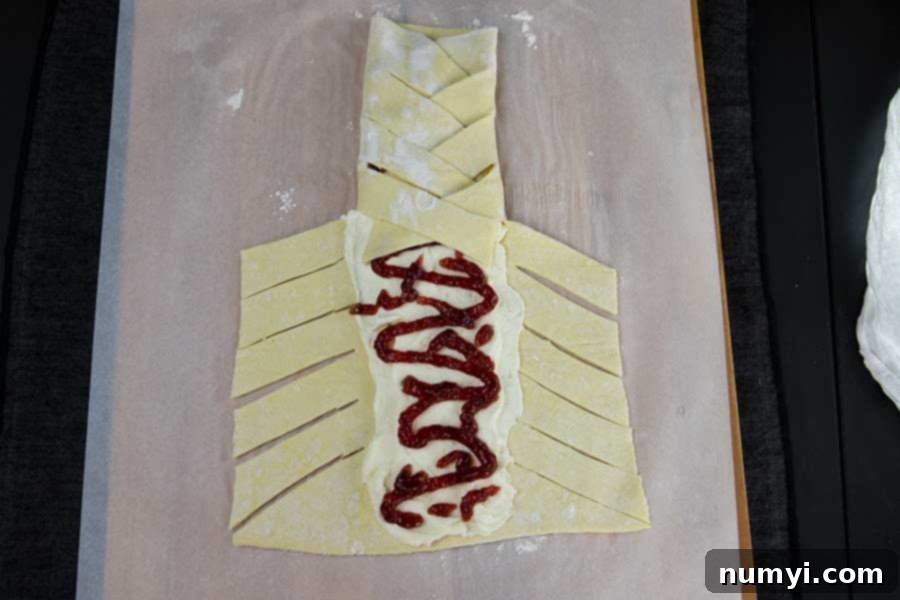
With your pastry shaped, it’s time for the delightful fillings. Carefully spread half of your prepared cream cheese mixture down the middle, uncut section of the puff pastry sheet. Spread it evenly from top to bottom, ensuring a generous layer that will peek through the braid. Leave a small border around the edges, especially at the bottom, to facilitate sealing.
Next, it’s time for the vibrant raspberry jam. To make this step easy and mess-free, I highly recommend transferring the raspberry jam into a plastic bag (a Ziploc bag works perfectly) and snipping off a small corner. This turns your bag into a makeshift piping bag, allowing you to neatly squeeze a ¼ cup of the jam directly onto the center of the cream cheese mixture. If you don’t have a bag, simply spoon the jam carefully over the cheese, trying to keep it centered.

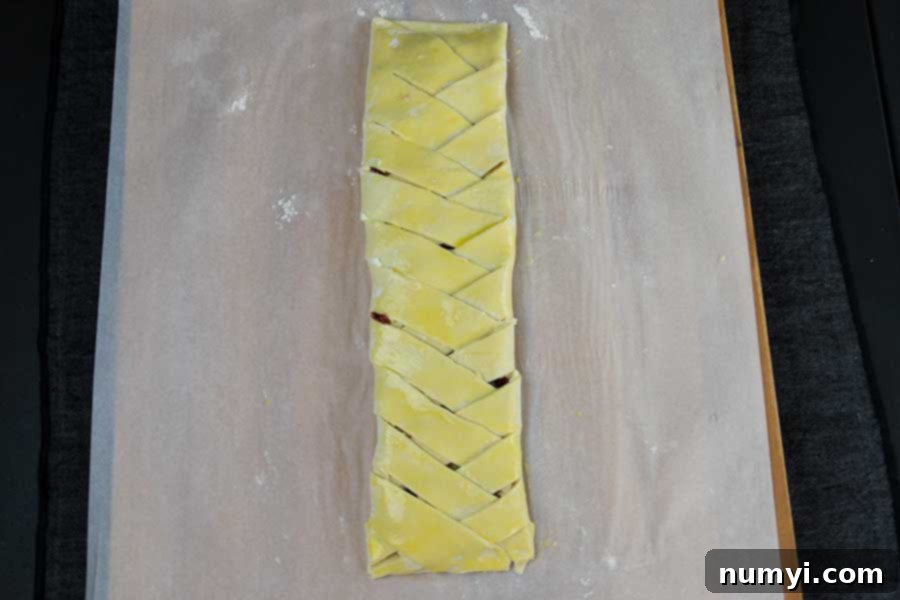
Now for the impressive part: the braid. Take the top left strip of pastry dough and cross it over the filling towards the right. Gently press it down to seal it against the pastry base. Then, take the top right strip and cross it over the filling towards the left, overlapping the first strip slightly. Continue this alternating pattern, crossing strips from left to right, then right to left, all the way down the length of the danish. As you work your way down, gently stretch the strips if needed to ensure they meet and overlap neatly. Before crossing over the very last strips, fold the bottom middle flap of the pastry up over the end of the filling. This creates a neat base and helps contain the filling during baking. Press firmly but gently to seal all edges.
Repeat this entire process with the second puff pastry sheet and the remaining half of your cream cheese and raspberry jam fillings. Once both danishes are braided, carefully transfer the parchment paper with the danishes onto a large baking sheet. This makes handling much easier.
To give your danishes that irresistible golden-brown hue and a beautiful sheen, prepare an egg wash. Whisk together one large egg with one tablespoon of water until well combined. Lightly brush this egg wash over the entire surface of both danishes, paying attention to the braided strips. This step is essential for that perfect bakery-fresh appearance.
Bake the danishes in your preheated 400-degree F (200-degree C) oven for approximately 20 minutes, or until they are puffed, golden brown, and cooked through. Keep a close eye on them during the last few minutes, as ovens can vary. The pastry should look beautifully caramelized and feel firm to the touch.
Need a hearty, savory dish to feed a crowd? Don’t forget to check out our comforting Sausage Hashbrown Breakfast Casserole!

Cooling and Glazing
Once baked to golden perfection, remove the danishes from the oven. It’s crucial to allow them to cool completely on a wire rack. This step is often overlooked but essential. Cooling allows the pastry to set, crisp up, and prevents the glaze from melting and becoming messy. Patience is key here for the best final texture and appearance.
While the danishes cool, prepare your simple yet elegant glaze. In a small bowl, combine the milk and powdered sugar. Whisk thoroughly until you achieve a smooth, pourable consistency. If the glaze is too thick, add a tiny bit more milk; if too thin, add a bit more powdered sugar. The ideal consistency is one that drizzles easily but holds its shape slightly on the pastry.
Once the danishes are completely cool, drizzle the prepared glaze generously over each pastry. You can use a spoon for a rustic look or a whisk for finer lines. The amount of glaze is entirely up to your preference – some prefer a light touch, while others enjoy a more decadent coating. Garnish with fresh raspberries and a sprig of mint for an extra touch of elegance and freshness, if desired.

Finally, serve and enjoy this crispy, yummy, and surprisingly easy raspberry cream cheese danish! Each bite offers a delightful contrast of textures and flavors – the crunchy, flaky pastry, the smooth, tangy cream cheese, and the burst of sweet raspberry. It’s a truly irresistible treat that will have everyone asking for your secret recipe.
Endless Flavor Possibilities: Beyond Raspberry
While raspberry cream cheese danish is a timeless classic, the beauty of this recipe lies in its adaptability. You don’t have to stick to just raspberry jam! Feel free to unleash your creativity and experiment with other fruit jam flavors. Consider using strawberry for a sweeter profile, blueberry for a burst of summer, apricot for a sophisticated tang, or even cherry for a rich, dark fruit experience. A lemon curd or chocolate-hazelnut spread could also create entirely new and exciting variations. Make it your way and discover your new favorite danish combination!
Whether you’re hosting a brunch, looking for a special breakfast treat, or simply craving something sweet and satisfying, this homemade danish recipe is a winner. Its impressive appearance belies its straightforward preparation, making you look like a pastry pro with minimal effort.
Fruit Danish Recipe

Raspberry Cream Cheese Danish Recipe
Print
Pin
Rate
Ingredients
- 2 puff pastry sheets
- 8 oz cream cheese, softened
- 6 tablespoon ricotta cheese
- 1/4 cup granulated sugar
- 1/2 teaspoon vanilla extract
- 1/2 cup raspberry jam
- 1 large egg + 1 tablespoon water
Glaze
- 1 tablespoon milk
- 1/2 cup powdered sugar
Instructions
Danish
-
Preheat the oven to 400 degrees F (200 degrees C).
-
In a medium-sized bowl, combine the softened cream cheese, ricotta, granulated sugar, and vanilla extract. Beat until the mixture is smooth and lump-free.8 oz cream cheese, softened, 6 tablespoon ricotta cheese, 1/4 cup granulated sugar, 1/2 teaspoon vanilla extract
-
Lay out a sheet of parchment paper and lightly flour the surface. Place a thawed puff pastry sheet on the paper and gently roll it out lengthwise by about 2 inches (5 cm).2 puff pastry sheets
-
Slice off the top corners of the puff pastry. Then, starting from just below the trimmed corners, cut 9 to 10 strips diagonally down each side of the pastry, each about 1-inch (2.5 cm) wide, leaving the center section uncut.
-
Spread half of the cream cheese mixture evenly down the middle of the puff pastry sheet.
-
Pipe or spoon 1/4 cup of the raspberry jam on top of the cream cheese mixture, keeping it centered.1/2 cup raspberry jam
-
Begin braiding by alternately crossing each pastry strip over the filling, gently pressing down to seal. Before crossing the last strips, fold the bottom middle flap up over the filling.
Repeat this entire process with the second puff pastry sheet.
-
Carefully transfer the parchment paper with both danishes to a large baking sheet. Brush both danishes generously with the egg wash.1 large egg + 1 tablespoon water
-
Bake for 20 minutes, or until the danishes are beautifully golden brown and puffed. Allow them to cool completely on a wire rack before glazing.
Glaze
-
Once cooled, combine the milk and powdered sugar in a small bowl and whisk until smooth. Drizzle the glaze over each pastry as desired, and garnish with fresh raspberries and mint if preferred.1/2 cup powdered sugar, 1 tablespoon milk
Notes
**Flavor Variations:** Don’t limit yourself to raspberry! This recipe is incredibly versatile. Experiment with other fruit jam flavors such as sweet strawberry, tangy apricot, rich blueberry, or tart cherry. You could also try lemon curd for a zesty twist or even a thin layer of chocolate-hazelnut spread for a decadent treat.
**Storing:** To maintain freshness, place any leftover danish in an airtight container or wrap it securely with plastic wrap. It will stay delicious when refrigerated for up to 4 days.
**Freezing:** For longer storage, wrap the cooled danish tightly with plastic wrap, then an additional layer of aluminum foil. It can be frozen for up to 3 months. When ready to enjoy, thaw it in the refrigerator overnight. You can gently warm it in the microwave or a low oven for a fresh-baked taste.
**Serving Suggestions:** These danishes are perfect alongside a hot cup of coffee, a soothing tea, or a glass of milk. For an extra special presentation, serve them with a side of fresh berries or a dollop of whipped cream.
