Crispy Buttermilk Battered Onion Rings: Your Ultimate Homemade Recipe Guide
There’s nothing quite like a basket brimming with hot, crispy, golden-brown onion rings. That perfect crunch, followed by the sweet, tender onion, is pure culinary bliss. If you’ve recently acquired a deep fryer, or are simply looking for an excuse to use one, then you’ve landed on the right page! This recipe for homemade buttermilk battered onion rings is about to become your new favorite side dish, appetizer, or even a satisfying snack on its own.

My journey to homemade onion rings began when my husband finally convinced me to invest in a deep fryer. While I initially hesitated due to storage space concerns and the lingering smell of fried food indoors, the promise of perfectly crispy onion rings was too tempting to resist. After experimenting, I discovered a method that yields results far superior to anything you’d find at a restaurant – and they’re surprisingly easy to make at home!
Why You’ll Fall in Love with These Homemade Onion Rings
Once you try these homemade buttermilk battered onion rings, you’ll understand why they’re such a beloved classic. Here’s what makes this recipe truly special:
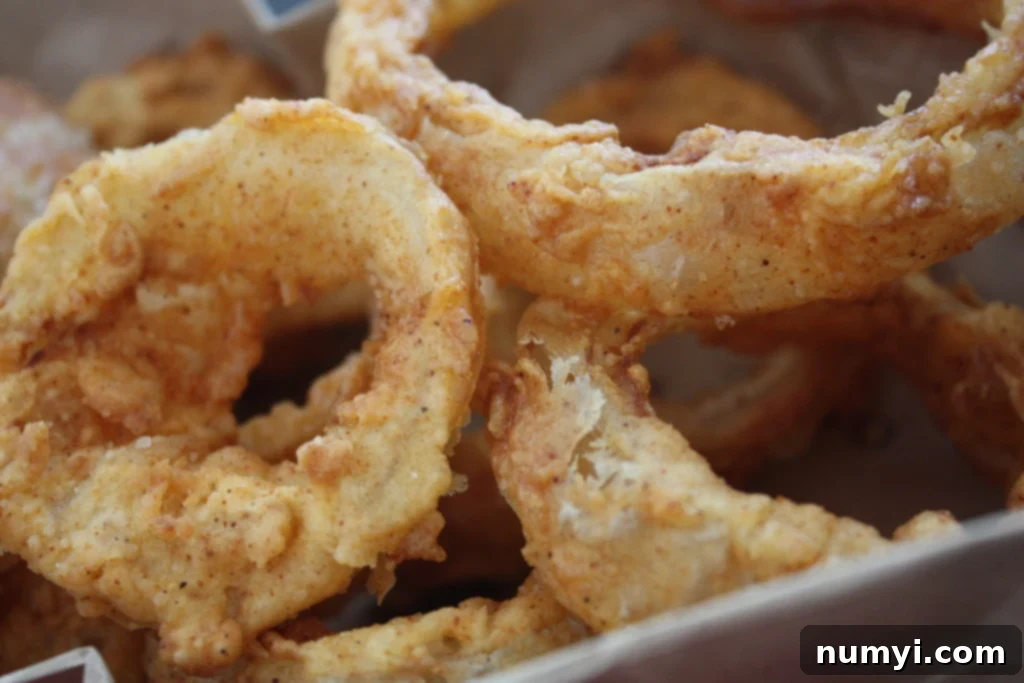
- Unmatched Freshness and Crispness: Forget soggy, greasy rings. Our recipe delivers an incredible crunch that lasts, thanks to the double-dipping batter technique and proper draining. The contrast between the crispy exterior and the sweet, tender onion inside is simply divine.
- Simple to Make, Restaurant Quality: Don’t be intimidated by deep frying. This recipe breaks down the process into easy, manageable steps, allowing you to achieve restaurant-level quality in your own kitchen. The batter is light, airy, and perfectly seasoned, avoiding the common pitfall of a thick, heavy coating.
- Superior Flavor Profile: The key is the buttermilk batter, which adds a subtle tang and helps create an incredibly tender texture while promoting that golden-brown crispness. Paired with sweet Vidalia onions and a blend of spices, every bite is packed with savory goodness.
- A Healthier Take on a Classic (Sort Of!): While deep-fried, making them at home gives you control over the quality of ingredients and oil. Plus, they taste so good, you might just find yourself eating fewer, more satisfying rings!
- An Easier Alternative to Bloomin’ Onions: If you love the flavor of a bloomin’ onion but find it daunting to prepare or messy to eat, these individual onion rings offer all the taste without the fuss. They’re much easier to cook evenly and enjoy.
As for the deep fryer dilemma, my husband and I have now established an “outdoor frying zone” for future culinary adventures. It keeps the house smelling fresh and makes for a fun, alfresco cooking experience, especially on cooler evenings. But even if you’re using a heavy pot on your stovetop, these onion rings are worth the minor inconvenience!
These crispy delights pair wonderfully with other homemade favorites. Some of our go-to side dish recipes include buttermilk fried okra, savory baked chicken wings, spicy jalapeno hush puppies, and delightful Italian jalapeno poppers.
Don’t Sweat The Recipe is supported by its readers. We may earn a commission if you purchase through a link on our site. Learn more.
Essential Ingredients for Perfectly Crispy Onion Rings
Creating crispy, crunchy, deep-fried buttermilk battered onion rings starts with selecting the right ingredients. Here’s a breakdown of what you’ll need and why each component is important:
- Vidalia Onions: These sweet onions are my top recommendation for onion rings. Their mild flavor caramelizes beautifully when fried, providing a wonderful contrast to the savory batter. However, if Vidalia onions aren’t available, other sweet onions, white onions, or even yellow onions will work well. Just be aware that stronger onions might require a quick soak in ice water before battering to mellow their flavor.
- Dry Ingredients: The foundation of our crispy batter.
- All-purpose flour: Provides the structure for the batter, ensuring it adheres well to the onion rings and crisps up nicely.
- Garlic powder: Adds a foundational savory note that enhances the overall flavor.
- Paprika: Contributes a subtle sweetness and a beautiful reddish-orange hue to the fried rings. You can use sweet paprika for a milder flavor or smoked paprika for a deeper, more robust taste.
- Salt and Black Pepper: Essential seasonings that bring all the flavors together and ensure the batter isn’t bland. Adjust to your preference.
- Wet Ingredients: These create the luscious, adherent coating.
- Buttermilk: The star of the wet batter! Buttermilk is crucial for two reasons: its acidity tenderizes the onion slightly, and its thicker consistency helps the flour mixture stick better, leading to a more robust and crispy coating. If you don’t have buttermilk, don’t worry – you can easily make a substitute (see our “Tips” section).
- Large eggs: Act as a binder, helping the batter cling to the onion rings and creating a richer, more substantial coating.
- Vegetable oil or Canola oil: For frying. It’s vital to use a neutral-flavored oil with a high smoke point for deep frying. Vegetable oil, canola oil, and peanut oil are excellent choices as they won’t impart unwanted flavors to your onion rings and can withstand the high temperatures required for proper frying.
Step-by-Step Guide: How to Make Irresistibly Crispy Battered Onion Rings
Making homemade onion rings is a rewarding experience, and with these detailed steps, you’ll be frying up perfect batches in no time.
1. Prepare Your Dipping Sauce (Optional, but Recommended!)
If you plan to serve your onion rings with a dipping sauce, prepare it first. Mixing it ahead of time allows the flavors to meld and chill thoroughly in the refrigerator while you prepare the rings. Our copycat bloomin’ onion sauce recipe below is a fantastic complement!
2. Slice and Separate the Onions
Begin by cutting your chosen onions into 1/2-inch thick slices. This thickness ensures a good onion-to-batter ratio – not too thin to disappear, not too thick to remain raw. Once sliced, gently separate each ring. It’s often helpful to discard the very small inner rings as they can overcook quickly. For extra crispness and to reduce the onion’s bite, you can soak the separated rings in ice water for about 15-30 minutes, then drain and pat them completely dry.
3. Whisk the Wet Ingredients
In a medium bowl, combine the buttermilk and large eggs. Whisk them together until they are well integrated and smooth. This creates the liquid base for our batter, which will help the dry ingredients adhere to the onion rings.
4. Mix the Dry Ingredients
In a separate, shallow bowl or a large zip-top bag (my preferred method for easy coating and cleanup), whisk together the all-purpose flour, garlic powder, paprika, salt, and black pepper. Make sure all the spices are evenly distributed throughout the flour.
5. The Battering Process: Double Dip for Double Crispness!
This is where the magic happens for extra crispiness. Take an onion ring and first dredge it thoroughly in the dry flour mixture, shaking off any excess. This initial coating helps the wet batter stick better. Next, dip the flour-coated ring into the buttermilk-egg mixture, ensuring it’s fully coated. Let any excess liquid drip off. Finally, return the wet ring to the dry flour mixture for a second, generous coating. Again, shake off any loose excess. Place the fully battered rings on a baking sheet lined with parchment paper or a wire rack as you go. Battering all your rings before you start frying can make the process smoother.
6. Heat the Oil to Perfection
In a deep fryer or a heavy-bottomed pot (like a Dutch oven), heat your vegetable or canola oil to a precise 350°F (175°C). Using a deep-fry thermometer is highly recommended for accuracy. Maintaining the correct oil temperature is crucial for crispy, non-soggy onion rings. If the oil isn’t hot enough, the rings will absorb too much oil and become greasy; if it’s too hot, they’ll burn before cooking through.
7. Fry to Golden Brown
Carefully place a few battered onion rings into the hot oil, ensuring you do not overcrowd the pot. Frying in small batches is essential to prevent the oil temperature from dropping too significantly. Fry the onion rings for about 2-3 minutes per batch, turning them once halfway through, until they are beautifully golden brown and crispy on all sides.
8. Drain for Maximum Crispness
Once fried, use a slotted spoon or spider to remove the onion rings from the oil. Immediately transfer them to a wire cooling rack placed over a baking sheet. This allows excess oil to drip away and air to circulate, maintaining their crispy texture. Avoid draining them on paper towels directly, as this can trap steam and lead to sogginess on one side.
While still hot, lightly sprinkle the onion rings with a pinch of salt to enhance their flavor. Serve them immediately with your favorite dipping sauce, like our delicious copycat bloomin’ onion sauce. These homemade onion rings are an absolute game-changer, proving that the best version of this classic comfort food is often found right in your own kitchen. They are truly one of our favorite side dishes, especially alongside grilled burgers or hot dogs.
What to Serve with Your Perfect Onion Rings
Crispy onion rings are incredibly versatile and can elevate almost any meal. Here are some fantastic serving suggestions:
- Classic Pairings: They are the quintessential partner for juicy homemade hamburgers, classic hot dogs, or hearty sandwiches.
- As an Appetizer: Serve them on their own with a variety of dipping sauces for a crowd-pleasing starter at parties or game nights.
- BBQ Side: An excellent addition to any barbecue spread, complementing grilled meats like ribs, pulled pork, or chicken.
- Brunch Booster: Surprisingly good with a savory breakfast or brunch, perhaps alongside a fried egg or a breakfast sandwich.
- Creative Toppings: Use them as a topping for chili, casseroles, or even gourmet salads for an added crunch.
Expert Tips for the Best Homemade Onion Rings
- Prepare in Batches: Whether you choose to batter all your onion rings before frying or batter-and-drop, working in small batches is key. This prevents overcrowding the fryer, which can cause the oil temperature to drop and lead to soggy, greasy rings instead of crispy ones.
- Shake Off Excess Batter: After each dip, gently shake off any excess batter. You want a thin, even coating that crisps beautifully, not a thick, doughy layer. The proper batter-to-onion ratio is essential for that perfect crunch.
- Maintain Oil Temperature: This cannot be stressed enough! Use a deep-fry thermometer to ensure your oil stays at a consistent 350°F (175°C). If the oil isn’t hot enough, the onion rings will absorb too much oil and become soggy. If it’s too hot, the batter will burn before the onion cooks. Adjust your heat source as needed between batches.
- Homemade Buttermilk Substitute: No buttermilk on hand? No problem! You can easily make your own. For every 1 cup of milk you need, add 1 tablespoon of lemon juice or white vinegar. Stir gently and let the mixture sit for about 5-10 minutes until it slightly curdles. Your homemade buttermilk is ready!
- Soak Onions for Milder Flavor: For particularly pungent onions or if you prefer a milder taste, soak the separated onion rings in a bowl of ice water for 30 minutes before battering. Pat them thoroughly dry before proceeding.
- Season Immediately After Frying: For the best flavor, sprinkle your hot, freshly fried onion rings with a pinch of fine salt (or even a seasoned salt blend) as soon as they come out of the oil. The hot oil helps the seasoning adhere.
- Safety First: When deep frying, always use caution. Ensure your pot is stable, don’t overfill it with oil, and have a lid handy in case of grease fires. Use tongs or a spider for carefully placing and removing rings.
Delicious Variations to Elevate Your Onion Rings
- Spicy Kick: Add a pinch of cayenne pepper, a dash of chili powder, or a few drops of hot sauce to your dry batter mix for a delightful spicy twist.
- Herbaceous Notes: Incorporate finely chopped fresh herbs like parsley, chives, or thyme into the dry flour mixture for an aromatic flavor. Dried herbs like oregano or Italian seasoning also work well.
- Cheesy Goodness: Mix a tablespoon or two of finely grated Parmesan cheese into your dry batter for a savory, cheesy crust.
- Different Dipping Sauces: While our bloomin’ onion sauce is fantastic, feel free to experiment with your favorite dipping sauces. Ranch, blue cheese, BBQ sauce, honey mustard, or even a simple Sriracha mayo are all great options.
- Gluten-Free Option: For those with dietary restrictions, substitute the all-purpose flour with a good quality gluten-free all-purpose flour blend. Ensure your blend contains xanthan gum for best results.
Frequently Asked Questions (FAQs)
The secret lies in the double-dredging technique. First, lightly coat the onion rings in the seasoned flour. This initial dry layer provides a better surface for the wet buttermilk-egg mixture to adhere to. Then, dip them in the wet mixture, letting any excess drip off. Finally, return them to the flour for a second and final coating. This creates a robust and adhesive layer that fries up perfectly crispy.
Soggy onion rings are almost always a result of incorrect oil temperature. If the oil isn’t hot enough (below 350°F / 175°C), the batter will absorb too much oil instead of instantly crisping up, leading to a greasy, limp result. Always use a frying thermometer to monitor and maintain the oil temperature at a consistent 350°F (175°C) throughout the entire cooking process. Additionally, overcrowding the pot can drop the oil temperature, so always fry in small batches to ensure consistent heat.
Fried onion rings are truly best enjoyed immediately after cooking for optimal crispness. However, if you do have leftovers, allow them to cool completely at room temperature to prevent condensation. Store the cooled onion rings in an airtight container in the refrigerator for up to 2 days. To reheat and restore their crispness, spread them in a single layer on a baking sheet and bake in a preheated 400°F (200°C) oven or air fryer until they are hot and crispy again, about 5-10 minutes, depending on your appliance.
While this recipe is designed for deep frying to achieve maximum crispness and flavor, you can adapt it for an air fryer. After battering, lightly mist the onion rings with cooking spray. Air fry at 375°F (190°C) for 10-15 minutes, flipping halfway through, until golden brown and crispy. Keep in mind that the texture will be slightly different from deep-fried, but still delicious!
More Delicious Recipes You’ll Love
Loaded Potato Bites Recipe
Shrimp Po’Boy
Copycat Bonefish Grill Bang Bang Shrimp
Are you on Pinterest? Click the button below to add this recipe to one of your boards!

Buttermilk Battered Onion Rings Recipe
Print
Pin
Rate
Side Dish
American
30 minutes
3 minutes
33 minutes
4
505
kcal
Leigh Harris
Ingredients
-
2
large
Vidalia onions
or sweet onions
-
2
cups
flour
-
2
teaspoons
garlic powder
-
2
teaspoons
paprika
-
2
teaspoons
salt
-
1
teaspoon
pepper
-
1
cup
buttermilk
-
2
large
eggs
-
oil for frying
Sauce
-
1/3
cup
mayo
-
2
Tablespoons
sour cream
-
2
Tablespoons
creamy horseradish sauce
-
1
Tablespoon
ketchup
-
1/4
teaspoon
paprika
-
1/4
teaspoon
garlic salt
Metric
Instructions
For the Sauce
-
Mix all sauce ingredients together until combined. Cover and refrigerate for at least 30 minutes.1/3 cup mayo,
2 Tablespoons sour cream,
2 Tablespoons creamy horseradish sauce,
1 Tablespoon ketchup,
1/4 teaspoon paprika,
1/4 teaspoon garlic salt
For the Onion Rings
-
Slice each onion into 1/2 inch thick rings. Carefully separate the rings.2 large Vidalia onions
-
In a medium-size bowl or zip bag, mix together the flour, garlic powder, paprika, salt & pepper.2 cups flour,
2 teaspoons garlic powder,
2 teaspoons paprika,
2 teaspoons salt,
1 teaspoon pepper -
In a separate bowl, whisk together the eggs and buttermilk.1 cup buttermilk,
2 large eggs -
Heat the oil to 350 degrees, either in a deep fryer or in a heavy pot.oil for frying
-
Start by dipping the rings in the flour. Shake off the excess, and then dip the rings in the egg mixture. Return the rings to the flour mixture for final coating. Shake off the excess and place the rings in the oil. Do this process in batches. Avoid overcrowding the pan or fryer.
-
Fry the rings for about three minutes, turning halfway through, until golden brown. Remove from the oil with a slotted spoon onto a wire rack placed over a baking sheet to drain.
-
Sprinkle with salt while still hot.
Notes
If you don’t have buttermilk you can make your own. Mix 1 cup of milk with 1 tablespoon of lemon juice or white vinegar, and let the mixture sit for about 10 minutes.
Be sure the oil is hot before frying the onion rings. If the oil is not hot enough, the onion rings will soak up the oil and become soggy.
Storing and Reheating Leftovers – Fried onion rings are best served immediately. But if you have leftovers, let them cool completely, place them in an airtight container, and refrigerate for up to 2 days. You can reheat them in a 400°F (200°C) oven until crispy and hot.
Nutrition
Calories:
505
kcal
|
Carbohydrates:
67
g
|
Protein:
13
g
|
Fat:
20
g
|
Saturated Fat:
5
g
|
Cholesterol:
99
mg
|
Sodium:
1607
mg
|
Potassium:
446
mg
|
Fiber:
4
g
|
Sugar:
14
g
|
Vitamin A:
829
IU
|
Vitamin C:
10
mg
|
Calcium:
135
mg
|
Iron:
4
mg
