Irresistible No-Bake Chocolate Peanut Butter Balls: Your Ultimate Holiday Treat
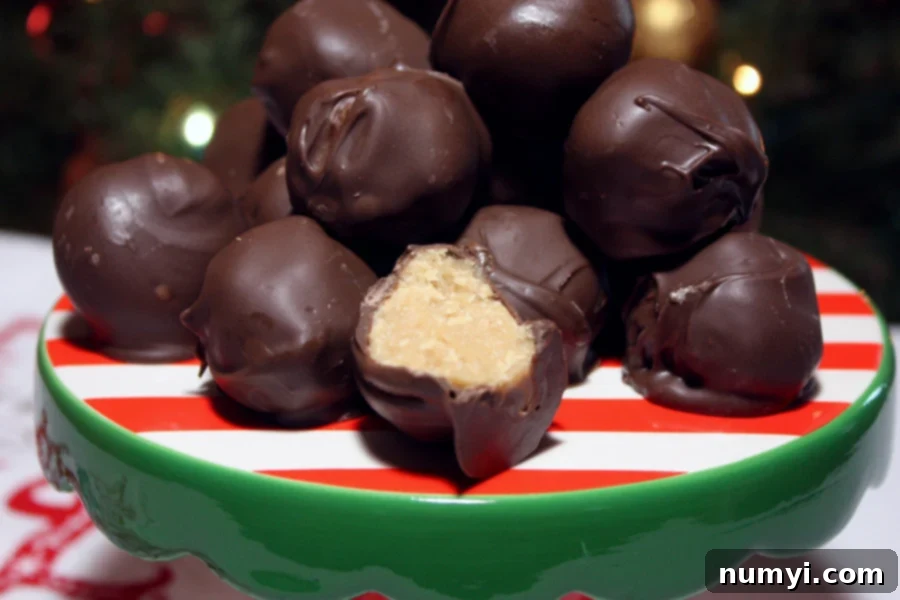
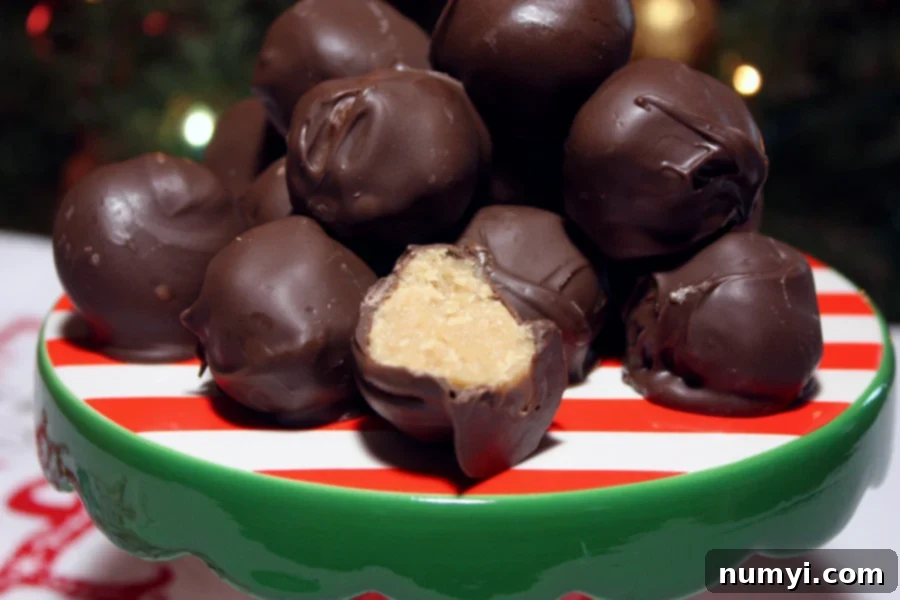
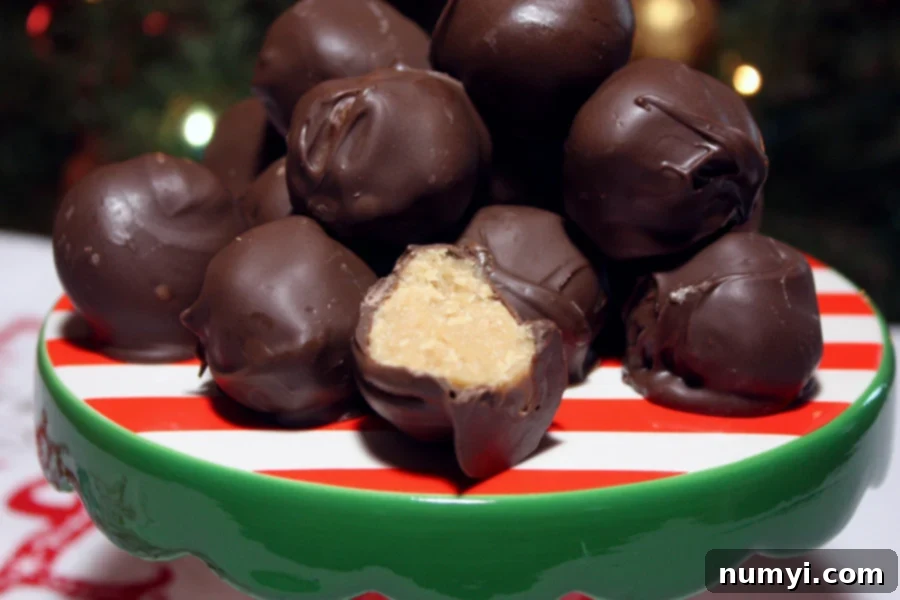
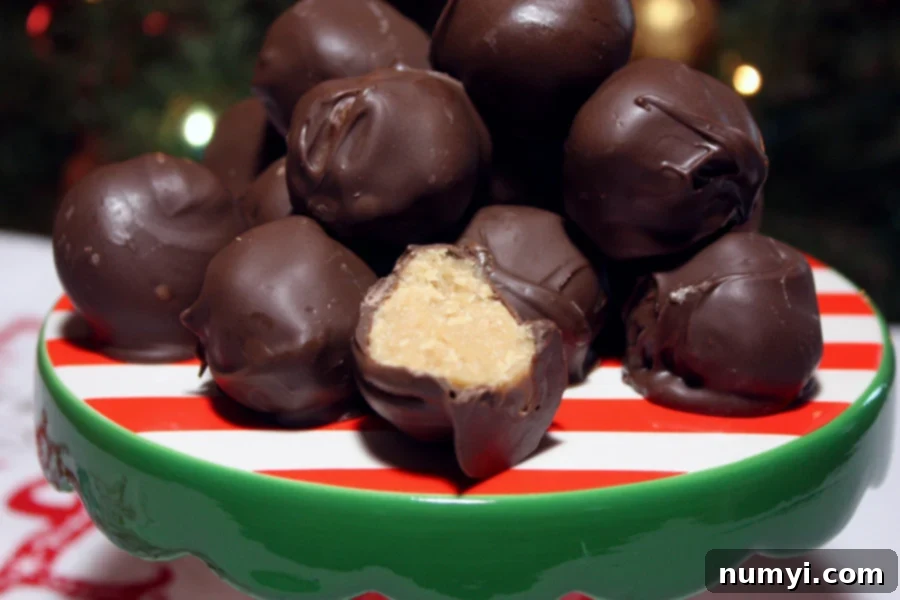
Prepare to delight your taste buds with the ultimate classic no-bake treat: Chocolate Peanut Butter Balls! These delectable bites are a cherished tradition, especially during the holidays, but truly perfect for any occasion. Imagine a rich, creamy, and velvety smooth peanut butter filling, perfectly encased in a crisp, sweet chocolate shell. They’re more than just a dessert; they’re a nostalgic journey to childhood, a crowd-pleaser on any platter, and a homemade gift that always brings joy. Forget complicated baking; this simple, four-ingredient recipe ensures a foolproof batch of the best peanut butter balls you’ll ever taste, ready to impress with minimal effort.

Why These Peanut Butter Balls Are Absolutely Irresistible
There are countless reasons why these chocolate peanut butter balls have earned a permanent spot on our holiday treat tray and in our hearts. They aren’t just good; they’re legendary. Here’s why you’ll fall in love with them:
- Better Than Store-Bought: Seriously, these homemade wonders are often described as superior to even the most famous peanut butter cups. The fresh ingredients, customizable sweetness, and the pure, unadulterated peanut butter flavor shine through, creating a taste experience that mass-produced candies simply can’t match. You control the quality, and that makes all the difference.
- The Perfect Buckeye Alternative: While similar to traditional Buckeyes, these treats offer a distinct advantage: a complete chocolate coating. Buckeyes typically leave a small circle of peanut butter exposed, but our recipe ensures every inch of that creamy peanut butter core is enveloped in rich chocolate. This creates an even more satisfying texture and flavor combination in every bite.
- The Ultimate Gift: Planning to surprise friends, family, or neighbors? These peanut butter balls are always received with enthusiastic praise. Their homemade charm, delicious flavor, and beautiful presentation make them an incredibly thoughtful and appreciated gift during the festive season or any time of year. Package them in a nice tin or box with a ribbon for an extra special touch.
- A Time-Tested Recipe: This isn’t just a random recipe; it’s a beloved classic passed down through the years. I received this recipe from a co-worker ages ago, and it has consistently produced the best peanut butter balls I’ve ever had. It’s a testament to its perfection and simplicity.
- Authentic Old-Fashioned Flavor: Unlike many modern recipes that include graham cracker crumbs or rice cereal, this recipe sticks to the true old-fashioned method. This means a pure, unadulterated peanut butter filling with a smooth, rich texture that truly lets the peanut butter shine. In my opinion, it’s the only way to make them – no fillers, just pure deliciousness!
- Effortless No-Bake Goodness: Who wants to turn on the oven when there’s so much else to do? These delightful treats are entirely no-bake, making them perfect for busy holidays or when you just want a quick and easy dessert without heating up the kitchen.
- Family Fun: Rolling the peanut butter mixture into balls is a fantastic activity for kids and adults alike. It’s a wonderful way to involve the whole family in creating delicious memories together.
While these peanut butter balls are a highlight, don’t forget to explore our other festive favorites like chocolate covered pretzel rods, a delightful eggnog cookie recipe, rich dark chocolate peppermint bark, and creamy peppermint fudge for a truly spectacular holiday spread.

Mastering Flavor with Just 4 Simple Ingredients
You might be surprised to learn that such an incredibly delicious and satisfying treat requires only four basic ingredients! The magic truly lies in the quality of these simple components and how they come together. These no-bake chocolate peanut butter balls are not just easy to make; they are unbelievably delicious, proving that sometimes, less is truly more.
- Peanut Butter: The star of the show! We highly recommend using a smooth and creamy peanut butter for the silkiest texture and best consistency. Brands like Jif, Skippy, or Peter Pan work perfectly. It is crucial to use a “no-stir” variety of peanut butter. Natural peanut butter, while delicious in its own right, tends to separate its oils, making the filling too oily and preventing it from setting up properly, resulting in a greasy and crumbly texture. If you’re a fan of a little crunch, feel free to use chunky peanut butter for added texture, though the classic is smooth.
- Unsalted Butter: Butter adds richness, flavor, and helps bind the peanut butter and sugar into a cohesive, pliable mixture. We specify unsalted butter to give you complete control over the saltiness of your final product. If you only have salted butter on hand, you can certainly use it; just be mindful that your peanut butter balls might have a slightly saltier profile.
- Confectioners’ Sugar (Powdered Sugar): This finely ground sugar is essential for both sweetness and texture. Unlike granulated sugar, confectioners’ sugar dissolves seamlessly into the mixture, creating that wonderfully smooth and melt-in-your-mouth filling without any grittiness. It also plays a critical role in binding the peanut butter and butter, helping the mixture firm up to a rollable consistency.
- Almond Bark (Candiquik) or Candy Melts: For the glorious chocolate coating! Almond bark and candy melts are specifically designed for easy melting and provide a smooth, shiny, and quick-setting finish without the need for tempering. They are incredibly convenient and yield professional-looking results. You can find them in various chocolate flavors, including milk, dark, and white chocolate.
Step-by-Step Guide: Crafting Your Perfect Peanut Butter Balls
Creating these delightful chocolate peanut butter balls is a straightforward and rewarding process. Follow these detailed steps to ensure your treats are nothing short of spectacular.
- Melt Peanut Butter and Butter: In a medium saucepan, combine the peanut butter and unsalted butter. Place the saucepan over medium-low heat. Stir constantly until both ingredients are fully melted and smoothly combined. The mixture should be uniform and liquid, but avoid bringing it to a boil. This gentle melting process ensures a creamy base for your filling.
- Prepare Your Workspace: While the peanut butter mixture is melting, line a baking sheet or a large plate with wax paper or parchment paper. This will be where you place your rolled peanut butter balls to chill and later, your chocolate-dipped creations to set.
- Incorporate Confectioners’ Sugar: Remove the saucepan from the heat immediately after the peanut butter and butter are melted. Gradually add the confectioners’ sugar to the warm mixture, stirring continuously with a wooden spoon or spatula until it is fully incorporated and a thick, pliable dough forms. Ensure there are no lumps for a truly smooth filling. The mixture will be quite stiff.
- Cool to Room Temperature: Allow the peanut butter mixture to cool down to room temperature, or until it is cool enough to comfortably handle with your hands. This step is crucial; if the mixture is too warm, it will be too soft and sticky to roll. You can speed up this process by spreading the mixture evenly in a shallow dish and refrigerating it for about 15-20 minutes, stirring occasionally, until it reaches a manageable consistency.
- Roll the Peanut Butter Balls: Once cooled, take small portions of the peanut butter mixture and roll them into uniform 1-inch balls. Aim for consistency in size for even dipping and a polished final look. If the mixture becomes too sticky, lightly dust your hands with a little extra confectioners’ sugar or chill the mixture briefly. Place the rolled balls onto your prepared wax paper-lined baking sheet.
- Chill Until Firm: Refrigerate the rolled peanut butter balls for at least 30 minutes, or until they are firm. This chilling step is essential as it prevents the peanut butter from melting and falling apart when dipped into the warm chocolate coating. A firm ball makes the dipping process much easier and cleaner.
- Melt Chocolate and Dip: This step can be the most time-consuming, but with patience, it’s incredibly rewarding. Melt your almond bark or candy melts according to the package instructions. You can use a double boiler for gentle, even melting, or microwave the chocolate in 30-second intervals, stirring well after each interval, until smooth and fully melted. Do not overheat the chocolate.
Using a fork or a toothpick, carefully dip each chilled peanut butter ball into the melted chocolate, ensuring it’s completely coated. Gently tap the fork against the side of the bowl to allow any excess chocolate to drip off, ensuring a thin, even coating. If you prefer not to use almond bark, you can melt a bag (about 10-12 oz) of semi-sweet chocolate chips with one tablespoon of vegetable oil or coconut oil. The oil helps to thin the chocolate and achieve a smooth, dippable consistency, as chocolate chips are not formulated for melting as easily as candy melts.
Feel free to experiment with different types of chocolate for your coating – white chocolate, dark chocolate, or classic milk chocolate all work wonderfully. The choice is yours and allows for customization!
- Allow to Dry: Place the chocolate-dipped peanut butter balls back onto the wax paper-lined baking sheet. Let them sit at room temperature until the chocolate coating is completely set and dry. This usually takes about 15-30 minutes, or you can place them in the refrigerator for quicker setting.
These old-fashioned chocolate peanut butter balls, sometimes affectionately referred to as Buckeyes when partially coated, are truly a delightful treat. In this fully-coated version, they’re like a perfect peanut butter cup, reimagined in a bite-sized ball.
Expert Tips & Creative Variations for Perfect Peanut Butter Balls
Achieving the perfect chocolate peanut butter ball is easier than you think, especially with a few helpful tips and creative variations. Here’s how to elevate your treats:
- Crucial Chilling: Never skip chilling the peanut butter balls before dipping them in chocolate. This is perhaps the most important tip! Cold, firm peanut butter balls will hold their shape when they hit the warm chocolate, making the dipping process much smoother and preventing them from melting or falling apart. Aim for at least 30 minutes in the refrigerator, or even longer if your kitchen is warm.
- Chocolate Choices: While almond bark and candy melts are super convenient, you can absolutely use high-quality chocolate chips for your coating. If opting for chocolate chips (milk, semi-sweet, or dark), remember to add about one teaspoon of coconut oil or vegetable oil per standard 10-12 oz bag of chocolate chips. This oil is essential to thin the chocolate and ensure a smooth, glossy, and dippable consistency, as chocolate chips are designed to hold their shape, not melt into a thin coating.
- Melting Chocolate Mastery: Whether you choose a double boiler or the microwave, gentle heat is key. For the microwave, heat in short 30-second intervals, stirring thoroughly after each one, until the chocolate is fully melted and smooth. Overheating can cause chocolate to seize or burn, making it unusable. A double boiler offers more controlled, gentle heat, reducing the risk of scorching.
- Battling Thickening Chocolate: If your chocolate starts to thicken as you’re dipping, it likely needs a little reheating. Return it to the microwave for another 15-20 seconds or back over the double boiler, stirring until it’s smooth again. If it’s too thick from the start when using chocolate chips, stir in another half teaspoon of coconut or vegetable oil.
- Dipping Tools: For an easy and clean dip, use a fork or a sturdy toothpick. Insert it into the center of a chilled peanut butter ball, dip into the melted chocolate, then gently tap the fork against the edge of the bowl to let excess chocolate drip off. This helps achieve a thin, even coating.
Creative Variations
Don’t be afraid to get creative and personalize your peanut butter balls! Here are some fun ideas:
- Peanut Butter Preference: While we adore smooth peanut butter for its classic texture, crunchy peanut butter offers a delightful textural contrast. If you love a bit of chew and crunch, go for it!
- Festive Toppings: Add an extra layer of visual appeal and flavor. Immediately after dipping, sprinkle the tops with festive sprinkles (for holidays!), mini chocolate chips, finely chopped peanuts, toffee bits, or even a delicate sprinkle of flaky sea salt to enhance the chocolate and peanut butter flavors.
- Decorative Drizzles: Once the main chocolate coating has set, melt a contrasting chocolate (e.g., white chocolate over dark chocolate, or vice versa) and drizzle it artfully over the tops of the balls using a fork or a piping bag with a very small tip. This adds an elegant touch.
- Shape Shifters: These aren’t just for balls! For Easter, you can easily shape the peanut butter mixture into small eggs before dipping. For other occasions, mini bar shapes could also be a fun twist.
- Flavor Boosters: A small dash of vanilla extract or a pinch of salt can really enhance the peanut butter filling. Experiment with a tiny amount of almond extract for a subtle marzipan-like hint, or even a drop of peppermint extract for a holiday twist (be cautious, a little goes a long way!).
- Dairy-Free/Vegan Option: You can easily adapt this recipe by using plant-based butter (ensure it’s a solid stick variety for baking) and dairy-free chocolate chips or vegan chocolate melts.
Frequently Asked Questions About Peanut Butter Balls
No, for this recipe, it is strongly recommended to use a “no-stir” processed peanut butter (like Jif, Skippy, or Peter Pan). Natural peanut butter, which typically separates oil, will result in a filling that is too oily, soft, and crumbly, making it difficult to roll and preventing it from setting properly. The texture will not be as smooth and firm as desired for these classic treats.
Store your finished chocolate peanut butter balls in an airtight container to maintain their freshness. They can be kept at room temperature for up to one week, especially in a cool environment. For extended freshness, they will last up to 10 days when stored in the refrigerator. Both methods work well, simply choose based on your preference and how quickly you plan to devour them!
Absolutely! Peanut butter balls freeze beautifully. First, allow them to set up completely after dipping. Then, layer them in an airtight freezer-safe container, using parchment paper or wax paper between layers to prevent sticking. They can be frozen for up to 3 months. To thaw, simply transfer them to the refrigerator overnight. Be aware that the chocolate coating might slightly discolor or “bloom” (develop a white film) due to temperature changes, and they might sweat a little upon thawing. Placing a layer of paper towels between the parchment paper layers during thawing can help absorb any excess moisture.
The yield of this recipe is approximately 36 peanut butter balls, but this can vary depending on the size you roll them. If you prefer smaller, bite-sized treats, you might get more; for larger, more substantial balls, the yield will be slightly less. Aim for consistently 1-inch balls for the best results and an even number.
If your mixture is too soft and sticky to roll, it likely needs more confectioners’ sugar. Add a tablespoon at a time, mixing until it reaches a firm, pliable consistency. If it’s too crumbly, it might be too cold or lack enough fat. Try kneading it with your hands for a moment (the warmth can help), or melt a tiny bit more butter (half a teaspoon) with a dash more peanut butter, then mix it in. Ensure you’re not using natural peanut butter, as its oil separation can cause crumbly texture.
Explore More Delicious Recipes
Butter Pecan Fudge
Peanut Butter Pretzel Bars
Chocolate Orange Fudge
Are you on Pinterest? Click the button below to add this recipe to one of your boards!

Old Fashioned Chocolate Peanut Butter Balls Recipe
Print
Pin
Rate
Ingredients
- 1 cup unsalted butter
- 12 oz peanut butter (creamy or crunchy)
- 1 lb confectioners sugar
- 1 lb almond bark or candy melts
Instructions
-
In a saucepan over medium heat, melt the peanut butter and butter together.1 cup unsalted butter, 12 oz peanut butter
-
Remove from the heat and add the confectioners’ sugar.1 lb confectioners sugar
-
Allow to cool enough to handle, shape into balls. (about 1 inch) Refrigerate to chill.
-
Melt almond bark per package instructions, dip each ball into chocolate to coat, place on wax paper to dry completely.1 lb almond bark or candy melts
Notes
You can also use melted chocolate chips instead of candy melts. Just melt a bag of your favorite chocolate chips with 1 teaspoon of coconut oil or vegetable oil. Chocolate chips are necessarily made for melting so you will need to add the oil.
Storing – Store in an air-tight container at room temperature for up to one week, or even in the refrigerator for up to 10 days. Both work fine.
Freezing – Allow them to set up completely. Layer in an airtight container between parchment paper or wax paper and freeze for up to 3 months. Thaw overnight in the refrigerator. (The chocolate might discolor a bit.) When thawing they might also sweat a little. Layering them between paper towels will help absorb the moisture.
