The Ultimate No-Spread Cut-Out Sugar Cookies: Perfect for Festive Decorating
There’s something truly magical about a batch of homemade cut-out sugar cookies, especially during the holiday season. They are the quintessential Christmas cookie, bringing joy and a delightful aroma to any home. This recipe isn’t just good; we consider it absolute perfection. These cookies are wonderfully tender, rich with buttery flavor, and, most importantly, they hold their shape beautifully without spreading during baking. This means your intricate cookie cutter designs will come out precisely as intended, making them ideal for all your festive decorating ambitions.

Whether you’re baking for Christmas, a birthday, or any special occasion, a reliable no-spread sugar cookie recipe is a baking essential. This guide will walk you through creating consistently perfect sugar cookies that are not only delicious but also a joy to decorate. Forget the frustration of distorted shapes; with our perfected technique, your cookies will be ready for dazzling embellishments every time.

Why This Cut-Out Sugar Cookie Recipe is a Must-Try
Our search for the perfect sugar cookie ends here. This recipe consistently delivers on all fronts, making it a favorite for seasoned bakers and beginners alike. Here’s why these festive cut-out sugar cookies will become your go-to:
- Perfect Texture: Enjoy slightly crisp edges that give way to wonderfully soft, tender centers. This delightful textural contrast makes every bite a pleasure.
- Unforgettable Buttery Flavor: Each cookie is infused with a rich, authentic buttery taste that truly stands out. Made with quality ingredients, the flavor profile is simple yet sophisticated, satisfying every sweet craving.
- No-Spread Guarantee: Say goodbye to misshapen cookies! This recipe is engineered so your cut-out sugar cookies maintain their precise shape during baking, ensuring your holiday trees, stars, and gingerbread men look exactly as intended. This is crucial for achieving professional-looking decorated cookies.
- The Best for Decorating: The flat, smooth surface of these baked cookies provides the perfect canvas for all your decorating ideas. Whether you prefer intricate royal icing designs, simple glazes, or colorful sprinkles, these cookies are ideal for showcasing your artistic flair.
- Shiny, Firm Icing: Our accompanying easy sugar cookie icing recipe hardens to a beautiful, glossy finish, adding a professional touch to your creations. It’s simple to make and dries perfectly, allowing for stacking and gifting without smudges.
While this beloved sugar cookie recipe has been shared before, we felt it deserved a significant update. The previous photos and details simply didn’t capture the true essence and perfection of these cookies. We’ve refined the instructions and added more comprehensive tips to ensure your baking experience is flawless.
If you’re looking for more delightful Christmas cookie ideas to add to your holiday baking list, be sure to explore our other festive favorites! Try our Italian butterball cookies, classic thumbprint cookies, comforting old fashioned molasses cookies, and elegant classic shortbread cookies. Each recipe offers a unique taste of holiday cheer!
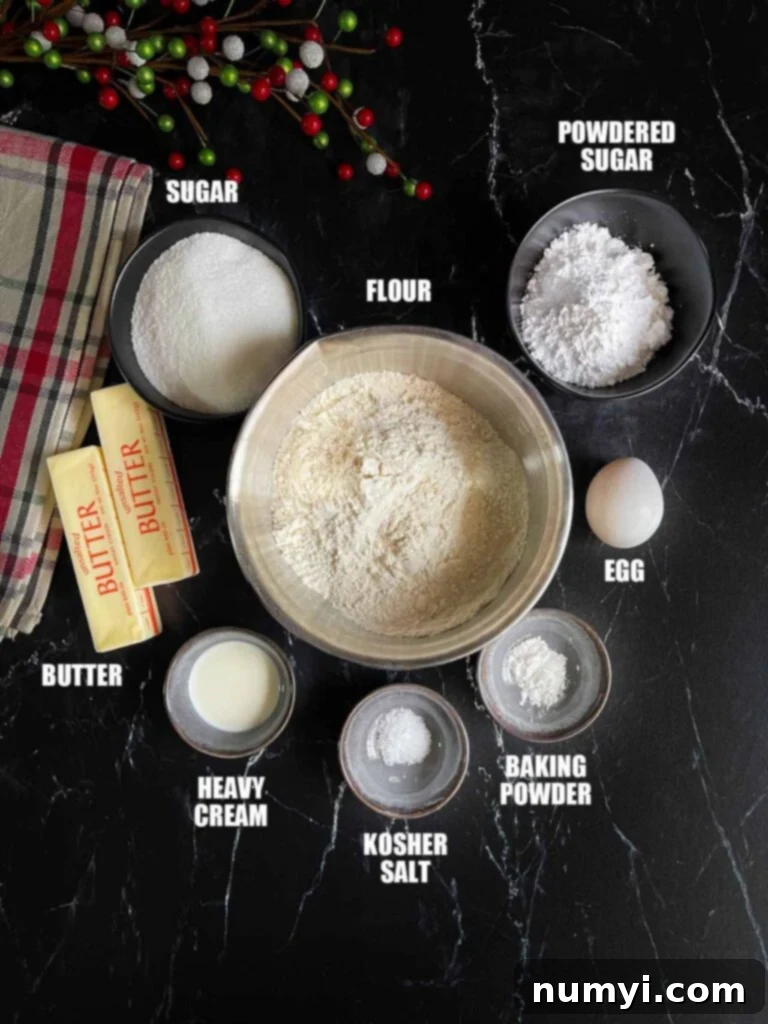
How to Make the Perfect Cut-Out Sugar Cookies
Creating these perfect cut-out sugar cookies is a rewarding process. Follow these detailed steps to achieve tender, buttery cookies that hold their shape every time.
- Prepare Dry Ingredients: In a medium bowl, sift together the all-purpose flour, baking powder, and salt. Sifting is crucial for achieving a light, airy texture and ensuring ingredients are evenly distributed. Set this mixture aside.
- Cream Butter and Sugar: In a large bowl of an electric stand mixer (or using a hand mixer), beat the softened room-temperature unsalted butter and granulated sugar together. Cream them until the mixture is light in color and fluffy. This step incorporates air, which contributes to the cookies’ tender texture.
- Incorporate Wet Ingredients: Add the beaten room-temperature egg and heavy cream to the butter-sugar mixture. Beat until just combined. Ensure your egg is at room temperature to prevent the butter from seizing.
- Combine Wet and Dry: With the mixer on low speed, gradually add the sifted dry ingredients to the wet mixture. Beat only until the flour is just incorporated and the dough begins to pull away from the sides of the bowl. Be careful not to overmix, as this can develop too much gluten, resulting in tough cookies.
- Chill the Dough: Divide the dough in half. Flatten each half into a disk, wrap tightly in plastic wrap, and refrigerate for at least 2 hours. For the best results and easiest handling, we often recommend chilling overnight. This crucial step solidifies the butter, which is key to preventing the cookies from spreading in the oven.

- Preheat Oven and Prep Baking Sheets: Preheat your oven to 375 degrees F (190 degrees C). Line your baking sheets with parchment paper or silicone mats. Avoid greasing the baking sheets with butter or cooking spray, as a slick surface can encourage spreading.
- Prepare Rolling Surface: Lightly dust a clean, large surface (like a countertop or heavy wood board) with confectioners’ sugar. Confectioners’ sugar is preferable to flour for rolling sugar cookie dough as it won’t make the baked cookies taste floury or dry.
- Roll and Cut Dough: Remove one wrapped dough disk from the refrigerator at a time. Lightly dust your rolling pin with confectioners’ sugar. Roll the dough out to an even thickness of 1/8 to 1/4 inch. We prefer 1/4 inch for a slightly thicker, softer cookie. Continuously move the dough around and check underneath to ensure it’s not sticking. If the dough becomes too warm and soft during rolling, place a cold cookie sheet on top for about 10 minutes to re-chill it. Use your desired cookie cutters to cut out shapes.
- Arrange on Baking Sheet: Carefully transfer the cut-out sugar cookies to the prepared parchment-lined baking sheet, spacing them about 1 inch apart. There’s no need to worry about them spreading, as they will perfectly hold their shape.

- Bake Cookies: Bake for 7-9 minutes, or until the edges are just beginning to turn a light golden color. Baking times can vary depending on your oven and cookie thickness, so watch them closely to avoid over-baking. Over-baked cookies will be too crispy.
- Cool Completely: Once baked, let the cookies cool on the baking sheet for about 2 minutes before carefully transferring them to a wire cooling rack to cool completely. It’s essential that the cookies are fully cooled before decorating to prevent the icing from melting or sliding off.
- Decorate as Desired: Once cooled, unleash your creativity! Decorate your beautiful sugar cookies with our easy homemade icing, sprinkles, or any embellishments you choose.

The cookie pictured above is a perfect (and hilarious) example of why my husband is no longer allowed to decorate. Yes, that’s a toothpick stabbed into the poor little guy’s tummy! It just goes to show that while the cookies are perfect, the decorating can be an adventure.
Simple & Shiny Sugar Cookie Icing Ingredients
Our easy sugar cookie icing is a fantastic alternative to traditional royal icing, offering a beautiful shine and a firm set without the fuss of egg whites. Here’s what you’ll need:
- Confectioners’ sugar (powdered sugar): The base of our icing, providing sweetness and a smooth consistency.
- Vanilla extract: Adds a classic, warm flavor that complements the buttery cookies perfectly. Use pure vanilla for the best taste.
- Light corn syrup: This secret ingredient is what gives the icing its lovely shine and helps it dry firm, making your decorated cookies stackable and gift-ready.
- Milk: Used to adjust the icing to your desired consistency. You can also use water.
- Pinch of salt: A tiny bit of salt enhances all the flavors, balancing the sweetness.
How to Make Easy Sugar Cookie Icing
Making this homemade sugar cookie icing is incredibly simple and yields beautifully glossy results that dry hard, similar to royal icing, but without the need for egg whites. Here’s how to whip it up:
- Combine Ingredients: In a medium bowl, combine the confectioners’ sugar, vanilla extract, light corn syrup, milk (or water), and a pinch of salt.
- Whisk Until Smooth: Whisk vigorously until all ingredients are thoroughly combined and the icing is completely smooth. You want a thick, yet pourable consistency that can hold a “ribbon” for a few seconds when drizzled from the whisk before melting back into the bowl.
- Adjust Consistency: If the icing is too thick, add ½ tablespoon more milk at a time until the desired consistency is reached. If it becomes too thin, gradually add 1 more tablespoon of confectioners’ sugar until it thickens up.
- Color and Decorate: Separate the smooth icing into small bowls or piping bags. Add your desired gel food coloring to each bowl and mix well. Gel colors are best as they don’t add excess liquid, maintaining the perfect consistency.
This icing dries perfectly with a beautiful shine, making your cookies look professionally decorated. While traditional royal icing often uses beaten egg whites and powdered sugar, our recipe offers a simpler, equally effective alternative. Some years, we opt for colorful decorating sugar and sprinkles, and other times we go all out with this smooth, shiny icing.

Aren’t they pretty for amateurs? I think we did an all-right job this year. My husband excluded! (Husband edit: I did a GREAT JOB!!)

We absolutely adore this recipe, and we sincerely hope Santa will enjoy these festive Christmas sugar cookies when he makes his special delivery this year!
Essential Tips to Keep Sugar Cookies From Spreading
The beauty of this cut-out sugar cookie recipe lies in its reliable ability to hold shape. I’ve personally never had these cookies spread, but understanding the underlying principles and following a few key tips will guarantee your success every time.
- Chill the Dough Thoroughly: This is arguably the most crucial step. Cold butter melts slower in the oven than room-temperature butter. By chilling the dough, you solidify the butter, which then takes longer to melt, allowing the cookie structure to set before the butter fully liquefies. This prevents the cookies from losing their shape. For best results, chill for at least 2 hours, or even overnight.
- Do Not Overmix the Dough: Overmixing develops gluten in the flour, which can make cookies tough. More importantly for cut-out cookies, it can incorporate too much air into the dough. This excess air can cause the cookies to puff up and then collapse, leading to spreading and a loss of definition in your shapes. Mix only until the ingredients are just combined.
- Line Your Baking Sheets Properly: Avoid using cooking spray or greasing your baking sheets with butter or shortening. These create a slick, greasy surface that causes the cookie dough to slide and spread. Instead, always line your baking sheets with parchment paper or silicone baking mats. These provide the necessary friction and insulation to help cookies hold their shape and bake evenly.
- Use Cool Baking Sheets: Never place fresh cookie dough on a warm or hot baking sheet. The residual heat will cause the butter in the dough to melt prematurely before the cookies even enter the oven, leading to immediate spreading. Always ensure your baking sheets are completely cool between batches.
- Measure Flour Correctly: Too little flour can lead to a dough that is too wet, making it more prone to spreading. Use the “spoon and level” method: gently spoon flour into your measuring cup until it overflows, then level off the excess with a straight edge (like a knife). Avoid scooping directly with the measuring cup, as this compacts the flour and results in too much.
Top Tips for Sugar Cookie Success
Achieving perfectly baked and decorated sugar cookies is easier with these tried-and-true tips:
- Accurate Flour Measurement: Always aerate your flour by fluffing it with a fork, then spoon it into your measuring cup and level it off with a straight edge. Don’t pack it down. Incorrect flour measurement is a common cause of spreading cookies.
- Room Temperature Ingredients: Ensure your butter and egg are at room temperature. This allows them to cream together properly, creating a smooth emulsion that holds air, which is essential for a tender cookie texture.
- Pure Vanilla Extract: For the best, most authentic flavor, always opt for pure vanilla extract over imitation vanilla. The difference in taste is significant.
- Chill Your Dough – It’s a Must!: This step cannot be emphasized enough. Chilling the sugar cookie dough is absolutely essential for these cookies to hold their shape during baking. Don’t skip it!
- Powdered Sugar for Cutters: Dip your cookie cutters in confectioners’ sugar (powdered sugar) before each cut. This simple trick prevents the dough from sticking to the cutters and makes for a cleaner release.
- Optimal Dough Thickness: Roll your dough out to an even thickness of 1/8 inch to 1/4 inch. If the dough is too thin, the cookies can become overly crispy or burn easily. We prefer a 1/4 inch thickness for a delightful, softer, and chewier cookie.
- Easy Icing Application: For precise and mess-free decorating, transfer your icing into a piping bag or a ziplock bag. Snip off a small corner of the bag to create a piping tip. This allows for controlled application, whether you’re outlining or flooding your cookies.
Exciting Sugar Cookie Variations
While classic vanilla sugar cookies are beloved, these cut-out cookies are also incredibly versatile! Here are some creative variations to try:
- Flavor Extracts: Substitute almond extract for vanilla extract for a distinct, nutty flavor, or try lemon, peppermint, or even rum extract for different seasonal twists.
- Colorful Toppings: Decorate with vibrant colored sugar or festive sprinkles. You can add them to the wet icing immediately after applying, or even sprinkle them directly onto the cut-out cookies before baking for a simpler look.
- Candy Embellishments: Press red hot cinnamon candies, mini chocolate chips, or small candied fruit pieces into the cookies before baking for added flavor and texture.
- Citrus Zest: Add 1-2 teaspoons of finely grated lemon or orange zest to the dough for a bright, aromatic cookie.
- Spiced Cookies: Incorporate a pinch of ground cinnamon, nutmeg, or cardamom into the dry ingredients for a warm, spiced flavor, perfect for the holidays.
Frequently Asked Questions About Cut-Out Sugar Cookies
The primary culprit is butter melting too quickly. When butter melts, it releases liquid, causing the dough to spread before its structure can set. This is why chilling the dough is so important – it resolidifies the butter, making it melt slower during baking. Additionally, overmixing the dough (which incorporates too much air that then collapses) or using greased baking sheets (which provide a slick surface) can also contribute to spreading. Always use parchment paper or silicone mats.
Yes, absolutely! You can re-roll the scraps of dough until all of it is used. However, after about 2-3 re-rollings, the dough tends to get warm and become more difficult to work with. It’s best to gather the scraps, gently form them into a disk, wrap them in plastic wrap, and refrigerate to chill them again for 15-30 minutes before rolling out for the next batch. This ensures your re-rolled cookies maintain their shape and tenderness.
Sugar cookies are typically done when their edges are just set and have barely begun to turn a light golden color. The centers should still look soft and slightly pale. It’s crucial not to overbake them if you want a tender, soft cookie. If they become deeply golden all over, they will likely be too crispy.
For this recipe, we highly recommend rolling the dough to 1/4 inch thickness. This provides the perfect balance of size and texture, resulting in a soft, slightly chewy cookie that is robust enough to handle decorating. You can roll them to 1/8 inch if you prefer a crispier, thinner cookie, but be extra careful not to overbake.
Once your frosted or iced cookies are completely set (the icing is firm to the touch), store them in an airtight container or bag at room temperature. They will remain fresh and delicious for 2 to 3 weeks. If unfrosted, they can last a bit longer, typically up to 4 weeks, when stored properly.
Unfrosted baked cookies freeze exceptionally well for up to 3 months. Place them in a single layer on a baking sheet to freeze until solid, then transfer to a freezer-safe, airtight container or resealable bag, separating layers with parchment paper. You can also freeze the dough: form it into discs, wrap tightly, and freeze for up to 2 months. Thaw the dough overnight in the refrigerator before proceeding with cutting and baking. For ultimate convenience, cut out your cookie shapes, place them on a parchment-lined baking sheet, freeze until hard, then transfer the frozen unbaked cookies to a freezer-safe bag or container. Bake from frozen, adding a couple of minutes to the baking time.
Yes, you can freeze frosted sugar cookies, but with some caveats. Ensure the icing is completely set and hard before placing them in a freezer-safe container. While they will still be delicious, the quality of the frosting and intricate decorations might not be as vibrant or pristine once they are thawed. Some colors may bleed slightly, and the texture of the icing might change.
More Delicious Cookie Recipes to Explore
If you loved making these cut-out sugar cookies, you’ll surely enjoy these other fantastic cookie recipes perfect for any occasion:
Eggnog Cookies (cut out)
Best Spicy Cut-Out Gingerbread Cookies
Italian Fig Cookies (Cucidati)
Are you on Pinterest? Click the button below to add this recipe to one of your boards!

Cut-Out Sugar Cookies Recipe
Print
Pin
Rate
Ingredients
Cookies
- 3 cups all-purpose flour
- ¾ teaspoon baking powder
- ½ teaspoon salt
- 1 cup unsalted butter softened, room temperature
- 1 cup granulated sugar
- 1 large egg beaten, room temperature
- 1 tablespoon heavy cream
- Powdered sugar for rolling out the dough
Sugar Cookie Icing
- 1½ cups confectioners’ sugar
- ½ teaspoon vanilla extract
- 1 teaspoon light corn syrup
- 3 tablespoons milk or water, adjust as needed for consistency
- pinch of salt
Instructions
-
Sift together the all-purpose flour, baking powder, and salt in a medium bowl. Set aside.3 cups all-purpose flour, ¾ teaspoon baking powder, ½ teaspoon salt
-
In a large bowl of an electric stand mixer, cream together the softened unsalted butter and granulated sugar until light in color and fluffy.1 cup unsalted butter, 1 cup granulated sugar
-
Add the beaten egg and heavy cream to the butter mixture and beat until just combined. With the mixer on low speed, gradually add the sifted dry ingredients, beating only until the mixture comes together and pulls away from the sides of the bowl. Do not overmix.1 large egg, 1 tablespoon heavy cream
-
Divide the dough in half. Flatten each half into a disk, wrap tightly in plastic wrap, and refrigerate for a minimum of 2 hours, or preferably overnight, to chill thoroughly.
-
Preheat your oven to 375 degrees F (190 degrees C). Prepare your baking sheets by lining them with parchment paper or silicone mats.
-
Lightly sprinkle your rolling surface (a countertop or large board) with confectioners’ sugar.Powdered sugar
-
Remove one wrapped dough disk from the refrigerator. Sprinkle your rolling pin with powdered sugar and roll the dough out to an even ¼-inch thick. Frequently move the dough and check underneath to prevent sticking. If the dough becomes too warm and soft, place a cold cookie sheet on top for 10 minutes to re-chill.
-
Using your desired cookie cutters, cut out shapes. Place the cut-out cookies at least 1-inch apart on the parchment-lined baking sheet. If desired, decorate with colored sugars before baking. Bake for 7-9 minutes, or until the edges are just beginning to turn a pale golden brown. Let sit on the baking sheet for about 2 minutes after removal from the oven, then transfer to a wire rack to cool completely.
-
For the Sugar Cookie Icing:
-
In a medium bowl, whisk together the confectioners’ sugar, vanilla extract, light corn syrup, milk, and a pinch of salt until smooth and lump-free.1½ cups confectioners’ sugar, ½ teaspoon vanilla extract, 1 teaspoon light corn syrup, 3 tablespoons milk, pinch of salt
-
The icing should be quite thick but still flowable. To test consistency, drizzle a small amount with the whisk; a ribbon of icing should hold its shape for a few seconds before melting back into the bowl. If too thick, add ½ tablespoon more milk. If too thin, add 1 more tablespoon of confectioners’ sugar. Once cooled, decorate your cookies as desired.
Notes
You can re-roll dough scraps. After about 2 re-rollings, gather the dough, wrap in plastic wrap, and refrigerate for 15-30 minutes to chill again before rolling to maintain consistency and prevent spreading.
Storing – Allow frosted or iced cookies to be fully set up (icing firm to the touch), then store them in an airtight container or bag for 2 to 3 weeks at room temperature.
Freezing – Unfrosted cookies will freeze well for up to 3 months in a freezer-safe, air-tight container or resealable bag. Freeze them in a single layer until solid before transferring to a bag/container.
Alternatively, you can freeze the dough discs for up to 2 months. Thaw the dough in the refrigerator overnight and then proceed with cutting and baking.
You can also cut cookie dough shapes, place them on a baking sheet lined with parchment paper, and freeze them until hard. Then, transfer the frozen unbaked cookies to a freezer-safe bag or container and bake from frozen, adding a couple of minutes to the baking time.
You can also freeze decorated (frosted) sugar cookies, but let the icing set up completely before freezing. Be aware that the quality of the frosting and decorations (e.g., color vibrancy, texture) may not be as good once they are thawed.
