The Best Homemade Pumpkin Chocolate Chip Scones for Fall
There’s nothing quite like the crisp air, changing leaves, and the comforting aroma of fall spices filling your home. If you’re eager to embrace the magic of pumpkin season, then look no further! This recipe for Pumpkin Chocolate Chip Scones is an absolute must-try. The harmonious blend of earthy pumpkin and rich, sweet chocolate chips creates a flavor combination that truly warms the heart and captures the essence of autumn. These delightful scones are not just a treat; they’re the perfect way to start a chilly fall morning or enjoy a cozy afternoon with a hot beverage.
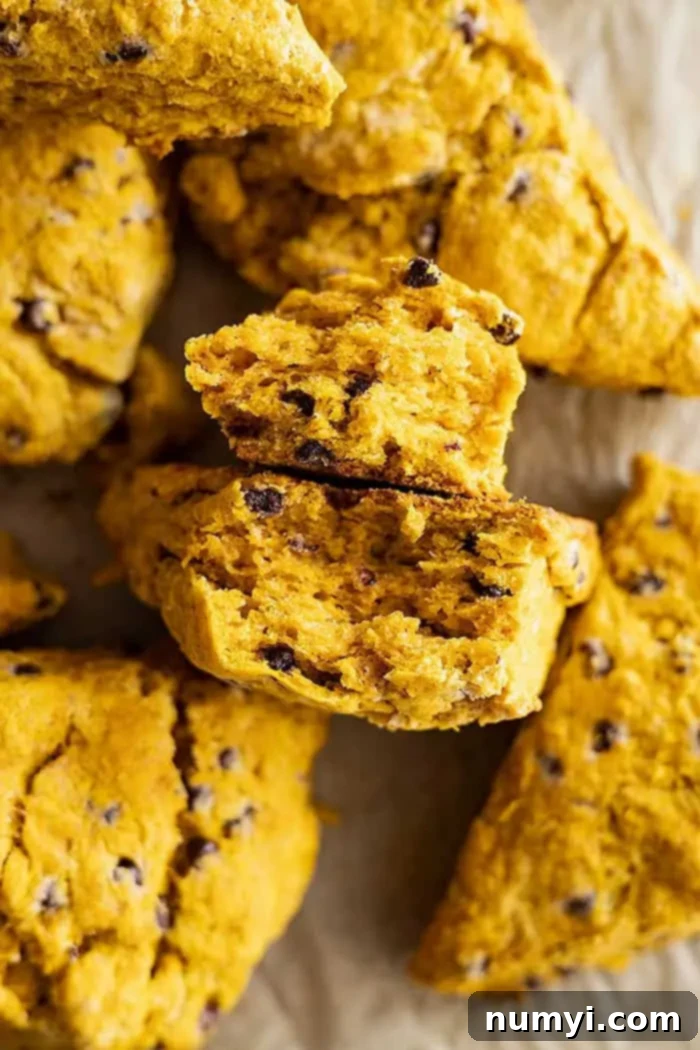
Imagine biting into a tender, flaky scone, where every mouthful offers the comforting spice of pumpkin perfectly balanced with pockets of melted chocolate. Whether you enjoy them with your morning coffee, as an elegant addition to brunch, or simply when your sweet tooth calls, these homemade pumpkin scones are incredibly simple to make and guaranteed to be a family favorite!

*Originally published September 2015. Photos, recipe, and text updated for enhanced clarity and SEO.*
Are you completely enamored with pumpkin spice and eager for more autumnal delights? I have plenty more pumpkin-infused tricks up my sleeve! Be sure to explore this incredibly simple and delicious Pumpkin Dump Cake for an effortless dessert, or dive into the timeless comfort of a Classic Pumpkin Pie, perfect for any fall gathering.
Why These Pumpkin Chocolate Chip Scones Will Become Your Fall Favorite:
- Embrace the Full Fall Spirit: If the vibrant changing leaves and crisp autumn air aren’t quite enough to ignite your seasonal excitement, these pumpkin chocolate chip scones certainly will! Their irresistible aroma of cinnamon and pumpkin pie spice will instantly transport you to a cozy fall wonderland, making every bite feel like a warm hug. It’s the ultimate edible expression of autumn.
- Effortlessly Easy to Make: Don’t be intimidated by homemade baking! This recipe is designed for simplicity, requiring just four straightforward steps from start to finish. You’ll be amazed at how quickly you can create these delicious fall delights, making them perfect for both seasoned bakers and kitchen novices.
- Fantastic for Freezing and Meal Prep: Planning ahead? These pumpkin scones are incredibly freezer-friendly! You can easily bake a larger batch and store the completely cooled scones in an airtight, freezer-safe container for up to three months. This means you can always have a delicious, homemade fall treat ready to go, perfect for unexpected guests or quick breakfast solutions.
- The Ultimate Fall Breakfast Goal: Picture this: a cozy morning, a perfectly flaky and tender chocolatey pumpkin scone, and a steaming mug of hot coffee or tea. Doesn’t that sound like the quintessential fall breakfast? It’s a moment of pure bliss, offering comfort and indulgence in every bite.
- A Unique Flavor Combination: The pairing of sweet pumpkin puree with warm spices and semi-sweet chocolate chips is truly exceptional. The pumpkin adds moisture and a subtle earthiness, while the chocolate provides a delightful contrast, creating a balanced and addictive flavor profile that’s perfect for the season.
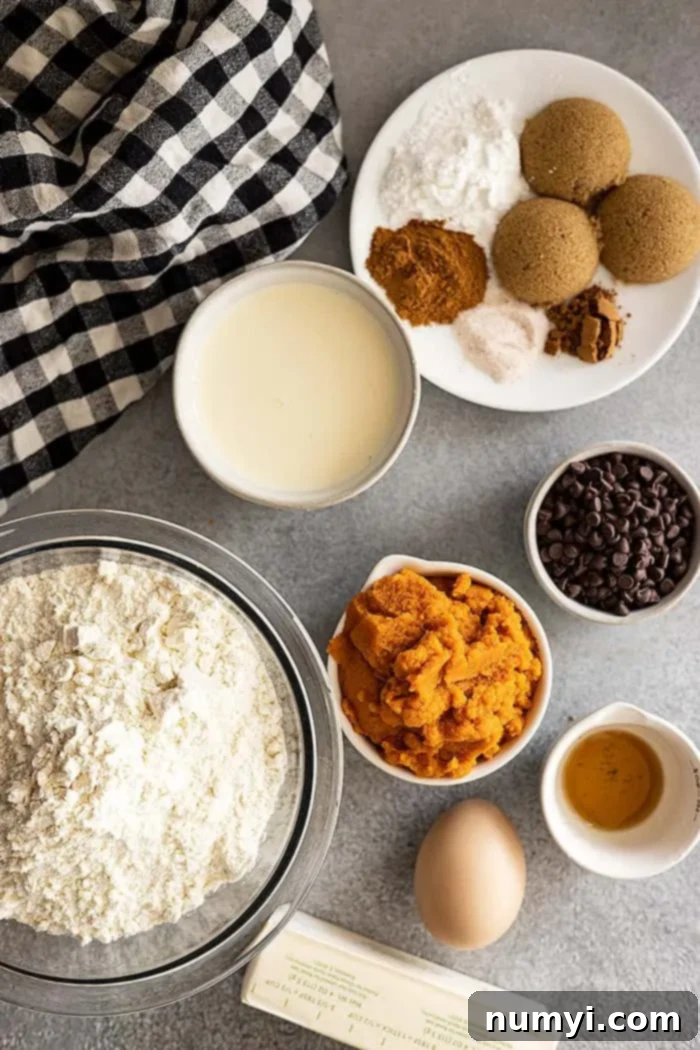
Key Ingredients for Perfect Pumpkin Chocolate Chip Scones:
Creating truly outstanding scones starts with understanding the role of each ingredient. Here’s a closer look at what makes these pumpkin chocolate chip scones so special:
- Dry Ingredients – The Flavor and Structure Base: We keep it wonderfully simple. You’ll need all-purpose flour for the structural foundation, brown sugar to add a subtle molasses note and moisture, baking powder for that essential lift and fluffiness, cinnamon and pumpkin pie spice to infuse the irresistible fall flavor, and a touch of salt to balance and enhance all the sweet notes.
- Cold Butter – The Secret to Flaky Texture: When I emphasize “cold,” I truly mean it! Using very cold butter, cut into small pieces, is paramount for achieving that signature tender, flaky scone texture. As the cold butter melts in the oven, it creates pockets of steam, which separate the layers of dough, resulting in a light and airy interior. Don’t skip this critical step!
- An Egg and Heavy Cream – For Richness and Binding: These liquid ingredients are essential for bringing the dough together and contributing to the scones’ luxurious texture. The egg adds richness and helps bind everything, while heavy cream provides an unmatched tenderness and a wonderfully moist crumb, far superior to using milk.
- Canned Pumpkin – The Heart of the Fall Flavor: Of course, pumpkin takes center stage in this autumnal scone recipe (closely followed by the chocolate chips!). Canned pumpkin puree adds not only its distinctive flavor but also crucial moisture and a beautiful orange hue to the scones. Make sure you’re using 100% pure pumpkin puree, not pumpkin pie filling, which contains added spices and sugar.
- Vanilla Extract – A Touch of Aromatic Sweetness: A little vanilla extract goes a long way in enhancing and complementing the warm flavors of pumpkin and spices. It adds a layer of aromatic sweetness that rounds out the overall taste profile of these delicious scones.
- Semi-Sweet Chocolate Chips – The Perfect Sweet Counterpart: I chose semi-sweet chocolate chips for this recipe because their balanced sweetness pairs beautifully with the pumpkin and spice without overpowering them. They melt into lovely pockets throughout the scone, providing a delightful contrast and a rich chocolatey flavor. If you prefer a bolder chocolate presence, feel free to adjust the type!
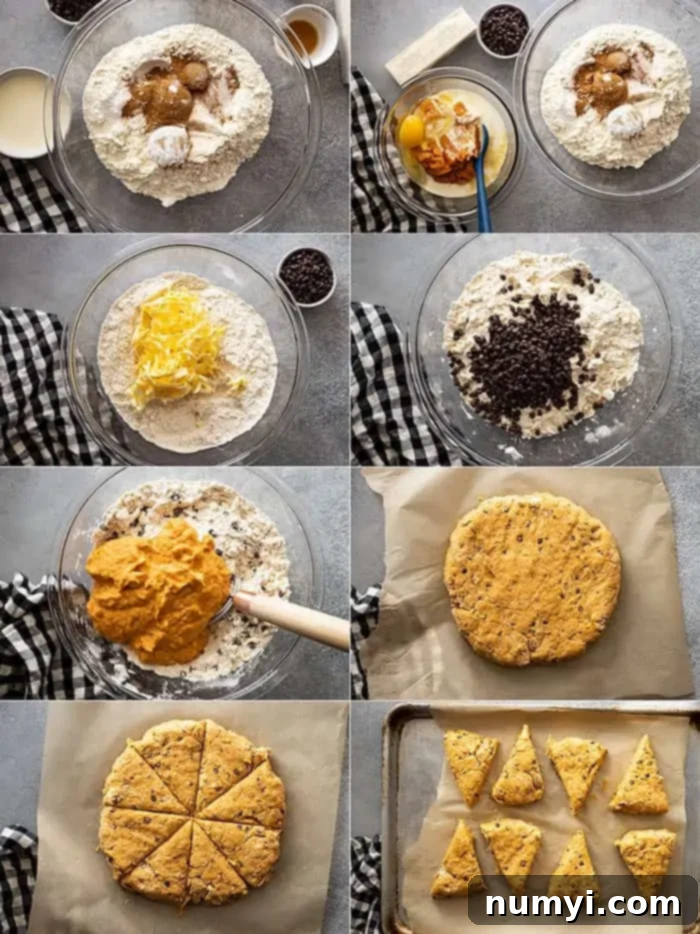
How to Make Delicious Pumpkin Chocolate Chip Scones:
Making these delightful pumpkin scones is a straightforward process, ensuring you’ll have warm, freshly baked treats in no time. Follow these simple steps for scone perfection:
- Prepare Your Baking Station: First things first, preheat your oven to 400°F (200°C). Then, line a baking sheet with parchment paper or lightly grease it. This prevents sticking and ensures easy cleanup.
- Combine Dry Ingredients and Cut in Butter: In a large mixing bowl, whisk together the all-purpose flour, brown sugar, baking powder, cinnamon, pumpkin pie spice, and salt until well combined. Next, add the small pieces of cold butter. Using a pastry blender, two knives, or even your fingertips (working quickly to keep the butter cold), cut the butter into the dry mixture until it resembles coarse crumbs, similar to small peas. This is crucial for a flaky scone.
- Incorporate Wet Ingredients and Chocolate: Create a small well in the center of your dry mixture. Add the large egg, canned pumpkin puree, heavy cream, vanilla extract, and semi-sweet chocolate chips. Stir gently with a spoon or spatula, just until the ingredients start to come together and pull away from the sides of the bowl. Be careful not to overmix; a shaggy dough is perfectly fine.
- Shape the Dough: Turn the scone dough out onto a lightly floured surface. Gently knead the dough about 10 times – no more! Over-kneading will develop the gluten and result in tough scones. Lightly roll or pat the dough into an 8-inch circle, aiming for an even thickness.
- Cut and Arrange: Carefully transfer the dough circle onto your prepared baking sheet. Using a sharp knife or a pastry cutter, cut the circle into 8 equal wedges. Gently space these wedges out evenly on the baking sheet, allowing a little room between each scone for even baking.
- Bake to Golden Perfection: Finally, bake the pumpkin scones for 18-22 minutes, or until they are lightly browned on top and feel firm to the touch. The internal temperature should reach around 200-210°F (93-99°C). Once baked, let them cool slightly on the baking sheet before transferring them to a wire rack. Serve warm and enjoy!

Expert Tips and Delicious Variations for Your Scones:
While these pumpkin chocolate chip scones are perfect as is, here are some tips and variations to help you customize them or ensure even greater success:
- Customize Your Chocolate (or Go Without!): Not a huge fan of chocolate? No problem! You can omit the chocolate chips entirely, or swap them for something else that tickles your fancy. Consider adding chopped walnuts or pecans for a nutty crunch, or dried cranberries for a tart counterpoint to the pumpkin spice. For an even richer chocolate experience, try using dark chocolate chips instead of semi-sweet, or even a mix of milk and dark chocolate.
- Homemade Pumpkin Pie Spice Blend: If you find yourself without a pre-made pumpkin pie spice blend, there’s no need to run to the store! You can easily whip up your own homemade version with common pantry spices. Check out this simple guide for homemade pumpkin pie spice to keep your baking plans on track.
- Elevate with a Simple Glaze: To take these delicious scones to the next level of indulgence, whip up a quick and easy glaze. Simply combine about 1 cup of confectioners’ sugar with 2-3 tablespoons of milk (or heavy cream for a richer glaze) and a splash of vanilla extract. Whisk until smooth, then drizzle generously over the cooled scones.
- Don’t Overmix the Dough: This is arguably the most important scone tip! Overmixing develops gluten, which leads to tough, chewy scones rather than light and flaky ones. Mix until the ingredients are just combined and the dough barely comes together.
- Brush for a Golden Top: For an extra golden-brown crust and a slight sheen, brush the tops of the scones with a little extra heavy cream or an egg wash (one egg whisked with a tablespoon of water) before baking.
- Chill for Stability: If your kitchen is warm or if you want perfectly shaped scones, you can chill the cut scone wedges in the refrigerator for 15-20 minutes before baking. This helps solidify the butter, leading to better rise and flakiness.
Frequently Asked Questions About Pumpkin Chocolate Chip Scones:
- Can I use my own homemade pumpkin puree instead of canned?
Absolutely! While canned pumpkin puree offers convenience and consistent results, using your own homemade pumpkin puree can be a rewarding experience. To do so, bake a sugar pumpkin or a pie pumpkin until very tender, scoop out the flesh, and then puree it in a food processor until smooth. Just ensure your homemade puree is thick and not too watery, as excess moisture can affect the scone’s texture.
- Can I make this recipe dairy-free?
Yes, you can adapt this scone recipe to be dairy-free, but be aware that the texture and density of the scones will differ slightly from those made with heavy cream and dairy butter. If you’re going dairy-free, I recommend using a high-fat, full-fat canned coconut milk (the thick cream part) as a substitute for heavy cream, and a good quality dairy-free butter alternative for the cold butter. The fat content is crucial for the scone’s tenderness.
- How do I know when my scones are fully baked?
Scones are typically done when they are lightly golden brown on the top and bottom. They should also feel firm to the touch when gently pressed. If you have a kitchen thermometer, the internal temperature should be around 200-210°F (93-99°C).
- Why are my scones tough?
Tough scones are usually a result of overworking the dough. When you over-knead or overmix, you develop the gluten in the flour too much, leading to a dense, chewy texture. Remember to mix the wet and dry ingredients just until they come together, and knead very gently, only about 10 times.
- Can I make the scone dough ahead of time?
Yes, you can! You can prepare the dough, cut it into wedges, and then place the unbaked scones on a baking sheet lined with parchment paper. Cover them tightly with plastic wrap and refrigerate for up to 24 hours. You can bake them straight from the fridge, though you might need to add a few extra minutes to the baking time.
Other Delicious Pumpkin Recipes You Might Enjoy:
If these pumpkin chocolate chip scones have sparked your love for all things pumpkin, be sure to check out these other fantastic recipes that celebrate the season’s favorite gourd:
- Classic Pumpkin Pie: A timeless dessert perfect for holidays or any fall occasion.
- Pumpkin Cake with Cream Cheese Frosting: A moist and flavorful cake, elevated by a rich and tangy cream cheese frosting.
- No-Churn Pumpkin Ice Cream: A surprisingly easy and refreshing way to enjoy pumpkin, without an ice cream maker!
- Creamy Pumpkin Hot Chocolate: The ultimate cozy drink, combining warm chocolate with comforting pumpkin spice.
- Pumpkin Dump Cake: An incredibly simple yet satisfying dessert that’s perfect for a crowd.
- Savory Pumpkin Rolls: A delicious twist on pumpkin, these rolls are perfect alongside your favorite fall meals.
HUNGRY FOR MORE? Subscribe to my newsletter and follow along on Pinterest, Facebook, and Instagram for all my latest updates and delicious recipes!
Pumpkin Chocolate Chip Scones

Ingredients
- 2 ½ cups (340g) all purpose flour
- 3 tablespoons brown sugar
- 1 tablespoon baking powder
- 1 teaspoon cinnamon
- ½ teaspoon pumpkin pie spice
- ½ teaspoon salt
- ½ cup cold butter, cut into small pieces
- 1 large egg
- 1 cup (240g) canned pumpkin puree
- ¼ cup (60ml) heavy cream OR half and half
- 1 teaspoon vanilla extract
- ½ cup (90g) mini semi-sweet chocolate chips
Instructions
-
Preheat oven to 400 degrees F. Line a baking sheet with parchment paper or lightly grease and set aside.
-
In a large bowl combine the flour, brown sugar, baking powder, spices and salt. Cut in the butter using a pastry blender or crisscrossing 2 knives, until mixture looks like coarse crumbs. Stir in the egg, pumpkin, cream, vanilla and chocolate chips just until it starts to come together and leave the sides of the bowl.
-
Turn out onto a lightly floured surface and gently knead 10 times. Roll or pat out into an 8″ circle. Place on the prepared baking sheet. Cut into 8 wedges using a sharp knife and separate into wedges.
-
Bake for 18-22 minutes or until lightly browned.
Notes
- STORAGE: Store completely cooled leftovers at room temperature well covered for up to 2 days.
- FREEZER FRIENDLY: Store completely cooled leftovers in a freezer safe container for up to 3 months. Thaw overnight on the counter.
- PUMPKIN PIE SPICE: If you don’t have pumpkin pie spice replace it with the following: ¼ teaspoon ground ginger, ⅛ teaspoon ground nutmeg, and ⅛ teaspoon ground clove
- I prefer to use cream or half and half in scone recipes for the best texture. You can replace it with milk or even a dairy free milk but it WILL change the texture of the scone.
Nutrition
