Irresistible No Bake Cookies and Cream Pie: Your Ultimate Easy Oreo Dessert Recipe
Imagine a dessert that requires no oven, comes together in a flash, and delivers an explosion of classic cookies and cream flavor with every bite. Our Irresistible No Bake Cookies and Cream Pie is precisely that – a dream come true for dessert lovers and busy home cooks alike. This incredibly easy recipe is perfect for any occasion, from a casual weeknight treat to an impressive summer gathering. Its cool, creamy texture and delightful flavor profile make it an instant favorite, especially when the weather calls for a dessert that won’t heat up your kitchen. Get ready to impress with minimal effort and maximum deliciousness!

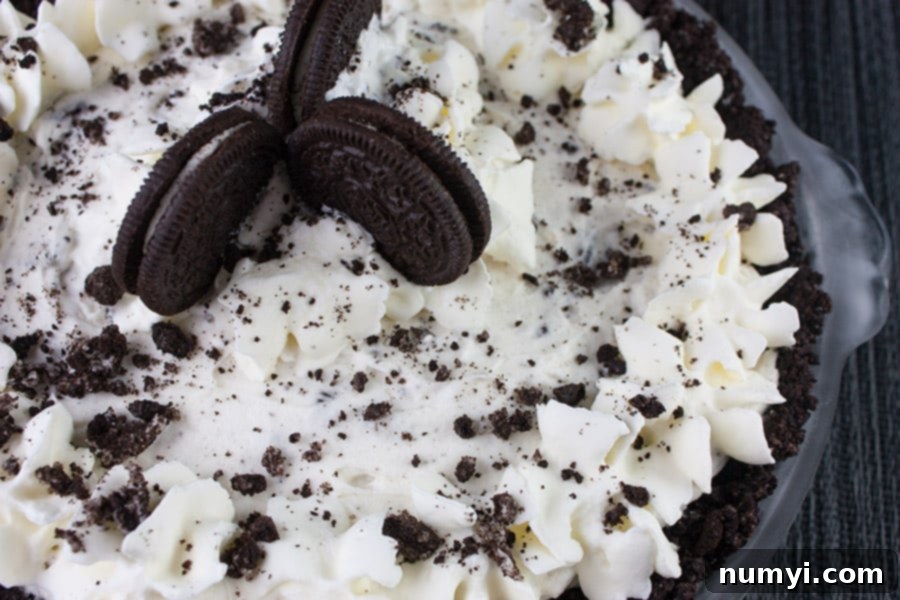
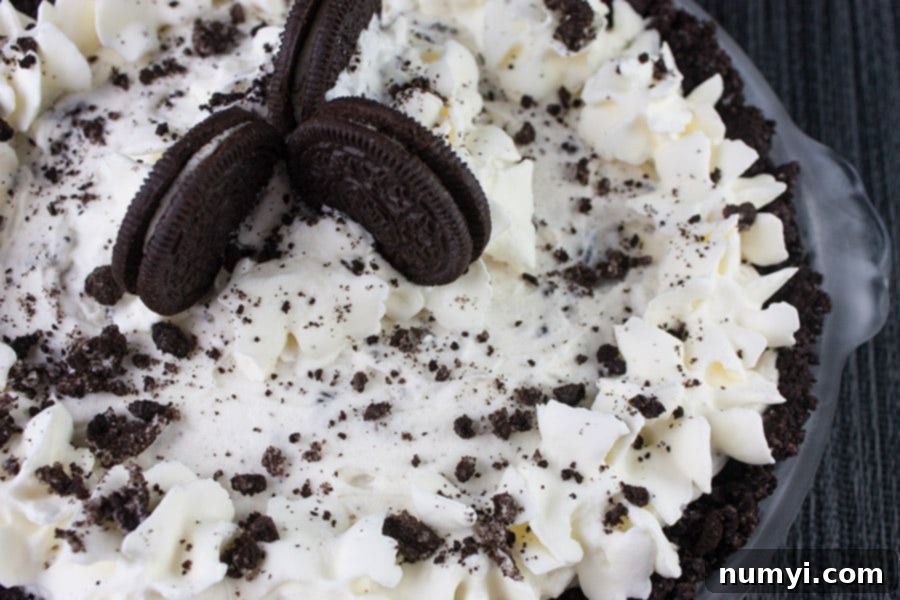
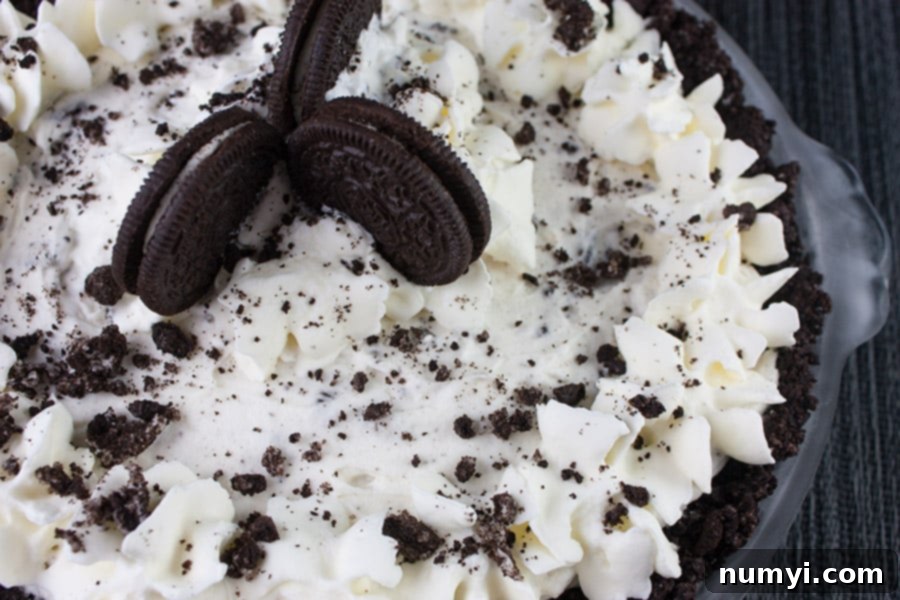
This delightful pie features a rich, buttery Oreo cookie crust generously studded with crunchy cookie pieces, providing a perfect textural contrast. The star of the show, however, is the incredibly creamy, dreamy filling, packed with more crushed Oreo cookies. It’s a cool, refreshing, and utterly delightful dessert that’s surprisingly simple and quick to whip up. You’ll spend more time waiting for it to chill than you will on actual prep, making it an ideal choice for last-minute cravings or entertaining.
Looking for another delightful treat? Try our Strawberry Shortcake!
The Magic of No Bake Cookies and Cream Pie
One of the greatest advantages of a no-bake dessert is its sheer simplicity. This particular Cookies and Cream Pie is so straightforward that you won’t need intricate step-by-step prep photos to guide you. It’s an excellent recipe for beginners, busy parents, or anyone who wants a fantastic dessert without the fuss of baking. The process is broken down into easily manageable steps, ensuring a perfect result every time.
Crafting the Perfect Oreo Crust
The foundation of this incredible pie is its irresistible Oreo cookie crust. To achieve this, you’ll need to transform whole Oreo cookies into fine crumbs. A food processor is your best friend here, making quick work of grinding the cookies to the perfect consistency. If you don’t have a food processor, a heavy-duty zip-top bag and a rolling pin will also do the trick – just ensure the crumbs are as fine as possible for a solid crust. Once crushed, these dark, chocolatey crumbs are combined with melted butter. This mixture creates a firm, flavorful base that holds the creamy filling beautifully. Press it evenly into a 9-inch pie plate, making sure to push it up the sides as well. A flat-bottomed glass or measuring cup can help you achieve a perfectly even and compact crust. After pressing, a quick chill in the refrigerator helps the crust set, becoming firm and ready for its delicious filling.
Whipping Up the Dreamy Filling
The filling is where the magic truly happens. It’s a combination of two key components: light, airy whipped cream and a rich, tangy cream cheese mixture. First, in a medium bowl, beat fresh whipping cream until it forms stiff peaks. This requires a cold bowl and cold cream for the best results. Set this aside, as it will be gently folded in later to maintain its airy texture. In a separate, larger bowl, beat softened cream cheese with sugar until it’s light and fluffy. Ensuring your cream cheese is at room temperature is crucial for a smooth, lump-free filling. Once the cream cheese mixture is perfectly fluffy, carefully fold in the stiffly whipped cream. This folding technique is important to keep the filling light and voluminous. Finally, gently stir in chopped Oreo cookies, adding pockets of delightful crunch and intense cookie flavor throughout the creamy filling. Spoon this luscious mixture into your prepared Oreo crust, spreading it evenly to create a smooth top.
The Art of Chilling and Setting
Patience is a virtue, especially when it comes to no-bake pies. For this Cookies and Cream Pie to achieve its ideal firm and sliceable consistency, it needs ample time to chill. Refrigerate the pie for at least 4 hours. However, for the absolute best results and a perfectly set pie, we highly recommend letting it set up overnight. This extended chilling time allows all the flavors to meld together beautifully and ensures the pie holds its shape when sliced, making for an effortless serving experience.
The Perfect Finishing Touches
Once your pie has chilled to perfection, it’s time for the grand finale – garnishing! While optional, a beautiful topping elevates this already fantastic dessert. You can beat additional whipping cream until stiff peaks form, sweeten it lightly with confectioners’ sugar, and pipe it onto the pie for an elegant touch. Alternatively, a simple dollop of store-bought whipped topping works wonderfully for an even quicker finish. A final sprinkle of crushed Oreo cookies on top adds both visual appeal and an extra burst of flavor and texture. No matter how you choose to top it, the added garnishes make this pie look as incredible as it tastes.
Slice, serve, and enjoy! Each bite offers a delightful journey through creamy, sweet, and crunchy textures, making it a truly satisfying dessert experience.
This No Bake Cookies and Cream Pie has become a cherished staple in our household. The universal appeal of cookies and cream makes it a guaranteed crowd-pleaser, and it’s particularly adored by my daughter. Watching her eyes light up when this pie makes an appearance is truly priceless. It’s a testament to how simple ingredients can come together to create something truly magical and memorable.
Don’t forget to check out our Monster Cookies for another fantastic cookie-inspired recipe!
Tips for No Bake Pie Success
Achieving the perfect No Bake Cookies and Cream Pie is incredibly easy, but a few simple tips can elevate your dessert from good to absolutely outstanding:
- Use Full-Fat Ingredients: For the creamiest, richest filling, opt for full-fat cream cheese and heavy whipping cream. Low-fat alternatives might affect the texture and how well the pie sets.
- Soften Cream Cheese Properly: Ensure your cream cheese is at room temperature before beating it. This prevents lumps and ensures a smooth, fluffy mixture. You can speed up the softening process by cutting it into cubes and letting it sit for about 30 minutes.
- Cold Whipping Cream and Bowl: For best results when whipping cream, make sure both the cream and your mixing bowl (and beaters, if possible) are well chilled. This helps the cream whip up faster and achieve firm, stable peaks.
- Don’t Overmix the Whipped Cream into the Cream Cheese: Once you’re folding the whipped cream into the cream cheese mixture, do so gently and only until just combined. Overmixing can deflate the whipped cream, leading to a less airy filling.
- Crucial Chilling Time: Do not skimp on the refrigeration time. While 4 hours is the minimum, an overnight chill is truly ideal. This allows the pie to fully set, making it easier to slice cleanly and ensuring the texture is perfect.
- Quality Oreos: While any chocolate sandwich cookie can work, classic Oreos provide that signature flavor that makes this pie truly special.
Exciting Variations and Customizations
This No Bake Cookies and Cream Pie recipe is fantastic as is, but it also provides a wonderful canvas for creativity. Feel free to experiment with these variations to make it your own:
- Different Cookie Crusts: Instead of classic Oreos, try Golden Oreos for a vanilla twist, graham crackers for a traditional cheesecake crust, or even Nilla Wafers for a milder flavor.
- Flavor Extracts: Add a teaspoon of peppermint extract to the cream cheese filling for a festive holiday pie, or almond extract for a subtle nutty note. Vanilla extract can always be added to enhance the overall flavor profile.
- Add-ins for the Filling: Fold in miniature chocolate chips, white chocolate chips, chopped toffee bits, or even a swirl of caramel sauce into the filling for extra indulgence.
- Fruit Enhancements: While not traditional for cookies and cream, a layer of sliced bananas or fresh berries could be added on top of the crust before adding the filling for a refreshing twist.
- Chocolate Drizzle: A simple chocolate ganache or melted chocolate drizzled over the top of the chilled pie before serving adds an extra layer of decadence and visual appeal.
- Seasonal Themes: For Halloween, use orange Oreos. For Valentine’s Day, use red velvet Oreos. The possibilities are endless!
Serving and Storage Suggestions
This pie is best served chilled. To get clean slices, use a sharp knife that has been run under hot water and wiped clean between each cut. This will prevent the filling from sticking and create a beautiful presentation. Pair it with a cup of coffee or a glass of milk for the ultimate comfort dessert.
Storage: Store any leftover pie loosely covered with plastic wrap or in an airtight container in the refrigerator for up to 3-4 days. While it’s best enjoyed within the first two days, it will still be delicious for a few more.
Freezing: You can freeze this pie! Wrap it tightly in plastic wrap, then a layer of aluminum foil, and freeze for up to 1 month. Thaw in the refrigerator for several hours or overnight before serving. The texture might be slightly different after freezing, but it will still be incredibly tasty.
Frequently Asked Questions (FAQs)
- Can I use a store-bought pie crust?
- Absolutely! Using a pre-made Oreo pie crust is a great shortcut and will save you even more time. Just be sure to still have extra Oreos on hand for the delicious filling!
- Why didn’t my pie set properly?
- The most common reasons for a pie not setting are insufficient chilling time or not whipping the cream to stiff peaks. Ensure you refrigerate the pie for at least 4 hours, or ideally overnight, and that your whipping cream is firm before folding it into the cream cheese mixture.
- Can I make this pie ahead of time?
- Yes, this pie is an excellent make-ahead dessert! In fact, making it the day before allows it ample time to chill and firm up, making serving much easier and enhancing the flavors. Just keep it covered in the refrigerator.
- What kind of cream cheese should I use?
- Always use full-fat block cream cheese, not cream cheese spread or whipped cream cheese. The block cream cheese provides the necessary structure and richness for the filling.
- Can I use a different type of cookie?
- While Oreos are classic, you can certainly experiment! Other sandwich cookies, chocolate chip cookies, or even shortbread cookies could work, though the flavor profile will change. If using a different cookie, ensure it’s suitable for crushing into a crust and mixing into a creamy filling.
This No Bake Cookies and Cream Pie is more than just a dessert; it’s an experience of pure delight and effortless creation. Its rich flavors, satisfying textures, and minimal preparation make it a standout recipe that you’ll return to again and again. So go ahead, whip up this amazing treat, and share the joy of homemade deliciousness!

No Bake Cookies and Cream Pie Recipe
Print
Pin
Rate
Ingredients
- 36 Oreo Cookies, divided
- 6 Tablespoons butter, melted
- 1 8 ounces cream cheese, softened
- 3/4 cup sugar
- 1 cup whipping cream
Topping:
- 1 cup whipping cream
- 2 Tablespoons confectioners’ sugar
- Garnish with crushed cookies
Instructions
-
Crush 26 of the Oreo cookies into fine crumbs, either using a food processor or by placing them in a sealed bag and crushing with a rolling pin. Mix these crumbs with the melted butter until thoroughly combined, then press the mixture firmly and evenly into the bottom and up the sides of a 9-inch pie plate. Refrigerate the crust while you prepare the filling.
-
Roughly chop the remaining 10 Oreo cookies and set them aside. These will be folded into the creamy filling.
-
In a medium-sized bowl, using an electric mixer, beat 1 cup of cold whipping cream until stiff peaks form. Be careful not to overbeat. Set aside.
-
In a large bowl, beat the softened cream cheese and sugar together with an electric mixer until the mixture is light, smooth, and fluffy. Ensure there are no lumps of cream cheese.
-
Gently fold the prepared stiffly beaten whipping cream into the cream cheese mixture until smooth and no streaks of cream cheese or whipped cream remain. Do this carefully to maintain the airy texture.
-
Add the roughly chopped cookies to the creamy filling and gently fold them in until they are completely and evenly incorporated throughout the mixture.
-
Pour the entire filling mixture into the chilled Oreo pie crust, spreading it out evenly with a spatula to create a smooth top.
-
Refrigerate the pie for at least 4 hours, or ideally overnight, until it is completely set and firm. This is crucial for the pie to hold its shape when sliced.
-
Topping – Garnish: Prepare your desired topping just before serving.
-
To make fresh whipped cream for garnishing, beat the remaining 1 cup of whipping cream with the confectioners’ sugar until stiff peaks form. Transfer to a piping bag with a decorative tip (or use a spoon) and garnish the top of the pie as desired with swirls or dollops. Sprinkle additional crushed Oreo cookies over the whipped cream for an extra touch. Alternatively, you can use a store-bought cool whip topping.
Notes
Garnishing the pie with additional whipped cream and crushed cookies is entirely optional. It enhances the visual appeal and adds extra texture, but the pie is wonderfully delicious on its own!
Nutrition
Recipe inspired by TogetherAsAFamily
