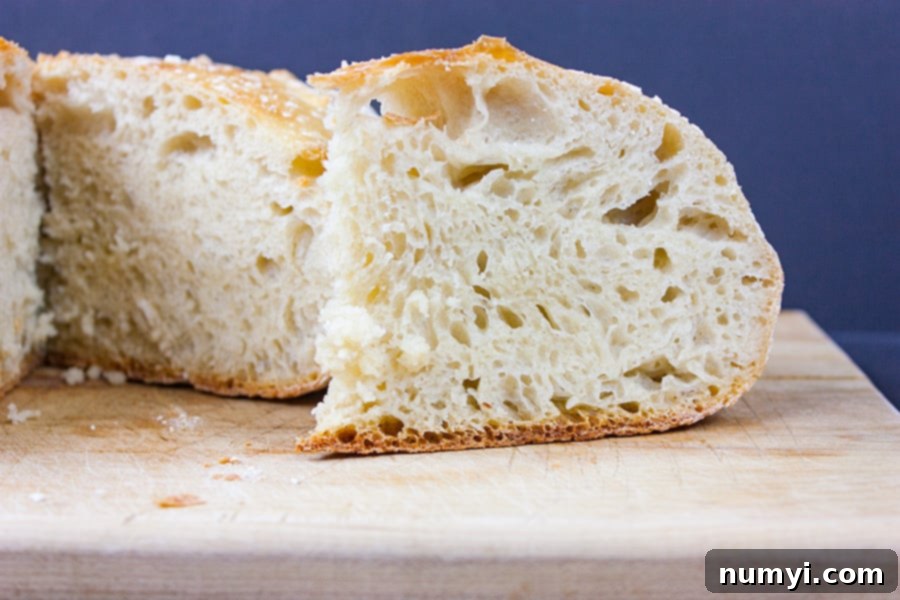
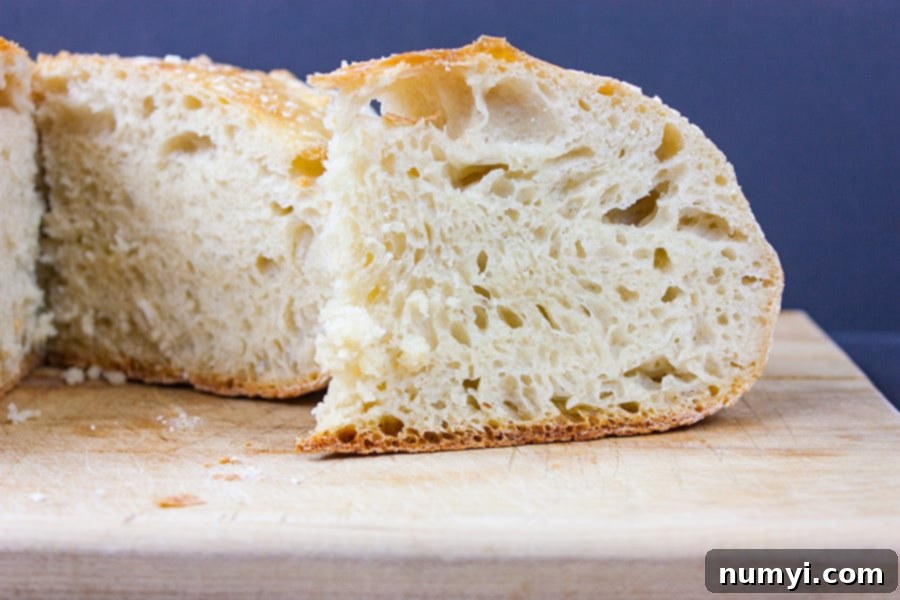
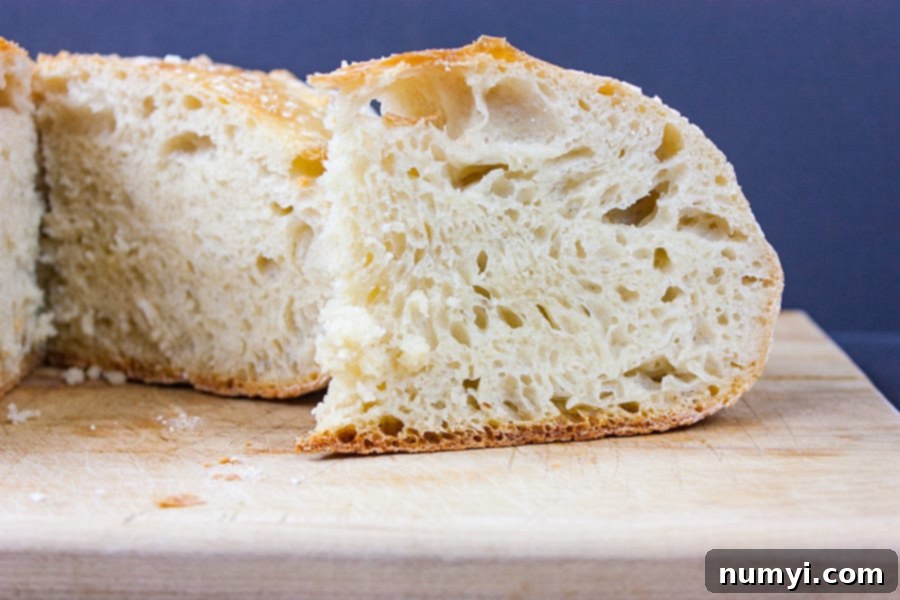
Effortless No-Knead Large Dutch Oven Bread: Achieve a Tall, Crusty Loaf Every Time
The culinary world is often filled with complicated techniques and lengthy processes, but sometimes, the simplest methods yield the most spectacular results. Such is the case with no-knead bread, a revolutionary approach that has transformed home baking for countless enthusiasts. This recipe, specifically adapted for a large 5.5 to 6-quart Dutch oven, is designed to help you achieve a truly magnificent, tall loaf with minimal effort. If you’ve ever shied away from baking bread due to the perceived complexity or the need for special equipment, prepare to have your mind changed. This guide will walk you through creating a perfect artisan-style loaf, boasting a crispy crust and a delightfully chewy interior, all thanks to the magic of the no-knead method and the versatility of your large Dutch oven.

You’ve likely heard the buzz about the “no-knead miracle bread” that took the internet by storm. For years, I resisted trying it, convinced that such an easy method couldn’t possibly produce truly artisan-quality bread. The long rest period seemed daunting, and I questioned if the results would justify the wait. However, my curiosity eventually got the better of me, and I can now confidently say: don’t make my mistake! This no-knead bread recipe is nothing short of amazing, offering a wonderfully crusty exterior and a delightfully chewy interior, all with surprisingly little hands-on time. It’s a game-changer for anyone who loves fresh bread but lacks the time or inclination for traditional kneading.
My journey into no-knead bread began with a common challenge: I only own one 5.5-quart Dutch oven, a size that often proves too large for many standard no-knead recipes. While the original, widely popular recipes deliver absolutely divine results, they typically produce a smaller loaf that looks a bit lost in a generous 5.5-quart pot. I craved a towering, impressive loaf that truly filled the Dutch oven and offered more slices for my family and friends. This led me on a quest to find or adapt a recipe that would maximize the potential of my larger pot, ensuring the bread rose tall and proud, rather than flat and wide.
My research quickly revealed that I wasn’t alone in this desire. Many home bakers with larger Dutch ovens were looking for a way to scale up the classic no-knead recipe. I was thrilled to discover that others, like the ingenious folks at FrugallivingNW, had successfully doubled the original proportions to achieve a more substantial and aesthetically pleasing loaf. This adaptation ensures that your bread rises beautifully high, developing a magnificent dome and a robust structure that stands tall and proud. Finally, a perfectly sized no-knead large Dutch oven bread could be mine – and yours too! This means less frequent baking for larger households and a more impressive presentation for any meal.
The Science Behind the Simplicity: How No-Knead Bread Works Its Magic
The magic of no-knead bread lies in its simplicity and reliance on time rather than muscle. Traditional bread making demands extensive kneading to develop gluten, the protein network that gives bread its structure and chewiness. However, with the no-knead method, a long, slow fermentation process allows water and yeast to gradually break down the starches and proteins in the flour, naturally developing the gluten structure. This “autolyse” process, where flour and water mix and rest, initiates enzyme activity, making the dough more extensible and easier to work with. The extended fermentation also enhances the bread’s flavor, creating complex notes often found in artisan loaves, yielding a depth of taste you wouldn’t expect from such a straightforward process.
Another critical element is the high hydration of the dough. A wetter dough promotes better gluten development during the long rest and contributes to the characteristic open crumb and chewy texture. The Dutch oven plays a pivotal role in the baking process by trapping steam, creating an ideal environment that mimics a professional bakery’s steam-injected oven. This steam keeps the crust soft initially, allowing the loaf to expand rapidly (“oven spring”) before setting into a beautifully crispy, golden-brown shell. Without the Dutch oven’s ability to create this steamy environment, achieving such a robust crust and airy interior would be significantly more challenging, highlighting why it’s the preferred baking vessel for this type of bread.
Crafting Your Perfect Large No-Knead Dutch Oven Bread
Ingredients Breakdown and Preparation
The ingredients for this large no-knead bread are incredibly simple: flour, yeast, salt, and water. While all-purpose flour works, bread flour is highly recommended. Bread flour has a higher protein content, which is crucial for developing strong gluten networks in a no-knead dough, resulting in a more structured and chewier crumb. This extra protein helps create the desired airy texture and robust chew that characterizes artisan bread. Instant or active dry yeast can both be used; if using active dry, ensure it’s fresh and dissolves properly in the water. The salt is not just for flavor; it also helps regulate yeast activity and strengthens the gluten structure, preventing the dough from becoming too slack. Cool water is preferred as it slows down the yeast’s fermentation, allowing for a longer, more flavorful rise, which is key to developing complex flavors in your loaf.
Mixing the Dough: Simplicity at its Best
In a large mixing bowl – choose one that can comfortably accommodate the dough as it doubles (or even triples!) in size – combine the flour, salt, and yeast. Give them a quick whisk to ensure they are evenly distributed throughout the dry ingredients. Next, add the cool water. Using a sturdy wooden spoon or a spatula, stir the ingredients together until all the flour is fully incorporated and there are no dry spots. The dough will be quite wet, shaggy, and noticeably sticky. This high hydration is intentional and key to the no-knead method, so resist the urge to add more flour at this stage, as it will alter the final texture. Once mixed, cover the bowl tightly with plastic wrap to prevent the dough from drying out and to create a humid environment for optimal fermentation. Ensure a good seal to keep moisture in.
The First Rise: Time is Your Kneading Tool
This is where the “no-knead” magic truly happens. Let the covered dough rest on your kitchen counter at room temperature for 12 to 18 hours. The exact time can vary depending on your room’s temperature; warmer kitchens will lead to a faster rise, while cooler ones will slow it down. The goal is a long, slow fermentation that develops flavor and structure. After this extended rest, the dough will have visibly expanded, often doubling in size, and will smell wonderfully yeasty, indicating robust microbial activity. Its surface will be covered with small bubbles, a clear sign of active yeast, and it may have darkened slightly. This bubbly, aromatic, and slightly sticky mass is a testament to the gluten development that has occurred without a single punch or fold from you. It’s a beautiful transformation that prepares your dough for its final form.
Shaping the Dough: Gentle Handling for a Beautiful Loaf
When your dough has completed its initial rise and you’re ready to bake, the next step is shaping. Be generous with flour – flour your hands thoroughly and liberally dust your work surface. The dough will be very sticky, and flour is your best friend here to prevent it from adhering to everything. Carefully scrape the dough out of the bowl onto the floured surface. Sprinkle a bit more flour over the top of the dough. Then, gently fold the dough over on itself once or twice. The aim isn’t to knead it, but to create some tension on the surface. Using floured hands, gently tuck the edges of the dough underneath itself to form a rough, round ball. Don’t worry about perfection; a rustic shape is part of its charm. The key is to handle the dough as little as possible to avoid deflating the precious air bubbles that have developed.
To prepare for the second rise, lay a large rectangle of parchment paper on a cotton towel. Dust the parchment paper generously with flour – this is crucial to prevent the sticky dough from adhering during its final proof. Carefully transfer the roughly shaped dough, seam-side down, onto the floured parchment paper. Dust the top of the dough with a little more flour. Now, gently pull the corners of the parchment paper around the loaf, essentially wrapping it to help maintain its round shape as it rises. You can even tie it loosely at the top with a rubber band, as the original author noted, to secure its form. Then, wrap the entire parchment-encased loaf in the cotton towel. This creates a cozy, supportive environment for its final proof, allowing it to relax and expand without spreading too much.
The Second Rise: Final Proofing for Maximum Volume
Allow the dough to rise for another approximately 2 hours. During this period, it will continue to expand and become lighter and more airy. This final proofing, or “proofing,” is essential for achieving the best texture and volume in your baked bread. It’s the last chance for the yeast to work its magic before hitting the heat of the oven. Meanwhile, ensure your oven is ready. About 30-45 minutes into the second rise, begin preheating your oven to 425 degrees F (218 degrees C). Critically, place your oven-safe cast iron Dutch oven with its lid into the oven as it preheats. Heating the Dutch oven ensures that when the dough hits the scorching hot surface, it receives an immediate burst of heat, known as “oven spring,” which contributes significantly to the desirable crispy crust and overall volume of your loaf.
Baking the Bread: The Dutch Oven Advantage in Action
Once the oven and Dutch oven are fully preheated, carefully pull out the scorching hot pot. Using heavy-duty oven mitts is non-negotiable here to protect your hands! Remove the lid. Now, gently untie or unwrap the parchment paper from around your risen dough. Using the parchment paper as a sling, carefully lift the dough and lower it, still on the parchment, into the preheated Dutch oven. Give the pot a slight shake once or twice if the dough appears unevenly distributed; it will naturally settle and straighten as it bakes. The parchment paper not only aids in the safe and easy transfer of the delicate dough but also prevents sticking, making cleanup a breeze later on.
Cover the Dutch oven with its lid and place it back into the hot oven. Bake for 40 minutes. The lid is crucial during this initial phase, as it traps the steam released by the dough. This steam keeps the crust from hardening too quickly, allowing the bread to expand fully and achieve maximum oven spring, which is vital for a tall, airy loaf with a beautiful open crumb. After 40 minutes, carefully remove the lid. The bread will be pale but should have expanded beautifully. Continue baking for an additional 10-15 minutes, or until the crust transforms into a deep, inviting golden brown. Baking times can vary slightly depending on your oven, so keep a close eye on it during this final stage. To confirm doneness, the internal temperature of the bread should reach around 200-210 degrees Fahrenheit (93-99 degrees Celsius) when checked with an instant-read thermometer. This ensures your bread is fully cooked through without being dry.
Cooling and Enjoying Your Artisan Loaf
Once baked to perfection, carefully use the parchment paper as handles to lift the magnificent loaf out of the Dutch oven and transfer it to a wire rack to cool. While it’s tempting to dive straight in, allowing the bread to cool completely is incredibly important. This cooling period allows the internal structure of the bread to set and the moisture to redistribute evenly throughout the crumb, preventing a gummy texture and ensuring that perfect chewy interior. Slicing warm bread often leads to a denser, slightly moist result. However, if you’re like me, waiting for complete cooling is a near-impossible feat when the intoxicating aroma of freshly baked bread fills the kitchen! The anticipation can be almost unbearable.
That said, a warm slice, still steaming slightly, slathered with a generous amount of butter, is one of life’s true simple pleasures. This no-knead large Dutch oven bread delivers on every promise: a wonderfully crusty exterior that crackles with each bite, and a slightly chewy, airy interior that is simply perfection. It’s robust enough to stand up to hearty stews, delicate enough to accompany a light salad or artisanal cheese, and utterly addictive on its own. Whether served with a family dinner or simply enjoyed as a comforting snack, this bread is sure to become a staple in your home.
This recipe truly demystifies bread baking, proving that you don’t need to be an experienced baker or own fancy equipment to create an artisan-quality loaf. With just a few basic ingredients, a Dutch oven, and a bit of patience, you can consistently produce impressive, delicious bread right in your own kitchen. Give this large no-knead Dutch oven bread a try – you won’t regret it! It’s an accessible and rewarding baking experience that brings the joy of homemade bread to your table with incredible ease.
Other Delicious Bread Recipes
Easy Homemade Crescent Rolls
Italian Bread Recipe
Sourdough Bread Recipe

No Knead Large Dutch Oven Bread
Print
Pin
Rate
Ingredients
- 6 cups bread flour, recommended (or all-purpose flour, plus more for work surface)
- 1/2 teaspoons instant or active dry yeast
- 2 1/2 teaspoons salt
- 2 2/3 cups cool water
Instructions
-
In a large bowl, combine the flour, yeast, and salt. Add the water and stir until all the ingredients are well incorporated; the dough should be wet and sticky. Cover the bowl with plastic wrap. Let the dough rest 12-18 hours on the counter at room temperature. When the surface of the risen dough has darkened slightly, smells yeasty, and is dotted with bubbles, it is ready.6 cups bread flour, recommended, 1/2 teaspoons instant or active dry yeast, 2 1/2 teaspoons salt, 2 2/3 cups cool water
-
Heavily flour your hands and a work surface. Place dough on work surface and sprinkle with more flour. Fold the dough over on itself once or twice and, using floured fingers, tuck the dough underneath to form a rough ball.
-
Place a large rectangle sheet of parchment paper on a cotton towel and dust it with enough flour to prevent the dough from sticking to the parchment paper as it rises; place dough seam side down on the parchment paper and dust with more flour. Pull the corners of parchment paper around the loaf, wrapping it completely. Do the same with the towel. Let rise for about 2 hours, until it has doubled in size.
-
After about 1 1/2 hours, preheat oven to 425 degrees. Place a 6-8 quart heavy covered pot, such as a cast-iron Dutch oven, in the oven as it heats. When the dough has fully risen, carefully remove the pot from oven. Unwrap the towel and parchment paper from around the dough carefully lift the parchment and place in the pot. Shake pan once or twice if the dough looks unevenly distributed; it will straighten out as it bakes.
-
Cover and bake for 40 minutes. Uncover and continue baking for 10-15 more minutes, until the crust is a deep golden brown. The internal temperature of the bread should be around 200 degrees. You can check this with a meat thermometer if desired.
-
Remove the bread from the pot and let it cool completely on a wire rack before slicing. ( I can never wait for complete cooling)
Notes
Optional Add-Ins – Try mixing in parmesan cheese, fresh herbs, roasted garlic, etc.
Storing – Place the completely cooled bread in a resealable airtight bag and keep it at room temperature for up to 2 days.
Freezing – You can freeze the completely cooled bread in a freezer-safe bag or container for up to 2 months.
