Irresistible Italian Fig Cookies (Cucidati) Recipe: A Sicilian Christmas Tradition
Experience the timeless delight of Italian Fig Cookies, affectionately known as Cucidati. These flavorful, moist, and tender treats are generously filled with a rich blend of dried fruits and bright hints of citrus. For many, including my family, Cucidati are more than just cookies; they are a cherished Christmas tradition, an essential part of the holiday celebration that brings loved ones together year after year. Every bite transports you to the heart of Sicily, offering a taste of history and heartwarming family memories.

Amongst countless family customs, making Cucidati remains the steadfast tradition in our household. Every year, as the festive season approaches, my beloved aunt embarks on the grand task of preparing an enormous batch of dough and her signature fig filling. This annual ritual is a call for all hands on deck! Family members gather, laughing and sharing stories as we work together to bake hundreds upon hundreds of these exquisite cookies. It’s truly a fun, memorable adventure that strengthens our bonds and fills our homes with an incredible aroma of sweet spices and citrus.
For years, I’ve consulted with my aunt, trying to coax her into scaling down her legendary Cucidati recipe. Her original version was so massive, it could easily send most home bakers running for the hills in fear of the sheer volume! This year, however, I was persistent. I hounded her, we consulted endlessly, and through careful experimentation, we finally achieved fantastic results: a more manageable, yet equally delicious, Cucidati recipe perfect for any home kitchen. This scaled-down version captures all the authentic flavors and textures of our family’s cherished cookies without the overwhelming quantity of the original. It’s the perfect balance of tradition and practicality, allowing more people to enjoy this beloved Sicilian Christmas cookie.
Looking for another comforting dessert to add to your holiday spread? Don’t forget to try our bread pudding recipe with a decadent bourbon sauce!

The journey to perfecting this recipe wasn’t without its challenges, as you can see from the photo above – a treasure trove of numerous, often vague, recipes from years past! Each one slightly different, each presenting its own quirks and historical notes. It’s a well-known fact that every Sicilian family prides itself on its unique Cucidati recipe, a closely guarded secret passed down through generations. Ours is no exception, although my quest was to make it more accessible while preserving its authentic taste.
I dedicated considerable time to testing various versions of her dough recipe until I nearly lost count. Her traditional recipes often called for a combination of shortening and butter, or sometimes just one or the other. My initial attempts, using only butter as implied by an ambiguous note, resulted in cookies as hard as rocks! This sent me straight back to her kitchen, sifting through old recipe cards and asking countless questions. It turns out, her long-held secret for the dough was a blend of margarine and shortening – ingredients that provide a distinct texture and flakiness. However, when it comes to baking cookies, I am firmly a “pure butter” kind of person, preferring the rich flavor and tender crumb it imparts. So, the refined dough recipe I’m sharing with you today is the culmination of extensive research and rigorous testing with all-butter, ensuring that rich, buttery flavor we all adore while maintaining the delicate structure. But rest assured, the authentic, incomparable fig filling? That’s all my aunt’s original masterpiece, a recipe she has perfected over decades.
The Essence of Italian Fig Cookies (Cucidati)
Cucidati, also known as buccellati in some regions of Italy, are more than just a sweet treat; they are a culinary emblem of Sicilian heritage, especially during the festive Christmas season. These delightful cookies are characterized by their tender, buttery pastry shell wrapped around a rich, aromatic filling of dried figs, nuts, and warming spices. Each bite offers a harmonious blend of textures and flavors – the soft, chewy filling contrasting beautifully with the slightly crisp yet tender dough – making them utterly addictive and a truly special addition to any holiday table. Understanding the delicate balance of these components is key to creating a truly authentic Cucidati experience.
Crafting the Perfect Fig Filling
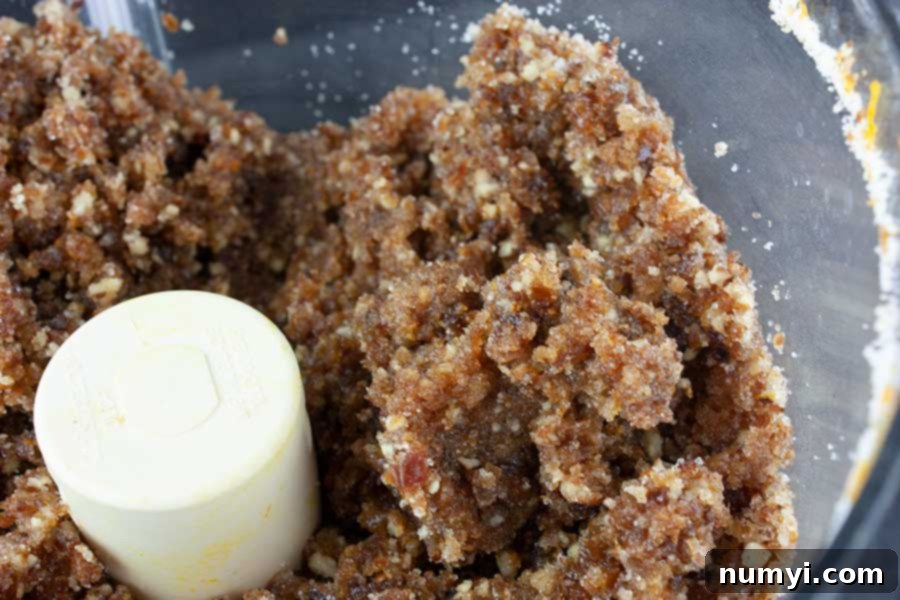
The heart of these irresistible Italian Fig Cookies lies in their incredibly flavorful filling. To begin, gather your core ingredients: a generous amount of dried figs (stems removed), succulent dates (pitted), dark raisins, and a cup of coarsely chopped pecans. Place these dried fruits and nuts into your food processor along with the vibrant zest of one small orange. Give it a few initial pulses to start grinding the fruit, breaking it down into smaller, more manageable pieces.
In a separate, small bowl, prepare the aromatic spice blend that gives Cucidati its signature warmth. Whisk together granulated sugar with ground cinnamon, allspice, and a touch of nutmeg. This combination of spices is carefully chosen to complement the sweetness of the figs and evoke the festive spirit of the holidays.
Next, add this sugar and spice mixture, along with the warm water (up to 1/3 cup, depending on desired consistency), to the food processor with the fruit and nuts. Continue pulsing until all the ingredients are finely ground and come together to form a cohesive, rich paste. The warmth of the water helps to soften the dried fruits and fully integrate the flavors, creating a smooth yet textural filling. For an even more pronounced citrus kick and a slight tang, consider substituting fresh orange juice for the warm water. While many traditional Sicilian recipes boldly call for rum to enhance the filling’s depth, in our family, we’ve always opted for a non-alcoholic approach, relying on the natural sweetness of the fruit and the aromatic spices to truly shine. Both methods yield a delicious result, so feel free to choose based on your preference.
Once your delectable fig filling is prepared, transfer it to an airtight container and refrigerate it. Allowing it to chill overnight, or even longer, is a crucial step. This chilling period not only helps the flavors meld and intensify, allowing the spices to fully permeate the fruit, but also makes the filling much easier to handle and shape when it’s time to assemble the cookies. This foresight ensures that the filling remains firm and holds its shape perfectly during the rolling process, preventing any messy mishaps.
My aunt, with her old-world charm and traditional techniques, famously used a heavy-duty meat grinder to achieve the perfect fine mince for her fruit and seasoning blend. She also swore by her bread machine for mixing the massive batches of dough for our large family gatherings. However, I’ve found that a modern food processor is an incredibly efficient and much easier tool for both tasks, delivering consistent results with significantly less effort and cleanup for the contemporary home baker. It’s a game-changer for speeding up the preparation of these labor-of-love cookies.
Making the Tender Cookie Dough
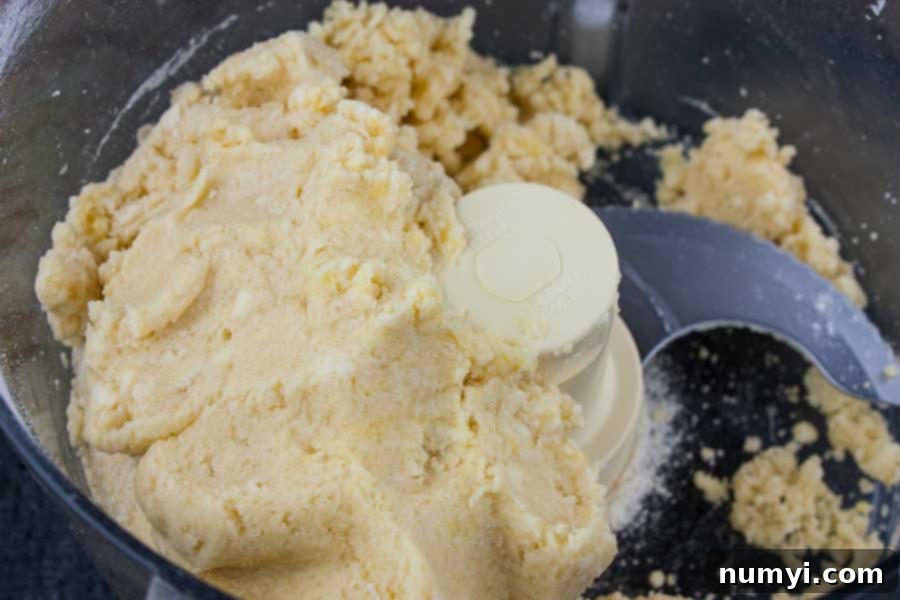
After your flavorful fig filling is chilling, your next step is to create the tender, buttery cookie dough that will encase the figgy goodness. First, ensure your food processor is clean and completely dry to avoid any cross-contamination or moisture issues. Add the dry ingredients: all-purpose flour, granulated sugar, baking powder, and a pinch of salt. Pulse them together a few times to ensure they are thoroughly combined and aerated.
Then, add the cold unsalted butter, which should be cut into small, even pieces. The temperature of the butter is absolutely critical here, much like in making a perfect pie crust, as it helps create that desirable flaky, tender texture in the finished cookie. Pulse the mixture a few more times until the butter is incorporated into the dry ingredients and the mixture resembles coarse meal or small pebbles. Be careful not to over-process at this stage, as you want pockets of butter to remain.
Finally, introduce the wet ingredients: large eggs, a teaspoon of pure vanilla extract for added warmth, and milk. Process the mixture until the dough just begins to come together. It should still look a bit shaggy, similar to a pie dough, but cohesive enough to form a ball. Avoid the temptation to over-process, as this can develop too much gluten, resulting in a tough, rather than tender, cookie. Remove the dough to a lightly floured work surface and gently knead it a few times until it forms a smooth, uniform ball. This minimal kneading helps develop the gluten just enough for structure without making the dough overly elastic or chewy.
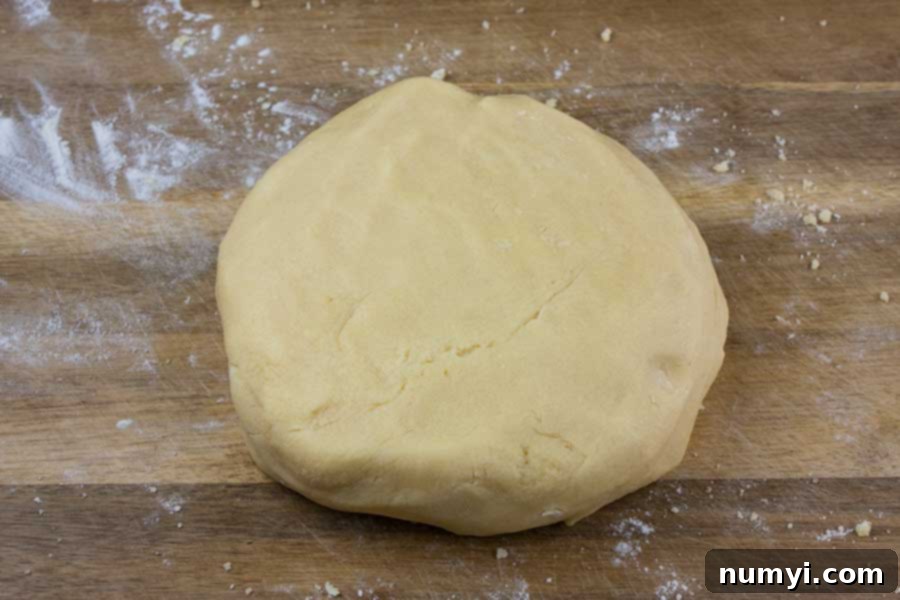
Once your dough is smooth and ready, divide it into four equal portions. Wrap each portion tightly in plastic wrap and refrigerate overnight. This crucial chilling period serves several important purposes: it allows the gluten to relax, making the dough much easier to roll out thinly without springing back; it also deepens the flavors, as the butter and other ingredients have time to fully meld. Both the Cucidati dough and the fig filling are remarkably forgiving; they can be prepared and refrigerated for several days, even up to a week, without compromising quality. This flexibility is what makes this Cucidati recipe more approachable and less intimidating for busy home bakers. You can break up the preparation process over a few days – perhaps tackling the filling one day and the dough the next, then assembling and baking when you have more time on a weekend. This staged approach transforms a potentially time-consuming recipe into an enjoyable and manageable holiday baking project, spreading the joy of Cucidati creation over several leisurely days.
Assembling and Baking Your Cucidati
When you’re ready to transform your chilled dough and filling into delicious Italian Fig Cookies, begin by preheating your oven to 325 degrees Fahrenheit (160 degrees Celsius). This lower temperature ensures a gentle bake, resulting in tender cookies without overly browning the filling. Line your baking sheets with parchment paper to prevent sticking and ensure easy cleanup, which is always a bonus during holiday baking.
Next, take your fig filling from the refrigerator. It should be firm and easy to handle. Form the filling into thin ropes, approximately the size of your little finger in thickness and length. For maximum efficiency and to streamline the assembly process, it’s highly recommended to shape all the filling into ropes at once and arrange them neatly on a parchment-lined baking sheet. This way, they are perfectly prepped and ready to go as you roll out each portion of dough.
Now, retrieve one portion of dough from the refrigerator at a time, making sure to keep the remaining dough chilled to maintain its workability. On a well-floured work surface, knead the dough a few times until it becomes smooth and pliable. This brief kneading helps to warm it slightly and make it easier to roll. Then, using a rolling pin, roll it out evenly and fairly thinly, aiming for about 1/8 inch thickness. Remember, this dough will rise slightly during baking, and you want the magnificent, spiced fig filling to be the undeniable star of each cookie, not an overwhelming amount of plain dough. The thinness of the dough is crucial for the authentic Cucidati experience.
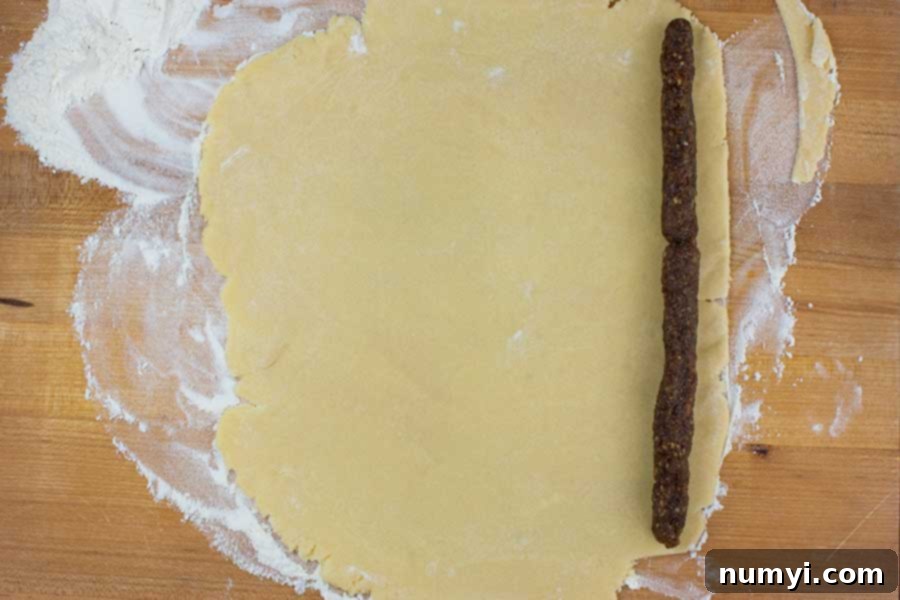
Once your dough is rolled, carefully trim any rough edges with a sharp knife or pastry wheel to create a neat, consistent rectangle. Place one of your pre-formed fig filling ropes along one long edge of the dough strip.
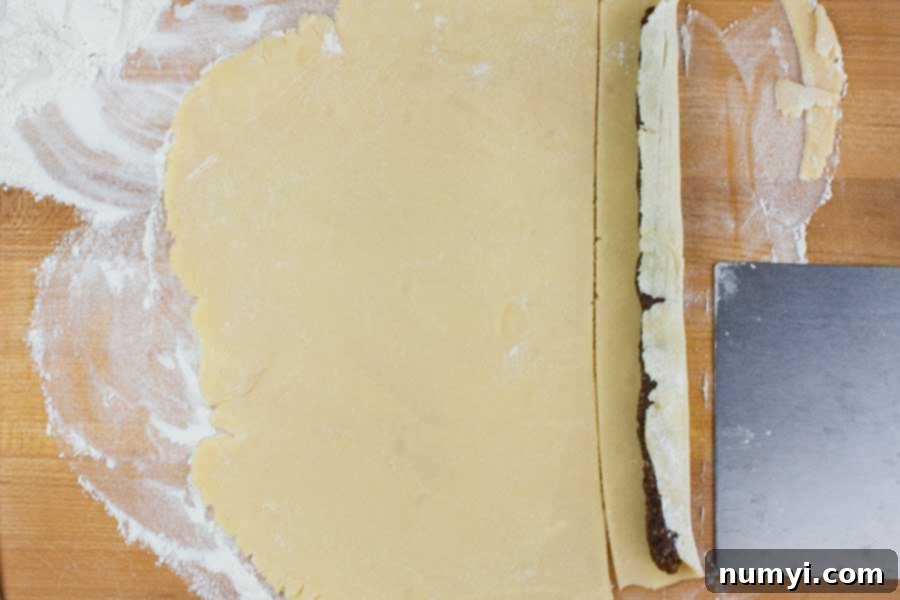
Gently lift the outer edge of the dough and begin rolling it over the filling rope, as shown in the image above. Continue to roll the dough completely around the filling, creating a tight, uniform log. Once the filling is fully enclosed and the dough forms a seamless cylinder, trim off any excess dough. The goal is to have just enough dough to encase the filling neatly. Carefully place the rolled log seam-side down on your work surface to secure the roll and prevent it from opening during baking. This attention to detail ensures your Cucidati look as beautiful as they taste.
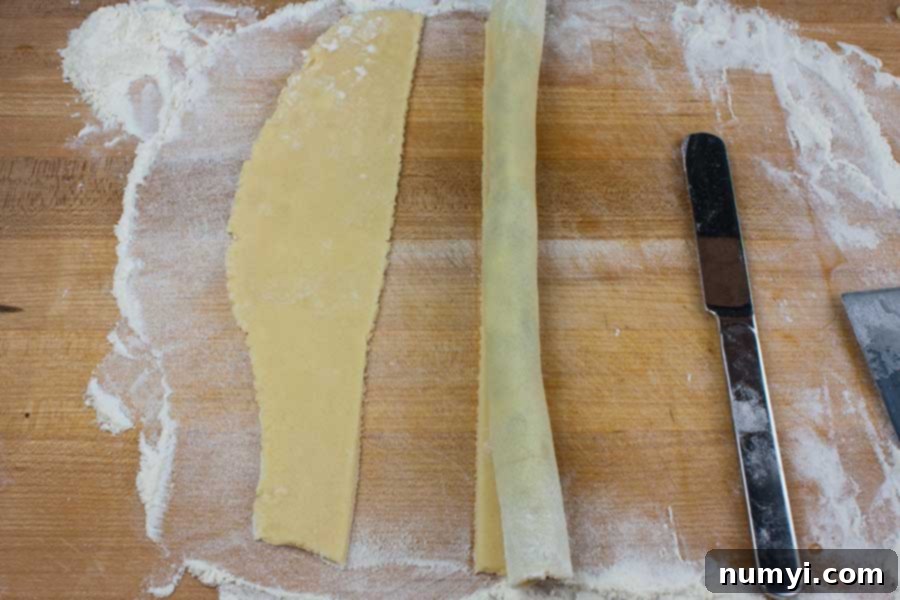
As depicted in the image above, the goal is a perfectly sealed log that will hold its shape during baking. Once all your dough and filling are rolled, you’ll have several long strips of these delightful treats waiting to be transformed into individual cookies. The care you put into rolling them ensures a beautiful presentation and even baking. A tightly sealed roll will prevent the delicious fig filling from escaping during the baking process, ensuring each cookie is perfectly intact and visually appealing. This step is a testament to the artisan craft of traditional Italian cookie making.
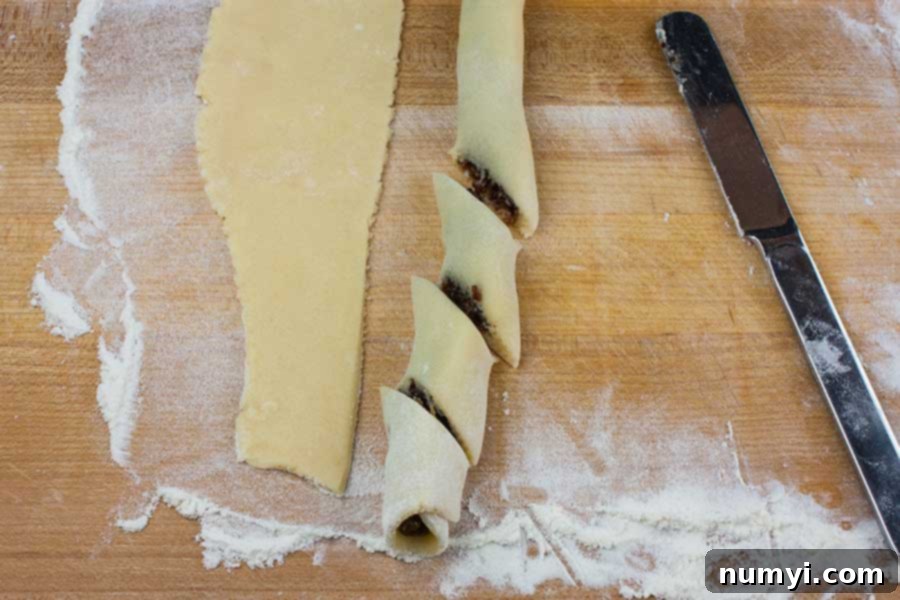
Now for the iconic Cucidati shape! Using a sharp knife, slice each long strip diagonally into pieces approximately 1 inch thick. This diagonal cut not only gives the cookies their traditional, charming appearance but also creates a larger surface area to showcase the rich and delicious fig filling. Arrange the sliced cookies on your prepared baking sheets, leaving about 1 inch of space between each to allow for slight spreading during baking. This spacing ensures each cookie bakes evenly and achieves a consistent texture.
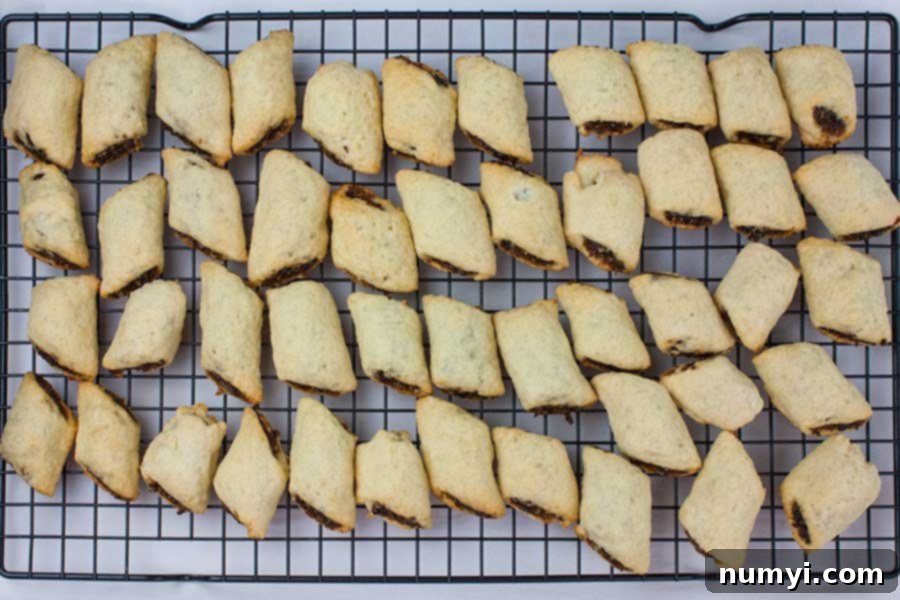
Bake your Cucidati for about 12-15 minutes, or until the tops are lightly golden and the bottoms are beautifully browned. It’s crucial to watch them closely, as oven temperatures can vary significantly even within the same kitchen. A good practice is to start checking around the 10-minute mark. You might also need to rotate your baking sheets halfway through the baking process for more even browning, especially if your oven has hot spots. The goal is a perfectly cooked cookie that is tender on the inside, with a slight crispness on the outside, and a golden hue.
Once baked to perfection, allow these fragrant cookies to cool on the baking pan for about 2 minutes. This brief resting period helps them set and firm up before you carefully transfer them to a wire rack to cool completely. Handling them too soon might cause them to break or crumble, given their tender nature. Patience at this stage is key to preserving their beautiful form.
These aren’t your average, mass-produced fig newtons from the grocery store. Our homemade Cucidati are a league of their own – perfectly spiced, wonderfully aromatic, and moist little morsels bursting with pure, heavenly flavor. What’s truly remarkable about these cookies is that they actually improve with age! The longer these Cucidati sit, the more the flavors meld and deepen, allowing the spices and fruits to fully integrate, making them even more delicious a few days after baking. This characteristic makes them the perfect make-ahead treat for holiday entertaining or simply to enjoy throughout the festive season.
To further enhance your holiday baking repertoire, explore our delightful Almond Biscotti recipe – another Italian classic that pairs wonderfully with coffee or tea!

Traditional Finishes and Modern Preferences
Traditionally, Cucidati are often adorned with a light, sweet icing and topped with festive colored sprinkles, adding to their holiday charm and visual appeal. This classic finish makes them even more celebratory, especially for children. While sprinkles have never been a part of our immediate family’s Cucidati tradition, we did use to apply a simple, thin icing in years past. However, over time, as our palates evolved and we came to appreciate the inherent beauty and rich flavors of the cookies themselves, we collectively decided that the icing was no longer a necessary step. Today, we typically enjoy them plain, allowing the intricate and complex flavors of the fig filling and the tender, buttery dough to take center stage, unadorned. This preference allows the true essence of the Cucidati to shine through, making each cookie a testament to its authentic ingredients.
For more delicious cookie ideas to expand your holiday cookie platter or simply to enjoy throughout the year, be sure to check out our popular Italian Butterball Cookie recipe, a melt-in-your-mouth classic that is always a crowd-pleaser. Or, if you’re craving a nostalgic twist, try our super yummy Old Fashioned Peanut Butter Cookies for a familiar comfort. And if you’re looking to keep your baking perfectly in season with other festive treats, our eggnog cookies are absolutely amazing and incredibly easy to make! Explore these delightful recipes to bring more joy to your kitchen.
Italian (Sicilian) Fig Cookie Recipe

Italian Fig Cookies (Cucidati) Recipe
Print
Pin
Rate
Ingredients
Dough
- 2 1/2 cups all-purpose flour
- 3/4 cup sugar
- 2 1/2 tsp baking powder
- 1/2 tsp salt
- 1/2 cup unsalted butter cold and cut into small pieces
- 2 large eggs
- 1 teaspoon vanilla extract
- 1/4 cup milk
Fig Filling
- 1 cup pecans rough chopped
- 8 oz dried figs stemmed and roughly chopped
- 5 oz dates pitted and roughly chopped
- 4 oz dark raisins
- 1 small orange zest
- 1/2 tsp cinnamon
- 1/2 tsp allspice
- 1/8 tsp nutmeg
- 2 cups granulated sugar
- 1/4 cup warm water Up to 1/3 cup
Instructions
Dough
-
Pulse the flour, sugar, baking powder, and salt together. Add the cold butter pieces and pulse again.
-
Add the eggs, vanilla extract, and milk. Process until the dough just starts to combine (like pie dough). Remove the dough to a lightly floured surface and knead a few times until it comes together completely and looks smooth.
-
Divide the dough into four equal pieces and wrap in plastic wrap. Refrigerate overnight.
Filling
-
Place the dried figs, dates, pecans, raisins, and orange zest in the food processor. Give it a couple of pulses to start grinding the fruit.
-
In a separate bowl whisk together the granulated sugar, cinnamon, nutmeg, and allspice.
-
Add the water and sugar mixture to the food processor and pulse until it grinds everything and comes together.
-
Place in an air-tight container and refrigerate for at least overnight or longer.
Forming and Baking
-
Preheat the oven to 325 degrees.
-
Form the fig filling into ropes about the size of your little finger. To make it easier form all the filling and place them on a parchment paper-lined baking sheet.
-
Using only one dough round at a time (leave the remaining dough refrigerated) on a well-floured surface, knead the dough a few times until it becomes smooth, roll the dough out fairly thin, about 1/8 inch thick.
-
Trim the rough edges from the dough, place a rope on the dough edge. Lift the outer edge and start rolling it over the filling. Roll it completely over and trim it off. Place the seam side down.
-
Slice each strip on the diagonal into about 1-inch pieces and place them on the prepared baking sheet about 1 inch apart.
-
Bake for about 12-15 minutes or until the tops a light golden and bottoms are browned. Watch them closely, all ovens are different. You may need to rotate the baking sheets for even browning.
-
Allow them to cool on the pan for about 2 minutes, then transfer to a wire rack to cool completely.
Notes
If you would like to double this recipe we have found you will need to double the filling and triple the dough. This adjustment ensures the best dough-to-filling ratio for a larger batch.
Both the dough and filling can be refrigerated for days! I have successfully made them as much as a week before baking, which is perfect for spreading out your holiday baking tasks.
Storage – Store completely cooled cookies in an airtight container or bag at room temperature for up to 3 weeks. These cookies are famously long-lasting, a testament to their traditional preparation (I’m almost embarrassed to tell you how long we have had them stay fresh and delicious!).
Freezing – Freeze completely cooled cookies (unfrosted) in a freezer-safe container or bag for up to 3 months. Thaw at room temperature before serving.
Nutrition
Essential Tools for Baking Cucidati
Having the right tools can make all the difference in your baking experience, transforming a complex recipe into an enjoyable and manageable project. While traditional methods might involve a meat grinder and a bread machine, modern kitchen appliances can streamline the process significantly, making these authentic Italian fig cookies more accessible for today’s home baker. Here are the key tools we recommend for preparing your Cucidati, ensuring a smooth and successful baking journey:
- Food Processor: This is an indispensable appliance for both preparing the dough and the fig filling. It quickly grinds the dried fruits and nuts to the perfect consistency for the filling and efficiently combines the dough ingredients without the risk of overworking them. We particularly recommend a robust model like the Cuisinart Food Processor 14 cup for its power, capacity, and versatility.
- Rolling Pin: An essential tool for rolling out the cookie dough evenly and thinly. A good quality rolling pin ensures consistent thickness, which is important for achieving the desired flaky yet tender texture of the cookie.
- Parchment Paper: A baker’s best friend! Parchment paper prevents sticking, makes cleanup significantly easier, and promotes more even baking by creating a non-stick surface.
- Baking Sheets: Sturdy, heavy-gauge baking sheets are a must for baking batches of Cucidati. Opt for light-colored sheets to prevent over-browning of the cookie bottoms.
- Wire Rack: Crucial for cooling the cookies completely after baking. A wire rack allows air to circulate around the entire cookie, preventing sogginess and ensuring a crisp bottom.
Don’t Sweat The Recipe is a participant in the Amazon Services LLC Associates Program, an affiliate advertising program designed to provide a means for sites to earn advertising fees by advertising and linking to amazon.com. Amazon, the Amazon logo, AmazonSupply, and the AmazonSupply logo are trademarks of Amazon.com, Inc. or its affiliates.
| Cuisinart Food Processor 14 cup | https://amzn.to/2Db6Cpj |
