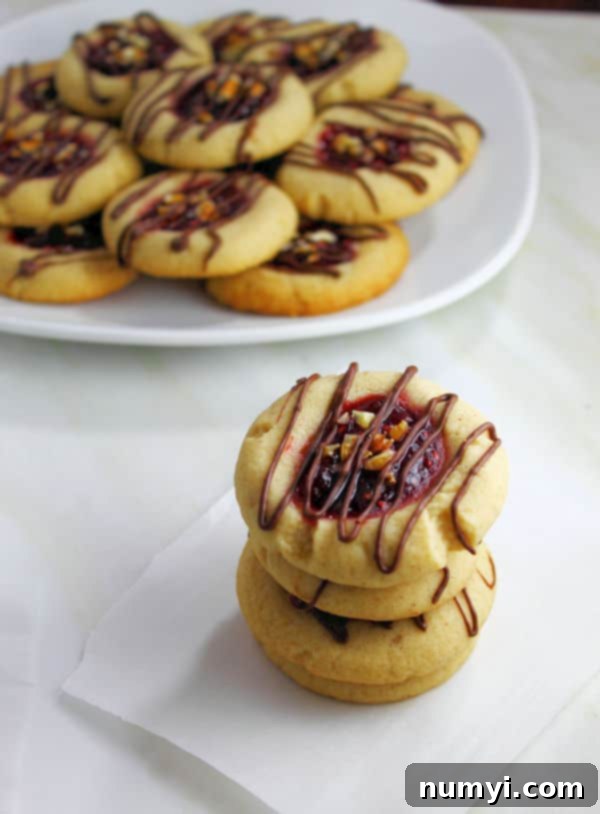
Classic Raspberry Thumbprint Cookies: Buttery, Jam-Filled Perfection for Any Occasion
Raspberry Thumbprints are a beloved classic for a reason. These tender shortbread cookies offer a delightful buttery treat, perfectly complemented by a vibrant, fruity center. They are an absolute must-have for the holiday season and any celebration, bringing joy with every bite!
Why Raspberry Thumbprint Cookies Are a Timeless Favorite
There’s an undeniable warmth and nostalgia that washes over you with the first bite of a Raspberry Thumbprint cookie. It’s more than just a cookie; it’s a tiny vessel of comfort, often evoking cherished memories of childhood kitchens, festive gatherings, and shared moments with loved ones. Perhaps it’s the rich, buttery shortbread base that melts in your mouth, or the bright, sweet tang of raspberry jam that creates a perfect harmony of flavors and textures. Whatever the secret, these cookies have a magical way of making you feel good.
Beyond their sentimental value, these delightful cookies boast incredible versatility. While our focus here is on the iconic raspberry filling – a true classic – the possibilities for customization are endless. Imagine them filled with a rich chocolate ganache, a zesty lemon cream cheese filling, or even a decadent caramel. Depending on your mood, the season, or what ingredients you have on hand, these cookies can easily transform to suit any craving or occasion. This adaptability makes them a fantastic addition to any baker’s repertoire, allowing for endless creative experimentation.
Another fantastic aspect of this recipe is how wonderfully kid-friendly it is. It’s an ideal project for baking with children, offering a simple yet engaging process that even the littlest helpers can enjoy. The best part? The joy of pressing their little thumbs (or fingers!) into the soft cookie dough to create the signature indentation. It’s a hands-on activity that fosters creativity and creates lasting memories in the kitchen, making the final treat all the more special.

Essential Ingredients for Perfect Thumbprint Cookies
One of the many reasons these cookies are so beloved and easy to make (even with kids!) is their straightforward ingredient list. You don’t need exotic items; just a few pantry staples transform into something truly extraordinary.
For the Buttery Shortbread Cookie Base:
- Softened Butter: This is the heart of any good shortbread. Using softened butter (not melted!) is crucial for achieving that light, fluffy, and creamy texture when combined with sugar. Ideally, take your butter out of the fridge about an hour before you start baking.
- Packed Brown Sugar: Brown sugar adds a lovely depth of flavor and moisture that white sugar alone can’t quite achieve, contributing to the cookie’s tender crumb.
- Vanilla Extract: A good quality vanilla extract enhances all the other flavors, providing a warm, aromatic base.
- All-Purpose Flour: The structural component. Make sure to measure it correctly by spooning it into your measuring cup and leveling it off, rather than scooping directly, to avoid adding too much.
- Ground Cinnamon: A hint of cinnamon adds a subtle warmth and spice, complementing the sweet jam beautifully.
- Pinch of Salt: Essential for balancing the sweetness and bringing out the rich flavors of the butter and vanilla.
For the Classic Raspberry Filling & Optional Toppings:
- Seedless Raspberry Jam: The star of the show! Seedless jam provides a smooth, delightful burst of fruity flavor without any textural interruptions. While raspberry is traditional, feel free to experiment with other jams.
- Optional Treats (Chopped Pecans or Melted Chocolate): These additions take your thumbprints to the next level. A sprinkle of finely chopped pecans adds a nutty crunch, while a delicate drizzle of melted chocolate creates an elegant finish and a touch of extra indulgence.
Unleash Your Creativity: Thumbprint Cookie Variations
The beauty of thumbprint cookies lies in their simple base, which serves as a perfect canvas for endless flavor combinations. Don’t be afraid to experiment beyond the classic raspberry!
- Chocolate Kiss Delights: For a simple yet indulgent twist, once the cookies are baked and slightly cooled, nestle a Hershey’s Kiss or your favorite small chocolate candy into the warm thumbprint indentation. The residual heat will slightly melt the chocolate, creating a gooey center.
- S’mores Inspired Cookies: Get truly fancy! Towards the end of baking, place a small marshmallow in the thumbprint. Pop the cookies back under the broiler for just a minute or two (watch carefully!) until the marshmallow is golden and toasted. Once cooled, drizzle the entire cookie with melted milk or dark chocolate for a gourmet s’mores experience. YUM!
- British Tea Time Elegance: Elevate your cookies with sophisticated flavors. Infuse your cookie dough with a few drops of Earl Grey extract (or finely ground Earl Grey tea leaves). After filling the thumbprint with classic raspberry jam, add a small dollop of clotted cream or whipped cream once the cookies have cooled completely, channeling the charm of a traditional British tea party.
- Irresistible Chocolate and Peanut Butter: A match made in heaven! Incorporate a tablespoon or two of cocoa powder into your cookie dough for a chocolate base. Then, fill the thumbprint with creamy peanut butter before baking, or with a peanut butter ganache after baking. Need I say more?
- Citrus Burst: Add lemon or orange zest to your shortbread dough for a bright, fresh flavor. Fill the indentation with lemon curd or orange marmalade for a sunny treat.
- Nutty Indulgence: Mix finely ground almonds or walnuts into your dough for an added nutty flavor. Fill with apricot jam or a caramel sauce for a rich, satisfying cookie.
- Mint Chocolate Magic: Or, may I suggest these incredible Mint Chocolate Thumbprints made by yours truly? They offer a refreshing twist on a classic!
Step-By-Step Instructions to Craft Your Raspberry Thumbprints
Making these classic shortbread cookies is a straightforward and rewarding process. Follow these detailed steps to ensure your Raspberry Thumbprints turn out perfectly golden, buttery, and delicious.
Step 1: Preheat Your Oven and Prepare Your Baking Sheet
Before you begin mixing, preheat your oven to 350 degrees F (175 degrees C). This ensures the oven is at the correct temperature when your cookies are ready, preventing uneven baking. While thumbprint cookies generally don’t spread excessively, you can line your baking sheets with parchment paper for easy cleanup, though an ungreased baking sheet will also work perfectly fine.
Step 2: Cream the Butter and Sugar to Perfection
In a large mixing bowl, combine the softened butter and brown sugar. Using an electric mixer (handheld or stand mixer), cream them together on medium speed until the mixture is visibly light in color and fluffy in texture. This process incorporates air into the butter, contributing to the cookie’s tender crumb. Next, add the vanilla extract and mix until it is thoroughly combined and fragrant. Be careful not to overmix at this stage; just until it’s well incorporated.
Step 3: Gently Combine the Dry and Wet Ingredients
In a separate small bowl, whisk together the all-purpose flour, ground cinnamon, and a pinch of salt. This ensures these dry ingredients are evenly distributed. Gradually add this dry mixture to your creamed butter and sugar mixture, mixing on low speed. Stir just until the flour is combined and no dry streaks remain. Overmixing the flour can develop the gluten too much, leading to tough cookies, so stop as soon as it comes together.
Step 4: Form the Cookies and Create the Iconic Thumbprints
Take your cookie dough and roll it into 1-inch balls. Place these balls onto your prepared baking sheet, ensuring they are evenly spaced about 1.5 to 2 inches apart. Gently flatten each dough ball just slightly with the palm of your hand. Now for the fun part: using your thumb (or the back of a small measuring spoon for a more uniform indentation), press firmly into the center of each dough ball to create a well. I often use my pointer finger to gently round out the indentation and make it a little wider – this allows it to hold more delicious filling! Finally, carefully fill each indentation with about a half-teaspoon of your seedless raspberry jam. If you’re adding optional chopped pecans, now is the time to sprinkle them generously over the jam.
Step 5: Bake and Cool for Optimal Texture and Flavor
Place your baking sheet in the preheated oven and bake for 12-14 minutes. The exact baking time may vary slightly depending on your oven, so watch for the edges to turn a light golden brown and the cookie to appear “set” in the center. Avoid overbaking, as this can make the shortbread dry. Once baked, remove the cookies from the oven and let them cool on the baking sheet for about 5 minutes. This allows them to firm up slightly before you move them. After 5 minutes, carefully transfer them to a wire rack to cool completely. Once fully cooled, you can drizzle them with melted chocolate for an extra touch of elegance and flavor. Now, indulge in your homemade raspberry thumbprint cookies!
Frequently Asked Questions About Raspberry Thumbprint Cookies
These delightful cookies have a rich history, originating from Sweden where they are famously known as “hallongrotta,” which charmingly translates to “raspberry cave.” They are a beloved staple in Swedish baking, particularly around holidays and Fika (coffee break) traditions, cherished for their simple elegance and delicious fruity center.
The key to perfectly structured thumbprint cookies lies in gentle handling and proper dough consistency. First, ensure your butter isn’t too soft or melted, as this can lead to a delicate, crumbly dough. When forming the balls, handle the dough minimally. Most importantly, be gentle when pressing the indentation! Don’t flatten them too much, and avoid pressing so hard that you compromise the integrity of the dough. A light, even press is all that’s needed to create the perfect “cave” for your jam.
Cookie spreading is a common issue, but easily preventable! The primary culprit is often butter that’s too warm or dough that hasn’t been properly chilled. Try cooling your formed cookie dough balls in the refrigerator for at least 30 minutes to an hour before baking. This solidifies the butter, allowing the cookies to hold their shape better in the hot oven. Also, ensure you measure your flour accurately; too little flour can also contribute to spreading.
Absolutely! Raspberry thumbprints are excellent candidates for freezing, making them perfect for make-ahead baking. Once they are done baking and have cooled completely on a wire rack, you can store them in an airtight container with parchment paper between layers to prevent sticking. They can be frozen for up to one month. To enjoy, simply allow them to defrost by coming to room temperature naturally – no need to reheat, though a quick warm-up can sometimes refresh the texture.
Yes, absolutely! While raspberry jam is classic, these cookies are incredibly versatile. Feel free to use your favorite fruit jams like apricot, strawberry, blueberry, or even a citrus curd (lemon or orange). You can also get creative with non-jam fillings such as a small dollop of Nutella, caramel sauce, or even a mini chocolate candy pressed in after baking, as mentioned in our variations section. The possibilities are truly endless!
Dry or crumbly cookies are typically a result of too much flour or overmixing the dough. When measuring flour, always use the spoon-and-level method rather than scooping directly from the bag. Overmixing develops the gluten in the flour, leading to a tough, dry texture. Mix only until the ingredients are just combined. Also, ensure your butter is softened, not melted, as melted butter can throw off the moisture balance.
More Raspberry Recipes To Enjoy All Year Round
If you’re a fan of the delightful tart and sweet flavor of raspberries, you’re in luck! This vibrant berry lends itself beautifully to a wide array of desserts. Here are some other fantastic raspberry recipes you might love, perfect for any time you’re craving that fruity goodness:
- Decadent Chocolate Fudge Raspberry Cake: A rich, moist chocolate cake with layers of luscious raspberry filling – an absolute showstopper!
- Bright Lemon Raspberry Coffee Cake: The perfect balance of tangy lemon and sweet raspberries, baked into a tender coffee cake, ideal for breakfast or a sweet treat.
- Refreshing Raspberry Brownie Frozen Yogurt Dessert: A lighter, yet incredibly satisfying dessert combining fudgy brownies with cool, tangy raspberry frozen yogurt.
- Cool & Creamy Frozen Raspberry Cheesecake Pie: An effortless and refreshing pie featuring a creamy cheesecake filling swirled with sweet raspberries.
- Indulgent Raspberry Cheesecake Stuffed French Toast: Elevate your brunch game with thick slices of French toast stuffed with a delightful raspberry cheesecake filling.
Thank you so much for joining me on this delightful journey into the world of raspberry thumbprint cookies! I hope this detailed guide inspires you to bake a batch (or two!) and share these wonderful treats with your loved ones. Now go forth and make your own delicious creations – I can’t wait to hear about them!
HUNGRY FOR MORE? Don’t miss out on new recipes and baking tips! Subscribe to my newsletter and follow along on Pinterest, Facebook, and Instagram for all my latest updates and behind-the-scenes glimpses!
Raspberry Thumbprints

Ingredients
- 1 cup 2 sticks butter, softened
- 1/2 cup packed brown sugar
- 1 teaspoon vanilla
- 2 cups all-purpose flour
- 1/2 teaspoon cinnamon
- pinch salt
- 1/2 cup seedless raspberry jam
- Optional- finely chopped pecans melted chocolate for drizzle
Instructions
-
Preheat oven to 350 degrees F.
-
In a large bowl cream the butter and brown sugar until light and fluffy. Add in vanilla and mix well.
-
In a small bowl combine the flour, cinnamon and salt. Slowly add to creamed mixture and mix just until combined.
-
Form dough into 1″ balls and place on ungreased baking sheet. Flatten slightly and using your thumb press in the center of each dough ball. I also use my pointer finger to round out the indentation and make it a little larger around. (it holds more filling this way). Fill each indentation with jam. May sprinkle top with optional chopped pecans.
-
Bake for 12-14 minutes or just until set. Let cookies cool on baking sheet for 5 minutes then transfer to wire rack to cool completely. May drizzle with melted chocolate.
