Authentic Italian Easter Bread (Pane di Pasqua): A Sweet, Braided Delight for Your Holiday Table
Italian Easter Bread, known as Pane di Pasqua, is a cherished culinary tradition, gracing tables across Italy and beyond during the Easter season. This delightful bread is a slightly sweet, braided masterpiece, renowned for its incredibly soft, light, and airy texture. It’s more than just a bread; it’s a symbol of celebration, renewal, and the joy of spring.

If you’ve ever admired the intricate beauty of challah and thought it was beyond your baking skills, you’re in for a wonderful surprise. Pane di Pasqua shares a similar elegance but is remarkably accessible for home bakers. After successfully creating this beautiful loaf, you’ll be eager to explore other braided bread recipes!
There’s immense satisfaction in pulling a perfectly golden, beautifully braided loaf from your oven. The aroma alone is enough to gather the entire family into the kitchen, eager to admire your culinary accomplishment. This bread isn’t just a treat for the palate; it’s a visual delight, sure to impress your guests with its stunning appearance, delicate taste, and wonderfully tender texture.
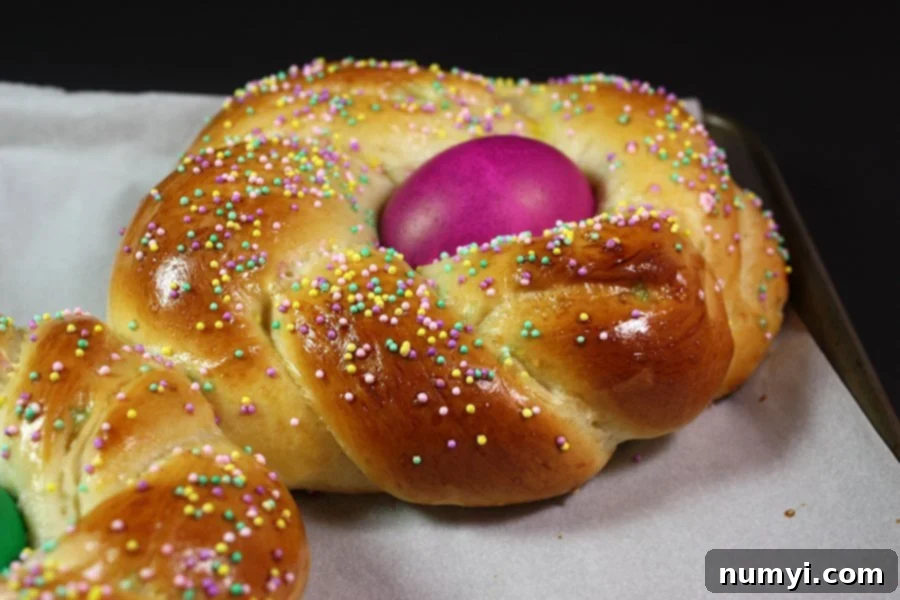
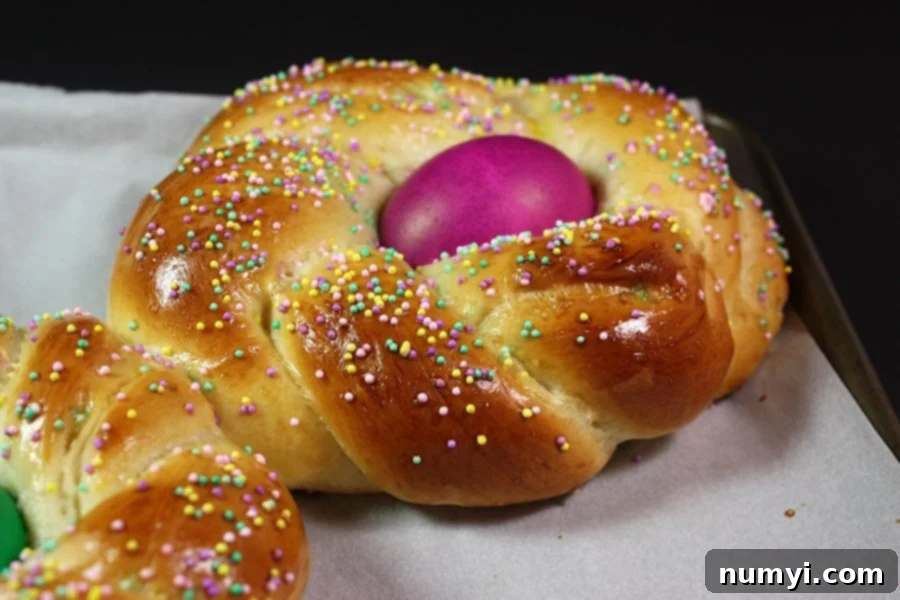
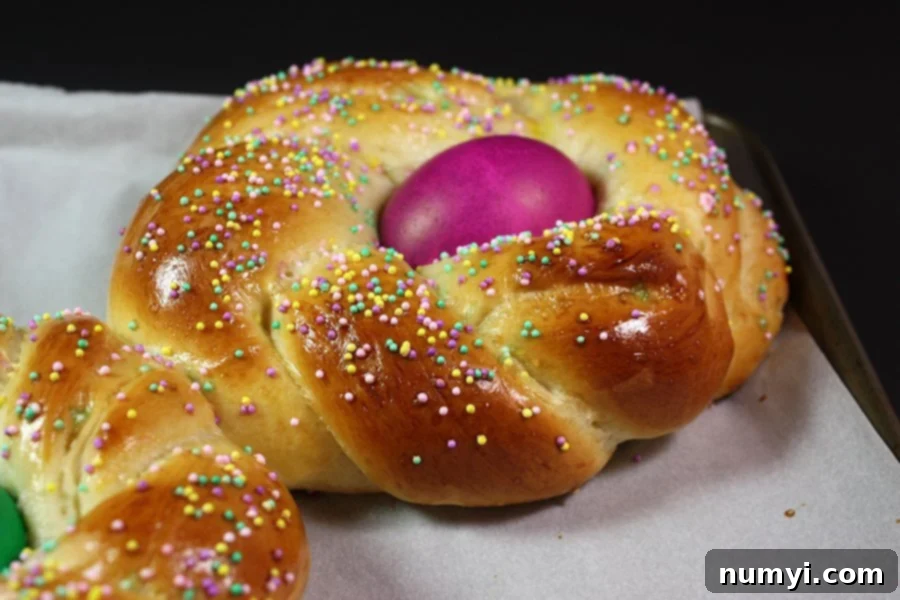
The secret to its charm lies in its simplicity and the love poured into its preparation. The soft, pillowy crumb, combined with a hint of sweetness, makes it an ideal accompaniment to your Easter brunch or dinner. And those vibrant, dyed eggs nestled within each braid? They add a festive touch that truly makes this bread an edible work of art, perfect for celebrating the holiday.
Indeed, who would have thought that such an exquisite bread could be made right in your own kitchen? The process is surprisingly straightforward, yielding results that look professionally baked. Get ready to elevate your Easter celebration with this unforgettable sweet bread.
Expert Tips for Baking Perfect Italian Easter Bread
Achieving a beautiful and delicious Pane di Pasqua is easier than you think, especially with a few expert tips. Follow these guidelines to ensure your Easter bread turns out perfectly soft, sweet, and visually appealing every time:
- Measure Flour Accurately: Precision in measuring flour is crucial for bread baking. Aerate your flour by spooning it lightly into a measuring cup and then leveling off the top with a straight edge. Never scoop directly from the bag, as this can compact the flour and lead to a denser, tougher dough. Too much flour will result in dry bread.
- Optimal Ingredient Temperatures: For best results and smoother dough incorporation, most bread recipes call for room temperature eggs and dairy. However, for this specific Pane di Pasqua recipe, the milk and butter are intentionally heated to activate the yeast and melt the butter, so there’s no need to bring them to room temperature beforehand. Ensure the milk mixture is within the 120-130°F range to keep the yeast happy and active without killing it.
- Prevent Over-Browning: If your beautiful braided bread starts to brown too quickly or excessively during baking, don’t fret. Simply cover it loosely with a piece of aluminum foil. This acts as a shield, preventing further browning while allowing the bread to continue cooking through evenly.
- Kneading is Key: Proper kneading develops the gluten in the flour, which is essential for the bread’s soft, chewy texture. Knead the dough until it’s smooth, elastic, and no longer sticky. The “windowpane test” is a great indicator: take a small piece of dough and gently stretch it. If you can stretch it thin enough to see light through it without tearing, your dough is perfectly kneaded.
- Warm Place for Rising: Yeast thrives in warmth. Find a cozy, draft-free spot in your kitchen for the dough to rise. A slightly warmed oven (turned off, of course) or simply placing the bowl in a sunny spot can work wonders. This ensures your dough doubles in size efficiently, leading to a light and airy bread.
- Don’t Over-Flour Your Work Surface: When shaping the dough, resist the urge to heavily flour your countertop. Too much added flour can alter the dough’s hydration, making your rolls heavy and tough instead of wonderfully soft. A very lightly greased surface or minimal dusting is usually sufficient for handling this dough.
Step-by-Step Guide: How to Make Authentic Italian Easter Bread (Pane di Pasqua)
Creating this beautiful Italian Easter bread is a rewarding process, combining simple ingredients with traditional techniques. Follow these detailed steps to bake your own festive Pane di Pasqua.
Preparing the Yeast Mixture
In a small saucepan, gently combine the milk and butter. Heat this mixture over low heat, stirring continuously, until the butter is completely melted and the milk reaches a temperature between 120°F and 130°F (49°C to 54°C). This temperature range is crucial: it’s warm enough to activate the rapid-rise instant yeast but not so hot that it kills it. Remove from heat immediately once the desired temperature is reached.
Mixing the Dough
In the large bowl of your electric stand mixer, combine the rapid rise instant yeast, salt, beaten eggs, and granulated sugar. Give these ingredients a quick stir to combine. Now, carefully pour in the warmed milk and butter mixture. Attach the dough hook to your mixer. Add the first 2 cups of all-purpose flour to the mixing bowl. Begin mixing on medium speed for approximately 2 minutes, until the mixture becomes smooth and well-combined. As you mix, use a spatula to scrape down the sides of the bowl periodically, ensuring all ingredients are incorporated.
Kneading and First Rise
Gradually add the remaining 2 cups of flour to the mixing bowl, about a half-cup at a time, while the mixer is running on medium-low speed. Continue kneading the dough for about 14 minutes, or until it transforms from sticky to smooth, firm, and elastic. It should pull away cleanly from the sides of the bowl. Once kneaded, gently shape the dough into a ball and place it in a lightly greased bowl (using vegetable cooking spray or a thin film of vegetable oil). Cover the bowl tightly with plastic wrap and let it rise in a warm, draft-free place for about an hour, or until the dough has proudly doubled in size.
Preparing the Dyed Eggs
While your bread dough is undergoing its first rise, it’s the perfect time to prepare your decorative Easter eggs. For this recipe, you will use raw eggs, as they will cook directly in the oven as the bread bakes. It’s important to dye them well in advance to allow them to dry completely before placing them on the dough. A simple and effective dye mixture consists of 1/2 cup room temperature water, 1 tablespoon of vinegar (which helps the color adhere), and a few drops of food coloring. Submerge the eggs until they reach your desired shade, then carefully remove and let them air dry on a rack.
Shaping the Bread Nests
Once the dough has completed its first rise and doubled in size, gently punch it down to release the air. Transfer the dough to a clean, lightly greased (not floured!) work surface. Divide the dough into 12 equal pieces. This precise division ensures uniform bread rolls. For best results, you can use a kitchen scale to weigh each piece for perfect consistency.
Take each piece of dough and roll it out with your hands to form a rope that is approximately 1 inch thick and about 14 inches long. The trick here is to use minimal flour on your surface if any; too much flour can make the final bread heavy and dense, detracting from its desired light and soft texture.
To form the braids, take two ropes of dough and twist them together gently. Once twisted, bring the ends together to form a circular “nest” shape, carefully pinching the tips to seal them. This creates a cavity in the center where the dyed egg will sit. Place these beautifully shaped dough nests onto a prepared baking sheet lined with parchment paper, ensuring there is ample space between each for their final rise.
Second Rise and Final Touches
After shaping, it’s time for the second rise. Loosely cover the baking sheets with plastic wrap (ensure the plastic doesn’t stick to the dough) and let the braided breads rise again for about 1 hour in a warm place, or until they have nearly doubled in size. This final proofing stage is essential for a light and airy texture.
Once risen, gently brush each braided bread with an egg wash (typically one beaten egg mixed with a teaspoon of water). This will give them a beautiful golden-brown sheen when baked. For an extra festive touch, sprinkle with colored sprinkles. Finally, carefully place one of your pre-dyed raw Easter eggs into the center of each braided dough ring. The eggs will cook perfectly inside the bread as it bakes, emerging firm and vibrantly colored.
Look at how pretty and fun these individual bread wreaths are! Each one is a little celebration in itself. While the individual nests are charming, you can also opt to make one large, impressive braid, perhaps with a few eggs nestled along its length, for a grander centerpiece. Sweet breads like Pane di Pasqua are always a fantastic and welcome addition to any holiday meal, offering a delightful counterpoint to savory dishes.
This traditional Italian Easter bread is more than just a recipe; it’s an experience. From the comforting aroma that fills your kitchen to the joy of sharing these beautiful, sweet loaves with loved ones, it embodies the spirit of the season. Enjoy the process, savor the delicious outcome, and have a very Happy Easter!
Frequently Asked Questions About Italian Easter Bread
Can this dough be made ahead?
Absolutely! Preparing the dough in advance can significantly streamline your Easter baking. You have a couple of options. You can make the dough through the kneading stage, then wrap it tightly in plastic wrap and store it in the refrigerator overnight. The next day, remove it from the fridge and allow it to come to room temperature for about 1-2 hours before punching it down, shaping it into the nests, and proceeding with the second rise and baking. Alternatively, you can shape the nests, cover them loosely but securely with plastic wrap, and refrigerate them overnight. The following day, take them out, let them come to room temperature (this might take 2-3 hours), complete the final rise, and then bake as instructed. This makes holiday morning baking much less hectic!
Yes, you should be able to freeze both the raw dough and the baked bread, though it’s important to do so properly to maintain quality. If freezing the shaped dough before baking: Place the shaped dough nests (without the egg or sprinkles yet) on a parchment-lined baking sheet and freeze for about an hour, or until they are firm. Once frozen, individually wrap each twist tightly in plastic wrap, and then place them in a freezer-safe container or bag. To bake, thaw them in the refrigerator overnight. The next day, remove them from the fridge, let them come to room temperature (this can take 3-4 hours), complete the final rise, add the eggs and sprinkles, and then follow the baking instructions. While I haven’t personally tested freezing the raw dough extensively, this method generally works well for enriched bread doughs. If freezing baked bread: Allow the bread to cool completely. Wrap each individual loaf tightly in plastic wrap, then in aluminum foil, and store in a freezer-safe bag for up to 1-2 months. Thaw at room temperature or gently warm in a low oven for a fresh-baked taste.
This recipe specifically calls for rapid-rise instant yeast, which is convenient as it can be mixed directly with the dry ingredients and doesn’t require separate proofing. If you only have active dry yeast, you can still use it, but you’ll need to activate it first. Dissolve the active dry yeast in the warm milk (ensure it’s around 105-115°F or 40-46°C) with a pinch of the sugar and let it sit for about 5-10 minutes until it becomes foamy. Then proceed with the recipe instructions.
Absolutely! While the individual bread nests with eggs are traditional and charming, you can certainly make one large braided loaf. To do this, divide your dough into three equal pieces after the first rise. Roll each into a long rope (about 18-24 inches, depending on desired size), then braid them together. Pinch the ends to seal and form a large ring or simply leave it as a straight braid. You can then strategically place a few dyed eggs within the braid before the final rise and baking. Adjust baking time as needed for a larger loaf (it will likely take longer, so keep an eye on it and tent with foil if browning too quickly).
More Delicious Italian Recipes to Explore
If you loved baking this traditional Italian Easter bread, you’re in for a treat with these other fantastic Italian recipes. From festive holiday bakes to classic everyday delights, these dishes capture the heart and soul of Italian cuisine. Expand your culinary repertoire and bring more authentic Italian flavors to your kitchen:
- Panettone Recipe: A classic Italian sweet bread, traditionally enjoyed during Christmas, known for its tall, domed shape and candied fruit.
- Italian Sesame Seed Cookies (Biscotti Regina): Delightfully crunchy and nutty cookies, perfect with a cup of coffee or tea, coated in sesame seeds for a unique texture.
- Italian Ricotta Cookies Recipe: Soft, cake-like cookies made with ricotta cheese, giving them an incredibly tender crumb and a subtly sweet flavor, often topped with a glaze and sprinkles.
- Classic Italian Bread Recipe: The quintessential crusty on the outside, soft on the inside bread that pairs perfectly with almost any Italian meal, from pasta to soups.

Italian Easter Bread Recipe
Print
Pin
Rate
Ingredients
- 2 1/4 teaspoons rapid rise instant yeast (1 package)
- 1-1/4 cup milk
- 1/4 teaspoon of salt
- 1/3 cup unsalted butter
- 2 large eggs, beaten
- 1/2 cup granulated sugar
- 4 cups all-purpose flour (more as needed for dusting and kneading)
- Vegetable cooking spray or vegetable oil for greasing proofing bowl
- 1 large egg, beaten with 1 teaspoon of water
- 6 dyed Easter eggs (raw, they will cook as the bread bakes)
- Colored sprinkles
Instructions
-
In a small saucepan, combine the milk and butter. Heat the milk to 120-130°F (49-54°C), stirring until the butter melts completely. Ensure the temperature does not exceed 130°F, as this can kill the yeast.
-
In the bowl of a stand mixer, combine the rapid rise yeast, salt, beaten eggs, and granulated sugar. Pour in the warmed milk and butter mixture. Add 2 cups of the all-purpose flour. Using a dough hook, mix on medium speed for about 2 minutes until the dough is smooth. Scrape down the sides of the bowl with a spatula as needed to ensure even mixing.
-
Gradually add the remaining 2 cups of flour to the mixing bowl, kneading the dough on medium-low speed. Continue to scrape the sides of the bowl as necessary. Knead until the dough is smooth, stiff, and no longer sticky, which should take approximately 14 minutes. Form the dough into a ball and place it in a lightly greased bowl (use vegetable cooking spray or oil). Cover the bowl with plastic wrap and let it rise in a warm place for 1 hour, or until it has doubled in size.
-
After the first rise, gently punch the dough down to release the air. Divide the dough into 12 equal pieces. On a clean, lightly greased surface (avoid excess flour), roll each piece to form a 1-inch thick rope, about 14 inches long. Take 2 pieces of rope, twist them together to create a braid, then join and pinch the ends together to form a circular nest.
-
Arrange the shaped dough nests on a parchment-lined baking sheet (you can usually fit 3 per standard sheet), ensuring sufficient space for them to rise. Loosely cover the baking sheet with plastic wrap and allow the dough to rise again for 1 hour, or until they have doubled in size.
-
Once risen, gently brush each braided bread with the prepared egg wash (1 large egg beaten with 1 teaspoon of water). If desired, sprinkle with colored sprinkles for a festive touch. Carefully place one dyed (raw) Easter egg into the center of each braided bread ring.
-
Preheat your oven to 350°F (175°C). Bake the bread for approximately 18-20 minutes, or until they are beautifully golden brown and cooked through. If they start browning too quickly, tent them loosely with aluminum foil. Once baked, quickly transfer the hot bread to a wire cooling rack. Enjoy your homemade Italian Easter Bread!
Notes
The provided nutrition information for this recipe includes the dyed eggs that are baked within the bread.
